LOGBOOK is an innovative new software that makes it easy to keep a legally valid logbook. LOGBOOK is suitable for individual users on a small ship as well as for large ships with permanent crew and entire fleets. LOGBOOK can be used with one or multiple devices located on board or anywhere else in the world.
LOGBOOK connects to the ship's NMEA network or a GPS device connected to the computer. The software receives the NMEA data and automatically creates logbook entries (so-called log entries) from this data every full hour and at other conditions you define.
Using LOGBOOK without a connection to a GPS or NMEA data source is not intended. The essential data for a logbook from GPS (UTC, position, course over ground, and speed over ground) cannot be entered manually in LOGBOOK.
The logbook created with LOGBOOK complies with official logbook guidelines. All entries are timestamped and thus serve as reliable evidence. A separate, self-contained logbook is created and maintained for each ship. Automatically captured data cannot be changed at all, manually entered data relevant as evidence can only be changed for a specified period.
A logbook is ultimately a chronological report about the positions of a ship during a voyage – that is, the representation of ship movement and events on board in space and time.
The ship's location is recorded in geographic longitude and latitude, the timing of events as time of day, weekday, calendar week, month, season, and year.
In LOGBOOK, ship time is displayed in the form of a Timeline. The timeline is a continuous vertical timeline that runs from top to bottom. The timeline begins in the first year for which there is a log entry and extends to the end of the current year. All log entries are arranged along this timeline.
By scrolling, zooming in or out, focus is directed to what is currently important. Past, present, and future are always in view, from individual hourly entries through passages and voyages to the annual overview or overall overview.
Instead of the confusing page-turning between times of day in analog logbooks, there is intuitive scrolling and zooming in the digital timeline.
The smallest unit in LOGBOOK is the log entry, which contains NMEA data and additional information relating to a specific point in time.
All log entries created during a day are grouped into a day. Log entries and days are arranged along the timeline according to date and time.
Any number of days can be grouped into a passage, and any number of passages make up a voyage. You can divide into voyages and passages as you wish. The only important thing is that a passage can only contain consecutive days, and likewise a voyage can only contain consecutive passages. Starting a new voyage automatically ends the current voyage and thus also the current passage. Starting a new passage automatically ends the current passage.
The timeline can be compressed or stretched more or less, depending on how detailed it should be viewed.
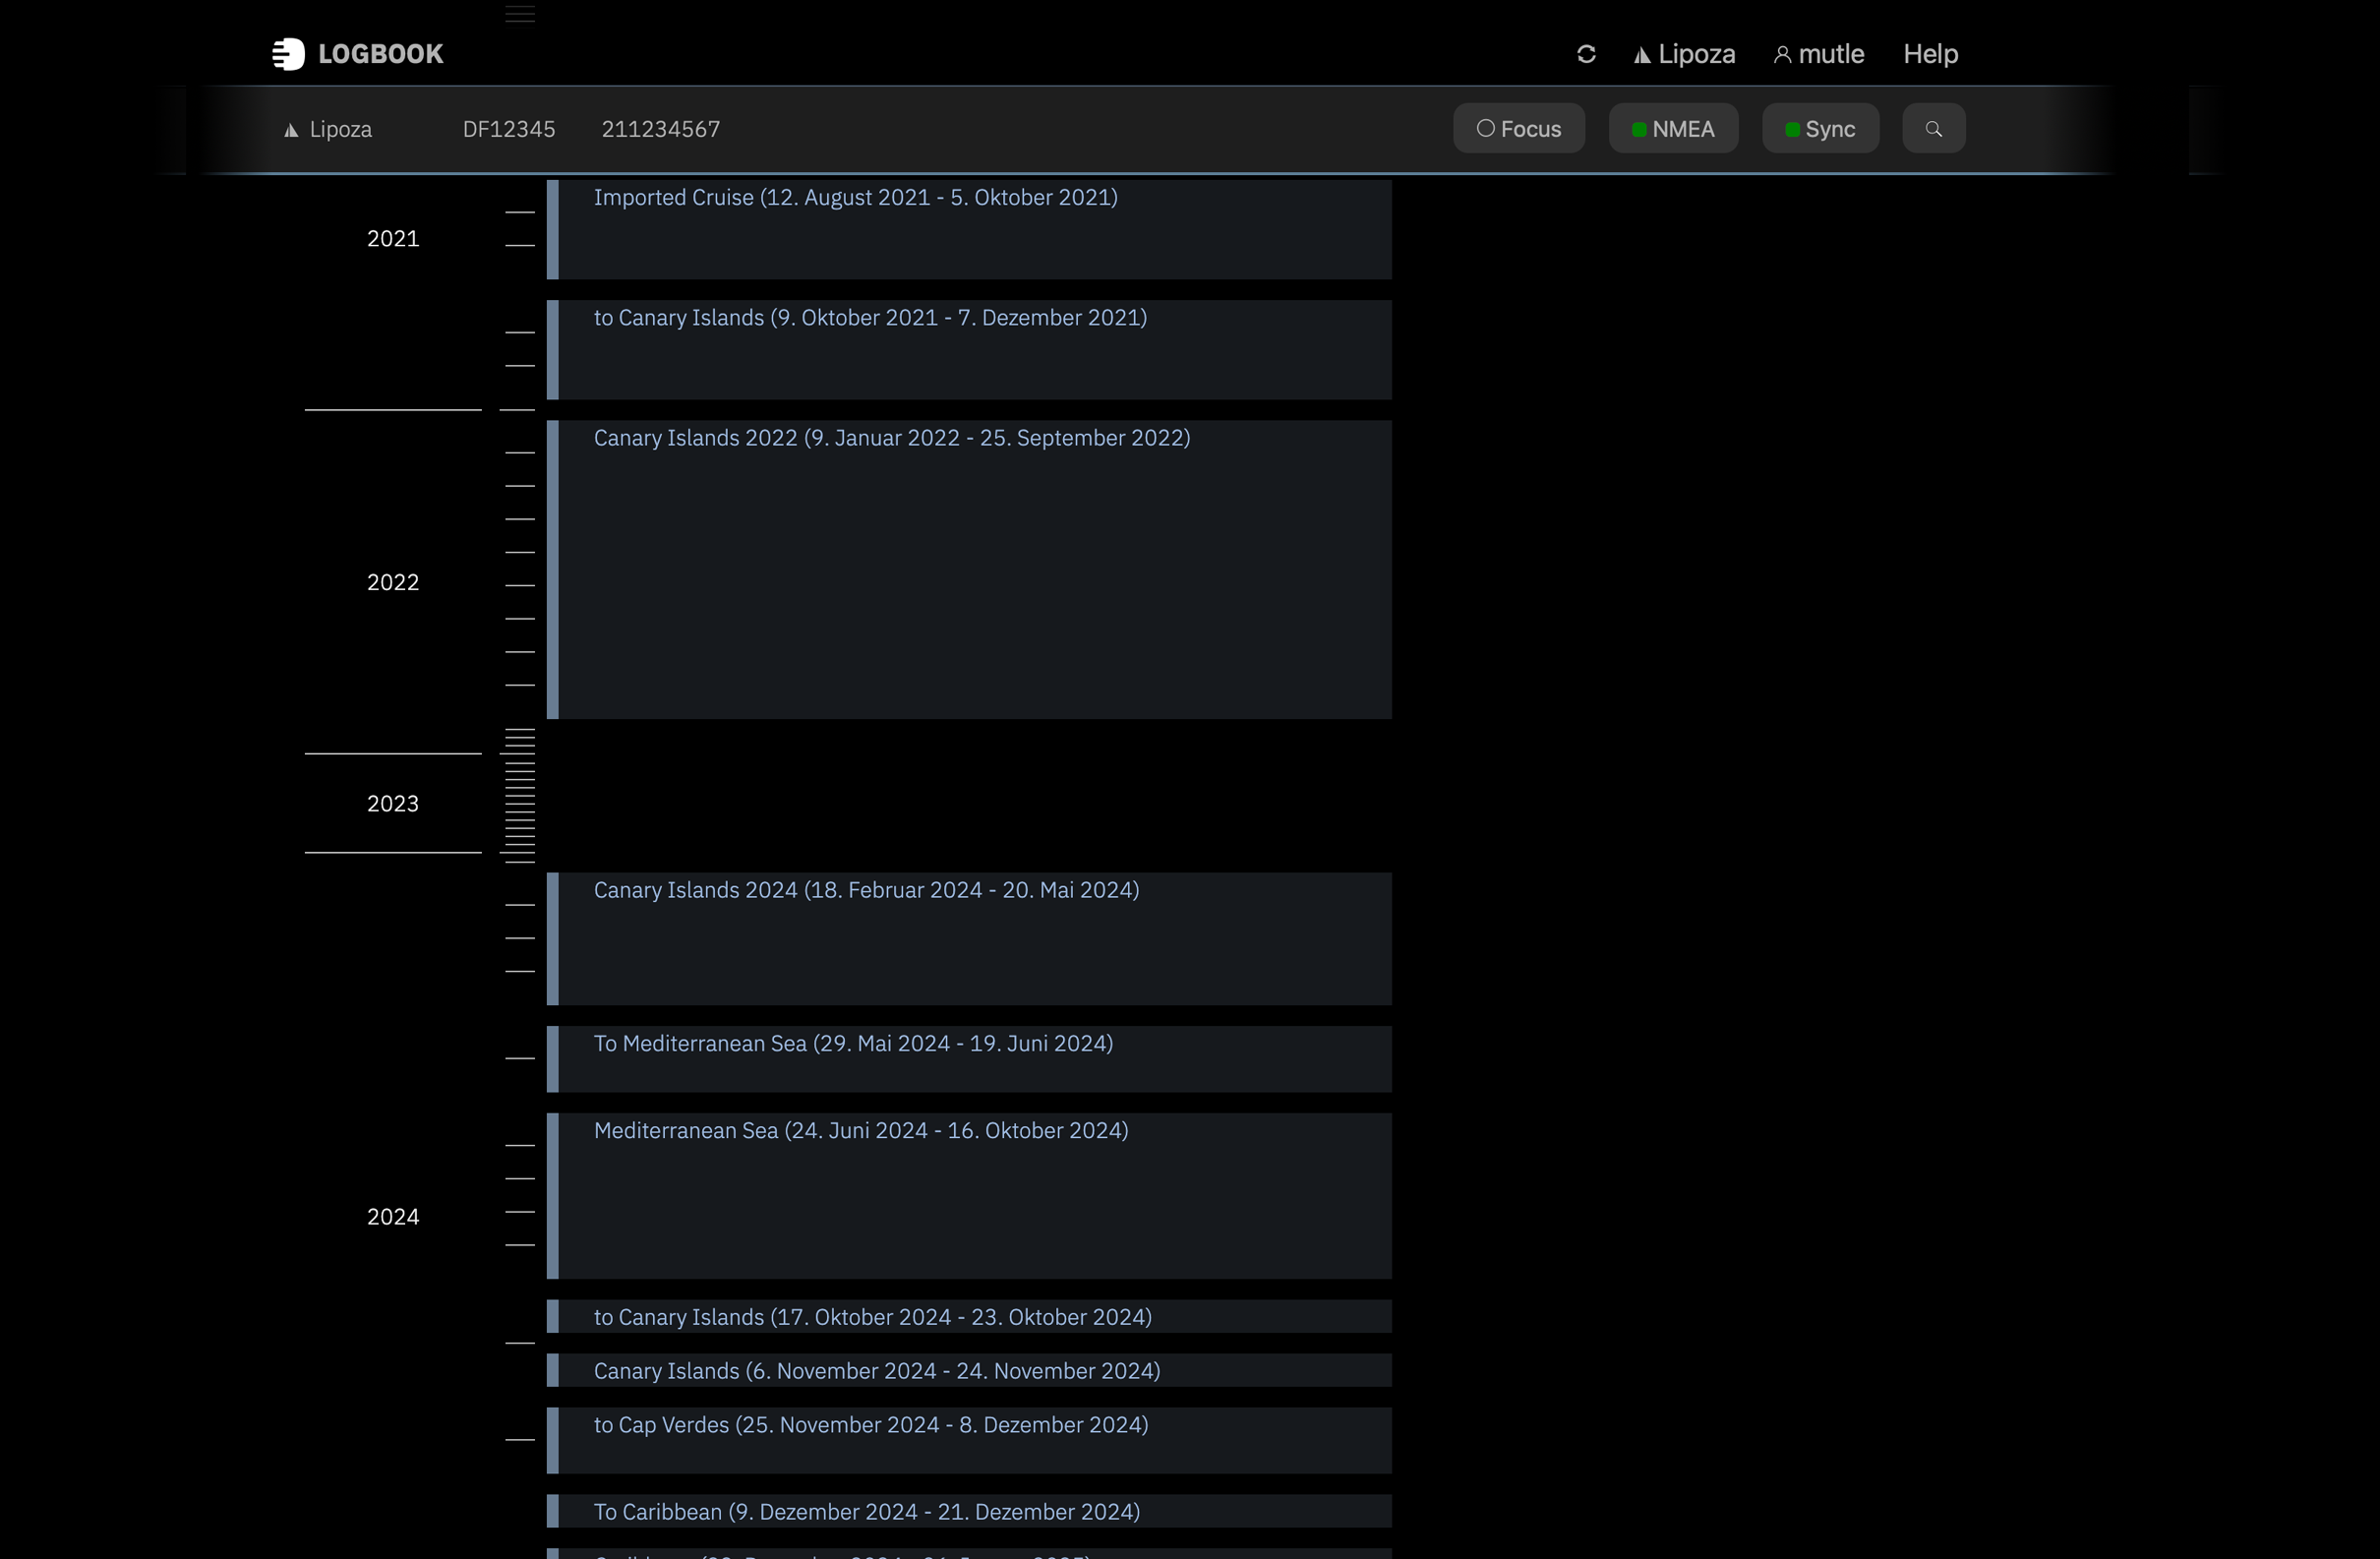
In overview mode, the timeline displays years and months. Each month is indicated by a small line. As soon as there are log entries for a year, the timeline is stretched for that year. To the right of the timeline, voyages appear with name and time period, and the relevant time period is marked in color on the timeline.
By clicking on a voyage, LOGBOOK switches from overview mode to displaying the selected voyage. LOGBOOK zooms into the timeline and shows only a section of the entire timeline, ranging from the first to the last day of the voyage. As a title, the name of the voyage and the date of the first and last day are displayed above the timeline.
With the ![]() button at the right end of the voyage title, you can switch back to the overall overview.
button at the right end of the voyage title, you can switch back to the overall overview.
The ![]() button to the left of the voyage name shows and hides the voyage's data sheet. The data sheet contains multiple cards. On the Voyage card, the voyage can be given a name. The Statistics card provides a summary and analysis of the voyage, the Track card shows the track of the completed days of the entire voyage on a nautical chart. On the Voyage plan card, there is the opportunity to plan the course of the voyage in advance.
button to the left of the voyage name shows and hides the voyage's data sheet. The data sheet contains multiple cards. On the Voyage card, the voyage can be given a name. The Statistics card provides a summary and analysis of the voyage, the Track card shows the track of the completed days of the entire voyage on a nautical chart. On the Voyage plan card, there is the opportunity to plan the course of the voyage in advance.
Directly below the voyage area begins the first passage of the voyage. Clicking the ![]() arrow to the left of the name displays the passage's data sheet. The data sheet contains multiple cards with data, settings, and displays. Here, for example, the track of the passage can be displayed and information relating to the entire passage can be recorded.
arrow to the left of the name displays the passage's data sheet. The data sheet contains multiple cards with data, settings, and displays. Here, for example, the track of the passage can be displayed and information relating to the entire passage can be recorded.
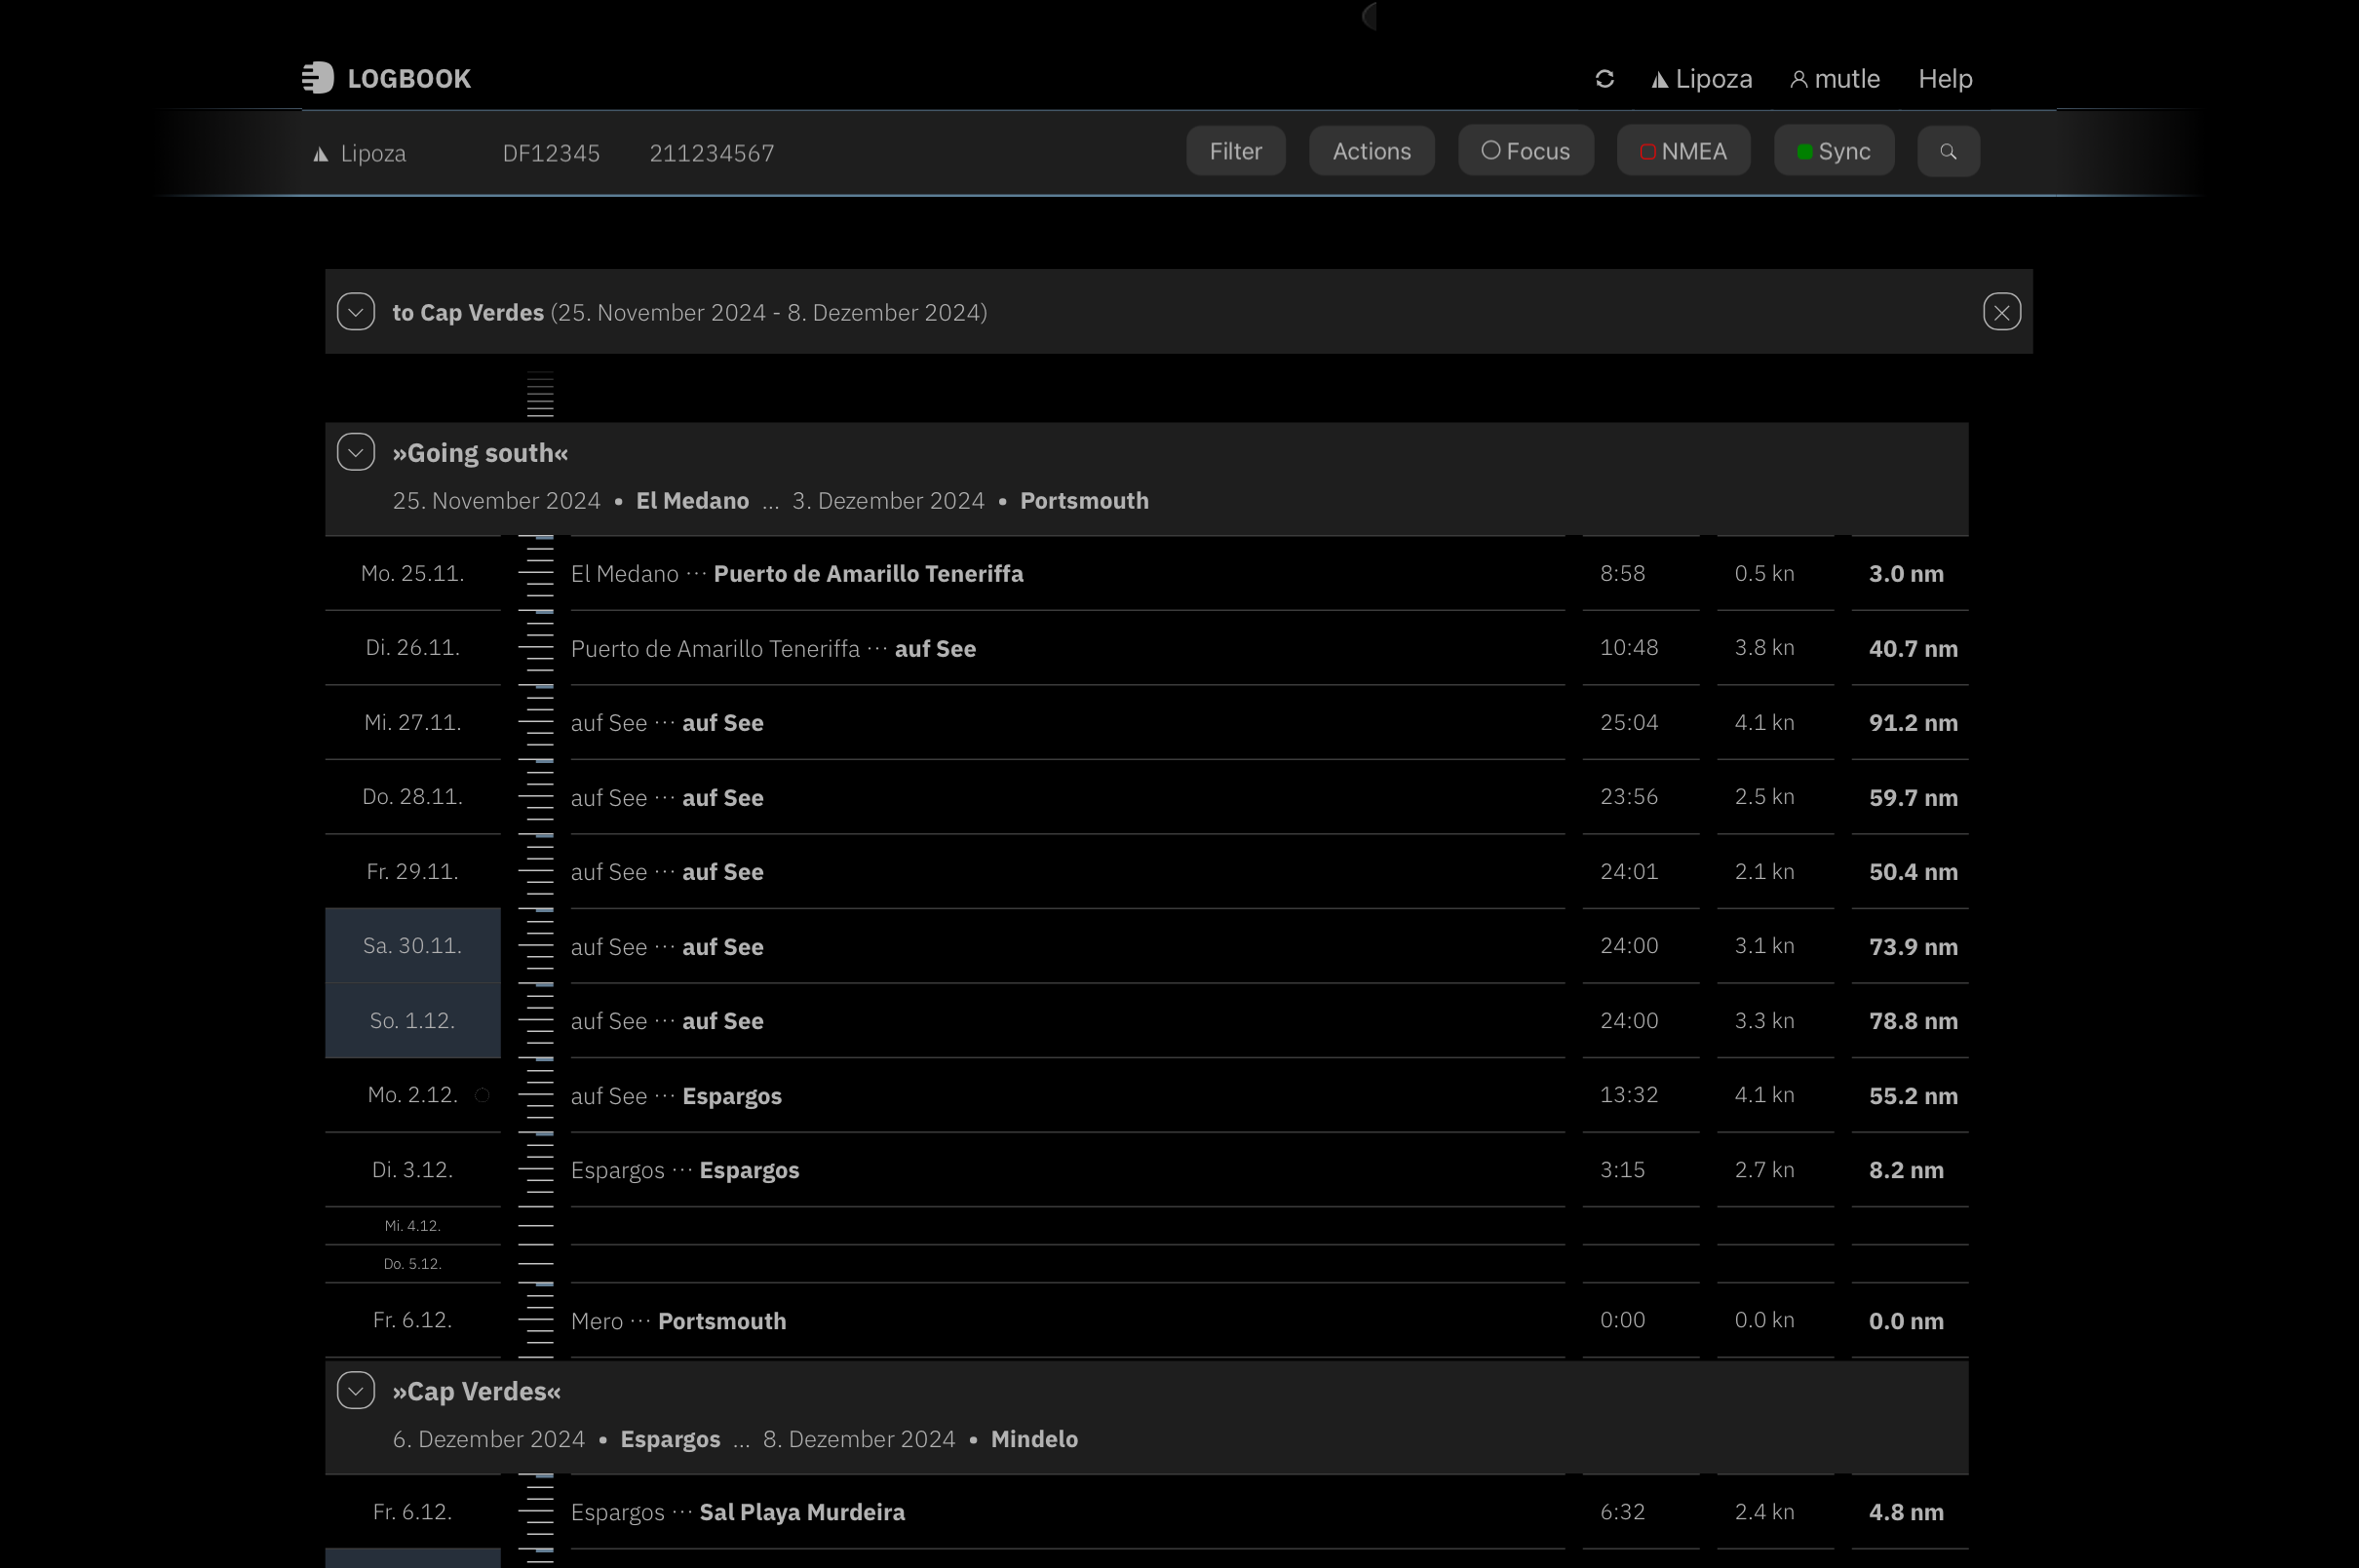
Below the passage header or below the passage's data sheet if it is expanded, all days of the passage are displayed along the timeline. The period during which the ship was underway on the respective day is highlighted in color on the timeline. The lines divide the day into 4-hour sections.
Clicking on the date of a day opens the day. It receives a color-highlighted header and all log entries recorded during the day are listed along the timeline, which is further stretched in this area.
On the timeline, each hour of the day is marked by a line. The lines for 0:00 h, 4:00 h, 8:00 h, 12:00 h, 16:00 h, and 20:00 h are somewhat longer, the lines for 0:00 h and 12:00 h even longer. This makes it easy to see at a glance how the log entries are distributed throughout the day.
The ![]() arrow in the colored header displays the day's data sheet with various cards instead of the log entries.
arrow in the colored header displays the day's data sheet with various cards instead of the log entries.
Clicking on a log entry displays the log entry's data sheet. The selected log entry contains a color-highlighted header. On the log entry's data sheet, the automatically captured data is displayed and additional data can be entered. The possible information is divided across three cards: Navigation, Environment, and Watch. Which fields contain immutable, automatically entered data and which fields allow manual data entry depends on the data present in the NMEA and can be recognized by the field's appearance.
All areas (passage, day, log entry) remain expanded until they are collapsed again via the close symbol at the right end of their header. Multiple areas can be expanded simultaneously.
The data sheets of the day or passage can be hidden again with the ![]() arrow reversed when expanded in the header. Alternatively, for the day, you can click on the date on the left in the header. The data sheet of a log entry can also be hidden again by clicking on the header.
arrow reversed when expanded in the header. Alternatively, for the day, you can click on the date on the left in the header. The data sheet of a log entry can also be hidden again by clicking on the header.
In the focus view, the focus is on the current day and the log row, so you don't have to scroll through the timeline for long to see the entries just recorded. LOGBOOK displays only a section of the timeline in the focus view. The section includes the previous, current, and upcoming day.
With the focus toggle button displayed in the Ship area, you can quickly switch back and forth between the normal view of the entire voyage and the focus view. Entries on the day's data sheet Day and in the log entries can only be made in the focus view.
The current day is displayed expanded by default during sailing, so that the data sheet, all log entries, and the log row are visible.
Below the last log entry is the log row. The log row is highlighted in color. Here LOGBOOK displays the current time and current values for course, speed, and distance, as well as possibly some buttons. The values come from the data just received from the NMEA.
In addition to the current values, the log row can contain various context-dependent buttons. These buttons provide quick access to important functions that make sense at this moment (for example, anchor watch or selection of ship status at the stop entry) or to warnings and notices that have not yet been acknowledged or addressed (such as insufficient water depth).
With the + Log button, which is located in the date area to the left of the log row, a log entry can be created manually at any time.
Via the Status button displayed directly to the right, the status of the ship (underway, at anchor, in harbor, etc.) can be changed. A change in status triggers a new log entry.

With an active connection to the NMEA, current values from the NMEA are continuously displayed at the bottom of the window. With the arrow at the bottom right, the instruments can be expanded so you can keep track of these values even without looking at the ship's instruments.


Your LOGBOOK can be opened both in the LOGBOOK app and in the LOGBOOK Cloud.
The LOGBOOK app is your working environment on board—and also at home when you review or add to your entries. It is installed on a device (computer or tablet).
In the LOGBOOK Cloud, on the other hand, you can view your logbooks from anywhere on the internet using a web browser. For an active logbook, you always see the most recent state synchronized from the Primary LOGBOOK on board to the LOGBOOK Cloud.
All functions described in the previous sections refer to the LOGBOOK app. In the LOGBOOK Cloud, only limited editing is possible—and generally only if the logbook is not open in a LOGBOOK app at the same time.
Some processes related to your Trimutic account are always carried out in the LOGBOOK Cloud. These include all subscription functions as well as creating a new ship.
The LOGBOOK Cloud is the secure backup of your logbook. From there, you can also load your logbook into the LOGBOOK app on another device and continue it there.

Note: The Primary LOGBOOK can, of course, also run on a tablet.
Learn more about the LOGBOOK-Cloud hier: Using LOGBOOK Remotely.
With LOGBOOK, you can keep logbooks for multiple ships. A separate, self-contained logbook is created for each ship—exactly as required by official guidelines. At the same time, only one logbook can be active. You switch between different ships in the Account Settings view.
In the Ship area, directly below the menu bar, LOGBOOK displays key information about the ship. This area is fixed at the top of the screen—just like the menu bar. Among other things, it shows a symbol for the ship type (motorboat or sailboat), as well as the ship name, call sign, and MMSI.
In addition, the row contains several menu buttons with functions for the active logbook. The focus button switches between the voyage timeline view and the view of the current day. In the Actions menu, which is visible only in focus mode, you can start new voyages and passages. The NMEA and Sync buttons are used to configure the NMEA connection and synchronization with the LOGBOOK Cloud. Other buttons that may be shown are explained in their respective context.

Learn more about the Ship area and ship data here: Ships.
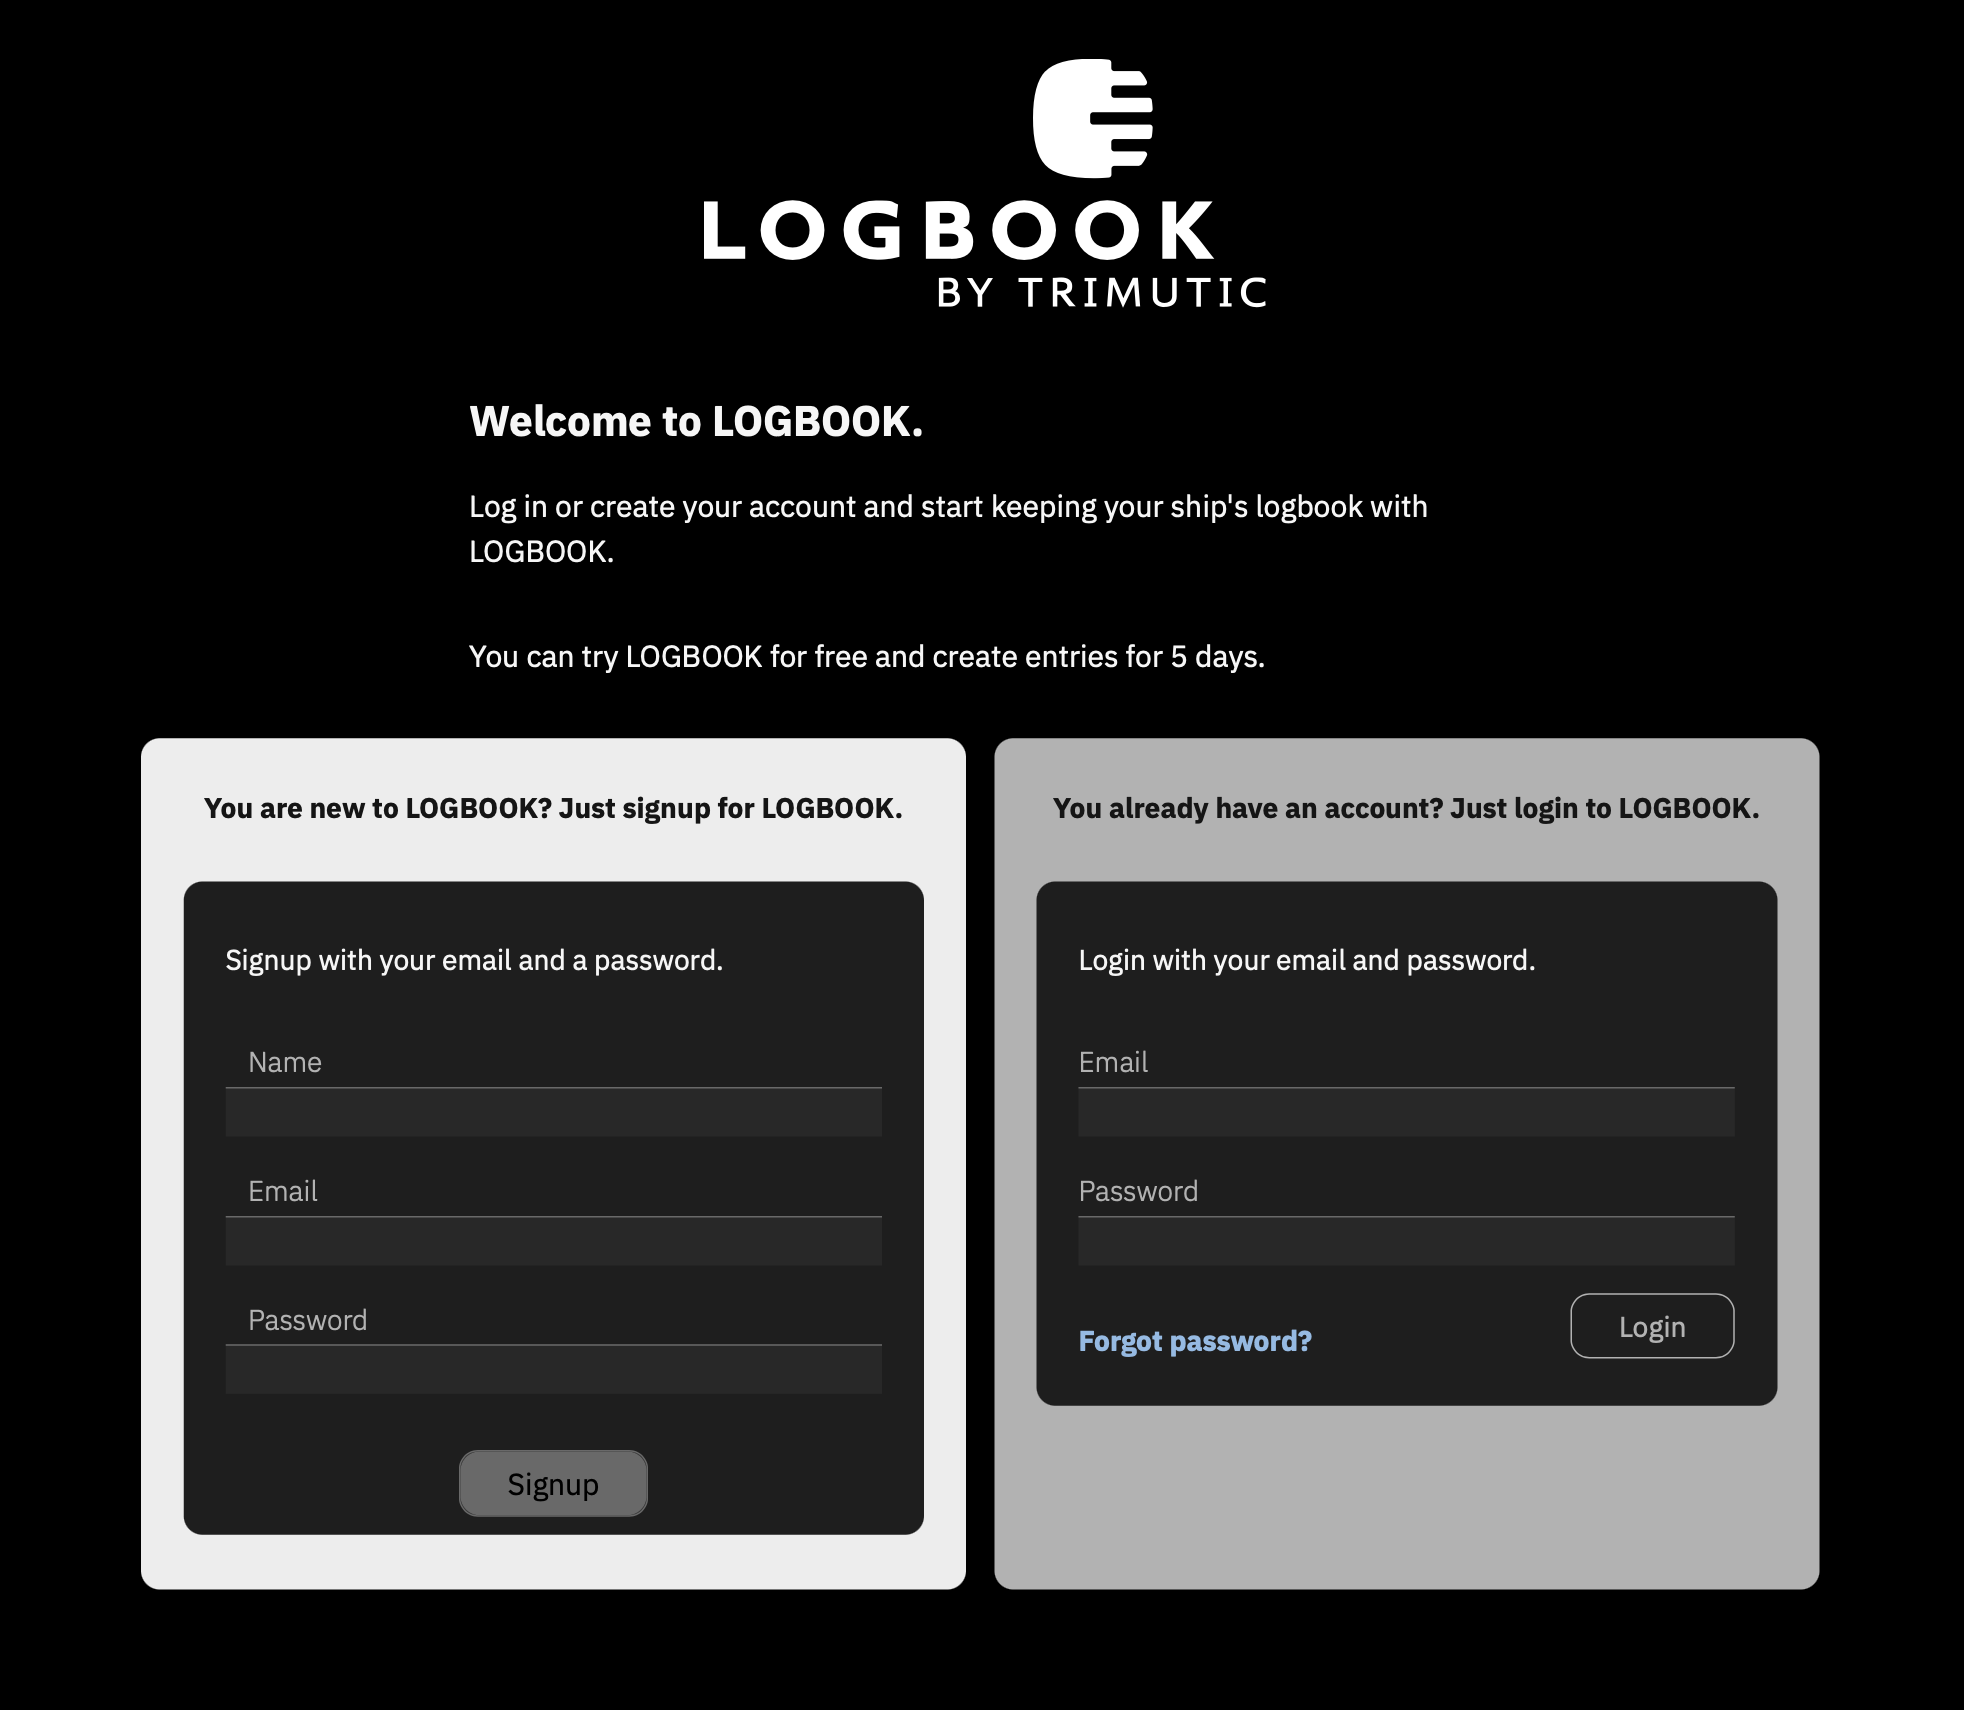
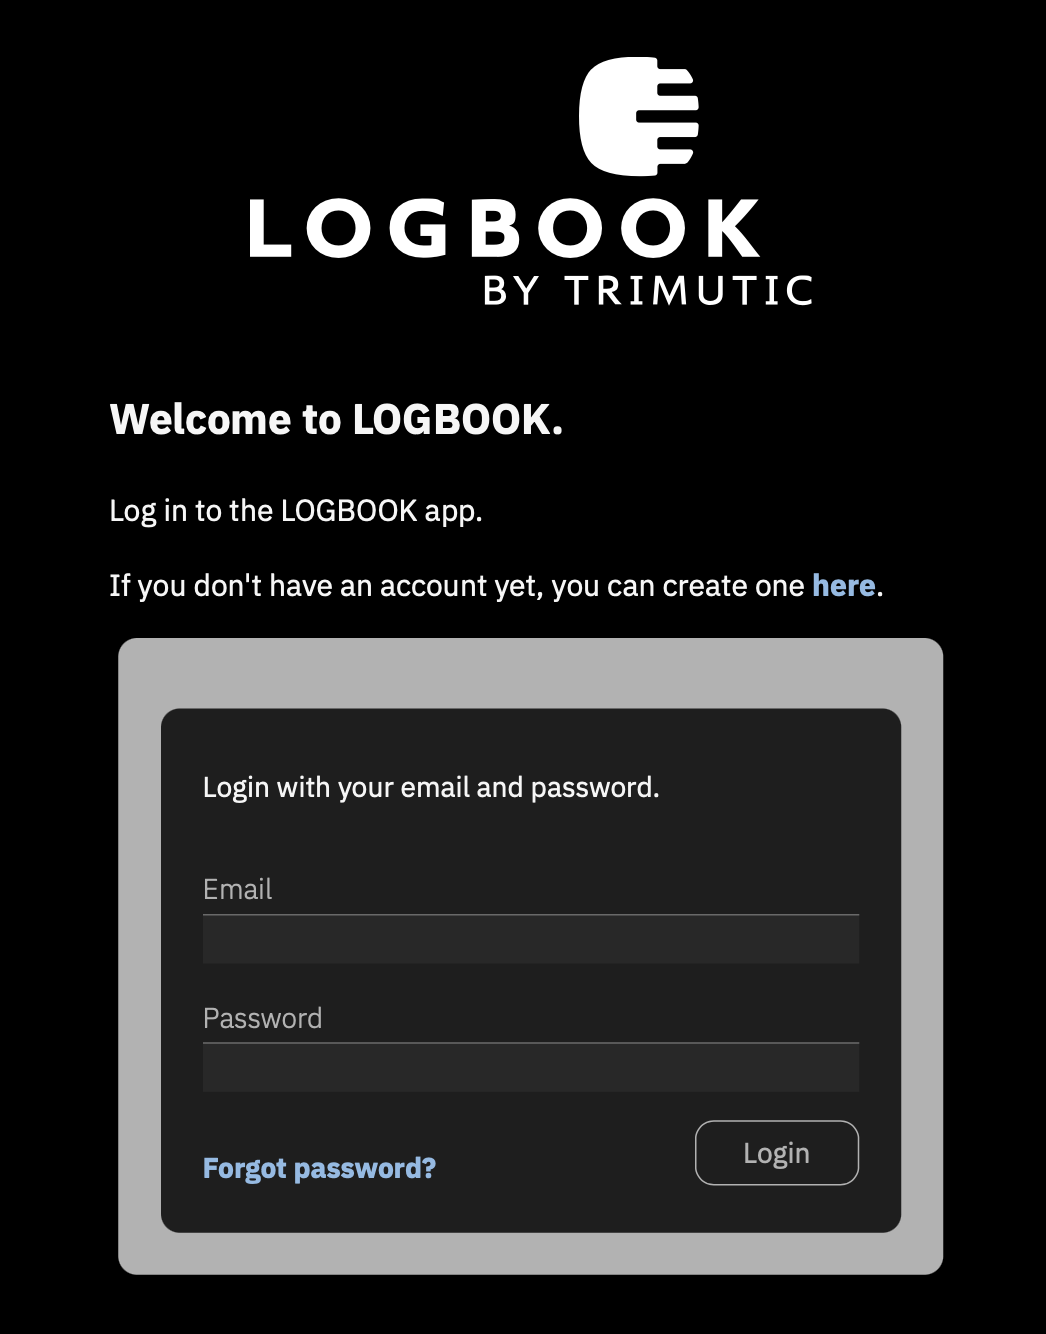
LOGBOOK is a cloud-based application. To set up the app, you need to create a LOGBOOK account at logbook.yachts/app.
Creating an account is free, and for testing purposes (selecting the LOGBOOK Trial option), we only need your name and email address. Only when you actually want to use LOGBOOK and purchase a subscription will additional personal information such as your mailing address be required.
After submitting the data, you will receive an email to confirm your registration once more.
After confirmation, your personal LOGBOOK will be created in the LOGBOOK cloud. You can then load this personal LOGBOOK into the LOGBOOK app on your devices and use it without an internet connection, independent of the LOGBOOK cloud.
By registering with LOGBOOK, you also allow us to send you a newsletter. Through the irregularly published newsletter, we keep you informed about important updates and changes to LOGBOOK. You can unsubscribe from the newsletter at any time.
As long as you have not yet purchased a paid LOGBOOK subscription, you can create log entries on 5 days with the LOGBOOK Trial. Days without entries are not counted. During the test phase, you naturally have access to all LOGBOOK features. The only restrictions are that only 1 ship can be created and no additional devices can log in.
So simply get started and test LOGBOOK. Follow the instructions in the Quickstart to create your first logbook entries with LOGBOOK in just a few steps.
If you like LOGBOOK and want to continue using it, you just need to purchase a subscription and can then continue directly. Learn more about the different subscriptions here: Plans & Pricing.
To create your account, either go to Try Now for Free or directly set up your account in the LOGBOOK Cloud.
If you select a paid plan, you must provide additional personal information in addition to your name and email address and complete the payment. Your account will then be activated immediately and a welcome screen will be displayed. After completing this initial registration, your personal LOGBOOK will be generated in the LOGBOOK cloud.
Now download the LOGBOOK app to the devices you want to use LOGBOOK with (only one device is supported with the LOGBOOK Trial). The installation files for Windows and macOS are downloaded directly from the LOGBOOK website; for iOS and Android, the LOGBOOK app is downloaded from the respective app store. You can find the download links here.
An internet connection is required for the following steps!
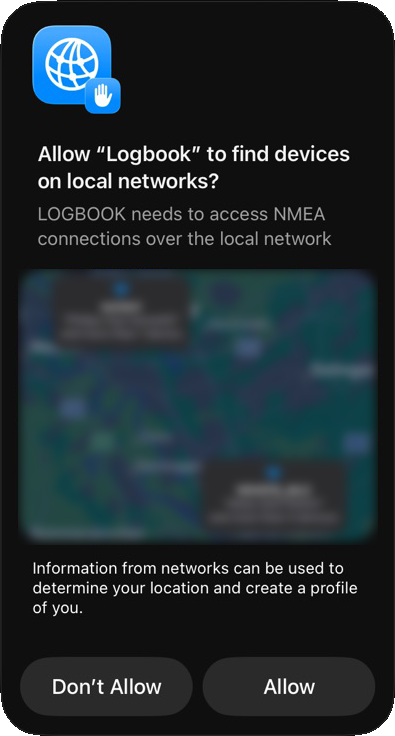
Allow NMEA Connection on iPad for LOGBOOK
When starting the LOGBOOK app on iPad for the first time, a security prompt appears asking whether LOGBOOK may connect to an NMEA data source via the local network. Select Allow here to grant LOGBOOK access to your NMEA network.
Allow GPS Data Reception on iPad for LOGBOOK
For LOGBOOK to receive GPS data via the internal GPS on the iPad, location services for LOGBOOK must be enabled in the iOS Settings app under Privacy, Location Services.
You can find the following steps explained in more detail in the Quickstart under Initial Setup.
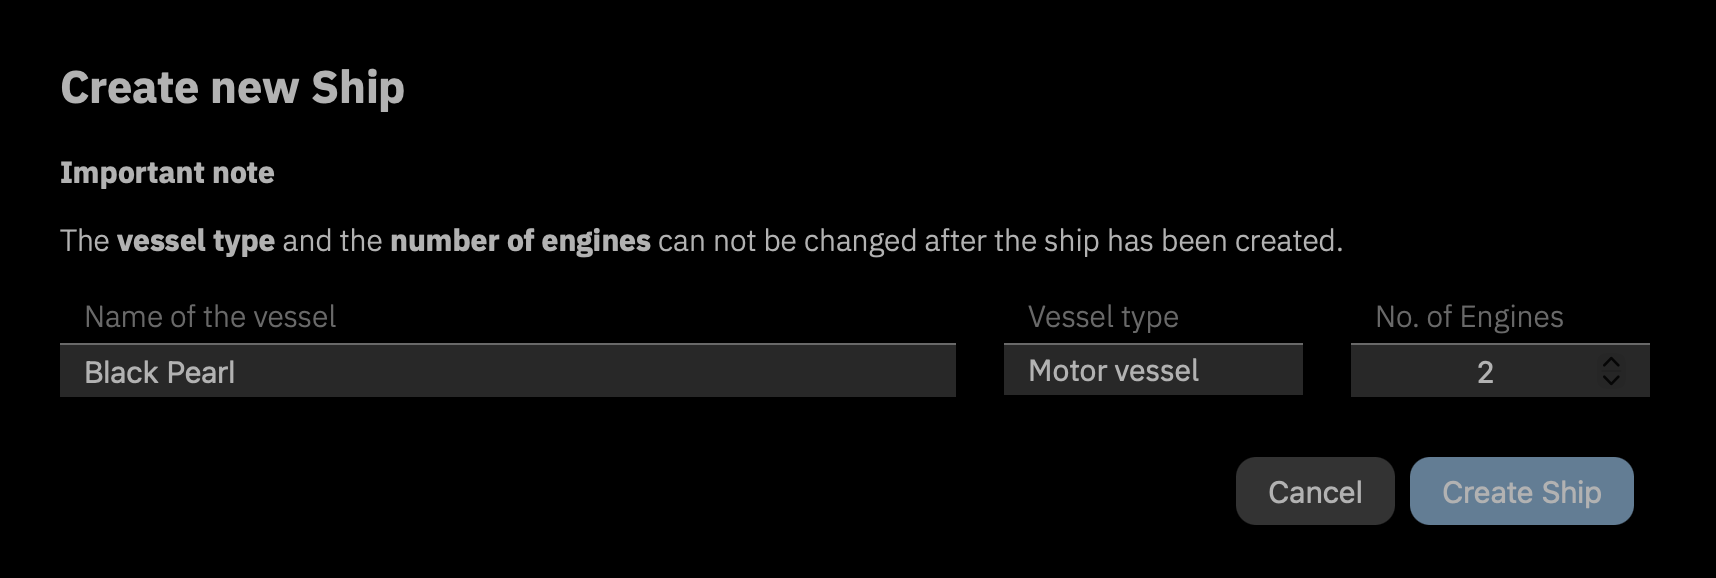
If you are completely new to LOGBOOK and have not yet created a ship, the view for Creating Your First ship will now open automatically.
To create a new ship, enter the ship name, select whether it is a sailboat or a motorboat, and specify the number of engines. These 3 pieces of information are mandatory before you can proceed.
LOGBOOK creates the ship and generates a new, empty logbook. This process takes place in the LOGBOOK Cloud and therefore requires an internet connection.
If the new ship is displayed in the LOGBOOK Cloud after completing this process, you will see a corresponding notice. In this case, switch back to the LOGBOOK app.
In the LOGBOOK app the Primary LOGBOOK for your new ship is generated and the overview timeline is displayed.
The first voyage and the first passage are already prepared.
If your account is already linked to one or more ships, the Account Settings view will open after login.
In the Account Settings you can connect the LOGBOOK app to an existing ship or create a new ship.
If you select an existing ship, the LOGBOOK app loads the logbook of the selected ship from the LOGBOOK cloud and then displays the overview timeline.
Depending on the volume of data already stored in the logbook, loading the logbook may take some time.
From this point on, you no longer need an internet connection!
After the Primary LOGBOOK has been started for the desired ship, the next step is to set up the connection to NMEA. You can learn more about this in the »Quickstart« under Setting Up the Connection and in the »LOGBOOK in Use« chapter under Connecting LOGBOOK to the NMEA Network.
Once the Primary LOGBOOK for the desired ship is active, you can connect additional devices to the Primary LOGBOOK. You can learn more about this in the Devices chapter under LOGBOOK Companions: Using LOGBOOK with Additional Devices.
When the LOGBOOK app is closed without the user logging out, the login remains stored on the device and the next time the LOGBOOK app is started, the ship's LOGBOOK is reopened. The NMEA connection is reactivated and if it was last active, data retrieval is also automatically restarted.
When the logged-in user logs out (option Logout in the Account menu) but the app is not closed, the ship's logbook remains open and data recording continues. The user can then log in again at any time without an internet connection, as the login data is stored on the device.
When the ship's LOGBOOK has been closed (Close LOGBOOK), the logbook must be reloaded from the LOGBOOK cloud the next time it is opened. Closing the logbook also deletes the settings for the NMEA connection, which must then be set up again.
It is optimal if the Primary LOGBOOK is permanently connected to the internet. Then all recorded data is automatically synchronized with the LOGBOOK cloud on a regular basis. This ensures optimal data security. As long as no images are inserted, the amount of data required for synchronization is quite small. Larger ships today are often connected to the internet even at sea via satellite, for example with Starlink.
However, LOGBOOK also works perfectly if there is no internet connection at sea. The data will then be automatically synchronized with the LOGBOOK cloud later as soon as the Primary LOGBOOK has an internet connection again.
However, some functions can only be performed with an internet connection. All affected functions are not needed during sailing but during the initial login:
When the Primary LOGBOOK has an internet connection, all modified data is automatically uploaded to the LOGBOOK cloud. This has two advantages: First, you can access the data stored in the LOGBOOK cloud and view the logbook at any time and from anywhere (read more at Using LOGBOOK Remotely). You don't even need to have the LOGBOOK app installed; an internet browser is sufficient. Second, you always have a secure backup version of your logbook – for example, in case the device you use on the ship for the Primary LOGBOOK is damaged or lost.
We therefore strongly recommend synchronizing LOGBOOK regularly with the LOGBOOK cloud. If you have a permanent internet connection on the ship, the Primary LOGBOOK should also have internet access. This is an important security aspect. In the event of device damage or loss, you can at least restore the last synchronized state at any time.
If the internet connection is interrupted, this is not a problem. Data that has not yet been synchronized or is incompletely synchronized will be synchronized as soon as the internet connection is available again. LOGBOOK regularly checks whether the internet connection is restored.
Get started with LOGBOOK in just a few steps.
The Quickstart guides you through the most important steps to gain your first experience with LOGBOOK. In practice, it is recommended to enter some information when creating the voyage and passage or before starting the day. Learn more in our practical tips for keeping a perfect logbook with LOGBOOK: Keeping a perfect logbook.
If you haven't installed the LOGBOOK app on your device yet, you can find instructions for installation and registration at Registration and Installation.
Before you can keep your first logbook with LOGBOOK, two steps are required once:
On the following days, these two steps are no longer necessary.
First, LOGBOOK needs some information about your ship that affects the basic configuration of the logbook. Therefore, when starting LOGBOOK for the first time, the Create new Ship view is displayed.
If you select the Add new Ship button in the LOGBOOK app, you will be redirected to the LOGBOOK Cloud. You can also create the ship directly in the LOGBOOK Cloud.
Enter the ship's name here, select the ship type (sailboat/motorboat), and set the number of engines.
Then close the view with the Create Ship button. Closing is only possible when all three fields are filled in.
LOGBOOK creates the ship and generates a new, empty logbook. This process takes place in the LOGBOOK Cloud and therefore requires an internet connection.
Switch to the LOGBOOK app with the Open in App button (further below in the text).
In the LOGBOOK app, you now see the overview timeline for your ship. In the Ship section (directly below the menu bar), the ship type and ship name as well as some buttons are displayed. All additional information about the ship can be entered at any time later in the Ship data view, which is opened via the Ship data menu item in the Ship menu (Ship Data).
After the ship has been created, you no longer need an internet connection. However, you should connect your Primary Device to the internet whenever possible so that all entries can be synchronized to the LOGBOOK Cloud and backed up there.
TCP Is Better Than USB
If you have the choice of connecting your NMEA network to the Primary LOGBOOK via USB or TCP, you should choose TCP in any case. A TCP connection is more stable and also allows multiple apps to access the NMEA data.
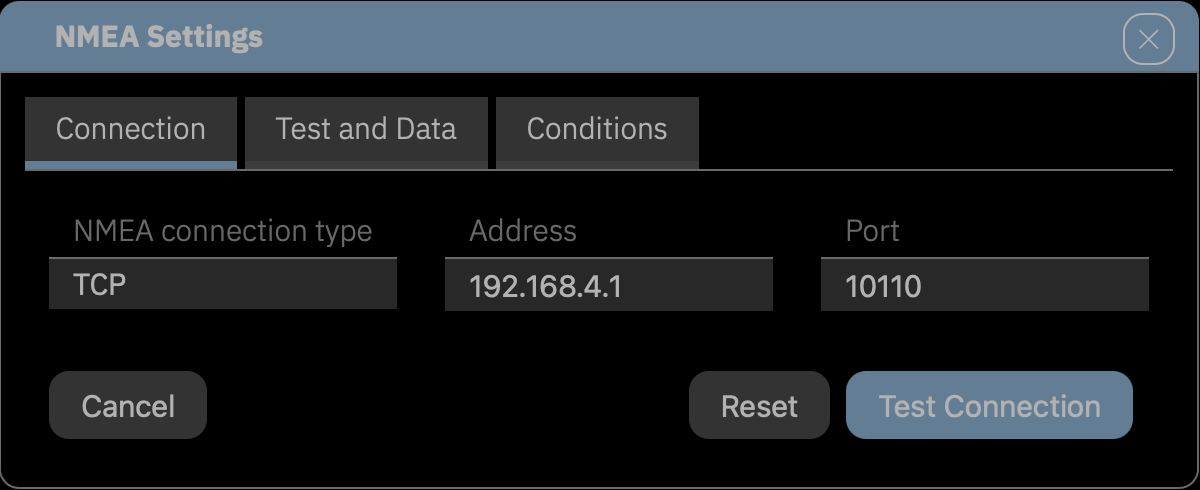
On the first card of the dialog under NMEA connection type, select which protocol or connection type connects the NMEA network to your device (USB or WiFi/Ethernet with TCP).
Then make the settings in the additional fields displayed for the connection type (Address, Port, etc.). You can find the required data in the documentation of the gateway, multiplexer, or plotter. If you want to connect via USB, the available devices are listed under Device. We have compiled additional tips here: Tips for Connecting to NMEA.
Using Internal GPS
If you have no way to connect to NMEA, you can use the internal GPS on iPad. Learn more about setup under Data Reception via Internal Sensors.
Allow "Receive GPS Data" on iPad for LOGBOOK
For LOGBOOK to receive GPS data on the iPad, location services for LOGBOOK must be enabled in the iOS Settings app under Privacy, Location Services.
Please note
With USB connections, it is not possible to also activate devices such as a GPS mouse, NMEA gateways, or NMEA multiplexers for LOGBOOK when they are already being used by navigation software, because the navigation software permanently occupies the device port and does not release it for other programs.
If you are not entirely sure whether your NMEA data also includes engine RPM, you should keep the engines switched on during the following test. In many installations, the NMEA sends engine data only while the engine is running. If the NMEA test still shows no engine data even with the engine switched on, LOGBOOK cannot automatically detect when an engine is turned on or off, and you must record this using manual log entries (see Manual Log Entries).
Switch to the next card of the dialog with Test Connection. LOGBOOK starts data recording via the connection set on the first card of the dialog. It may take a moment until the first data is received.
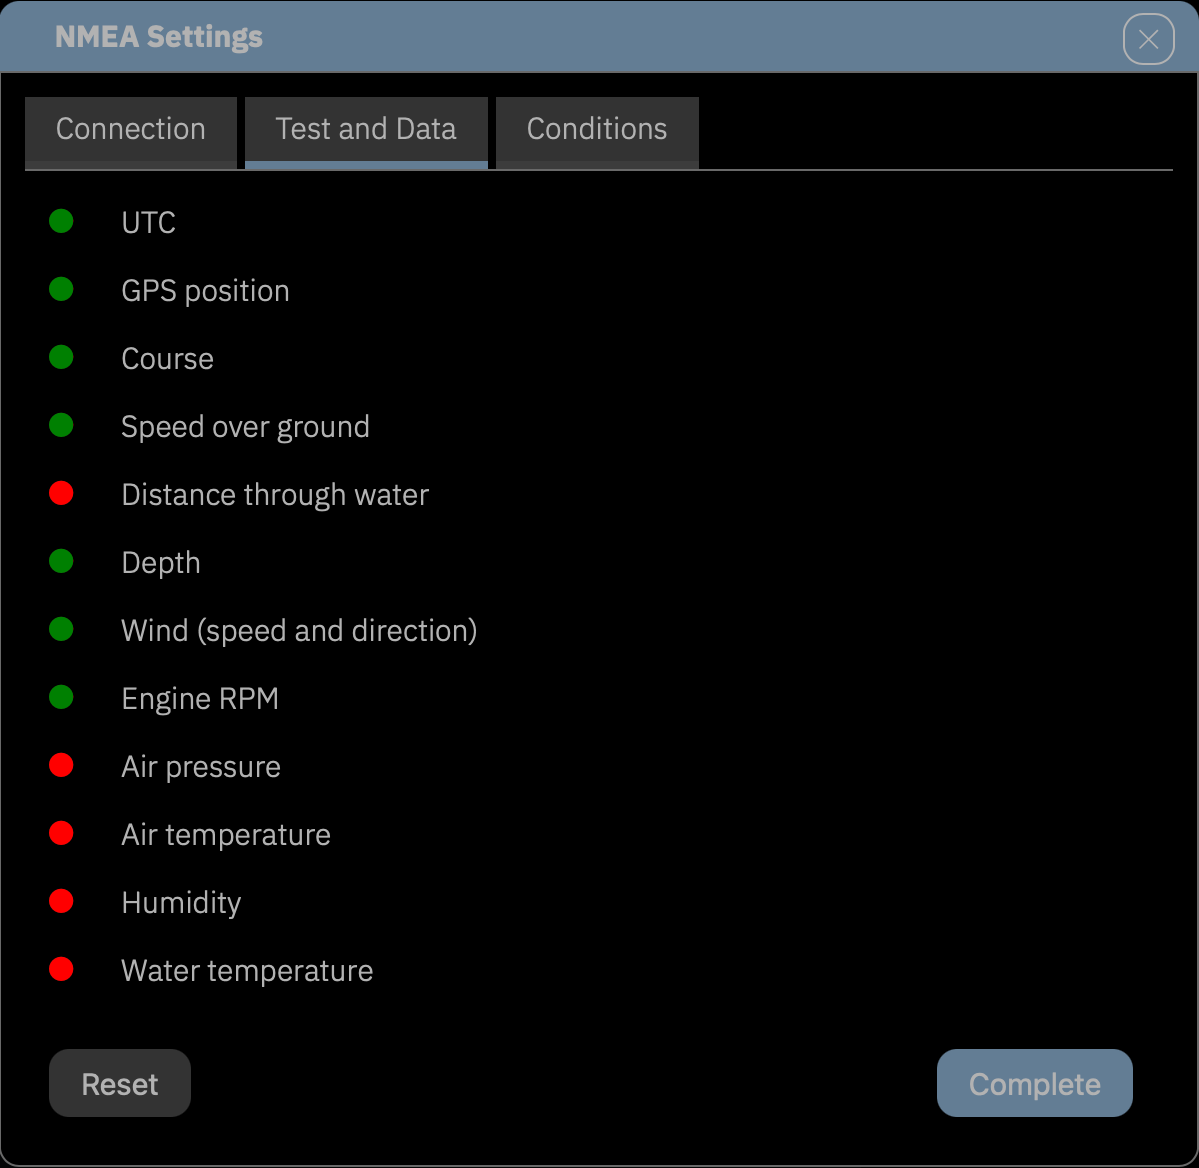
When data is received, LOGBOOK analyzes it and displays on the Test and Data card which data the connected NMEA data source provides usable values for LOGBOOK (green dot).
Test for Engine Data in NMEA
When the engine is off, some systems provide no engine data in the NMEA, not even data with a value of 0. You can only verify whether engine data is available when the engines are switched on. When the engine is running, the RPM is also displayed in the instruments at the bottom of the window.
If LOGBOOK does not receive any data, the settings on the Connection card are usually incorrect. It's also possible that the NMEA network or gateway is not active. Then check the settings on the previous card.
If at least UTC and GPS position show a green dot on the Test and Data card, you can close the dialog with Complete.
Data sources that are switched on later are detected during operation, and their data is evaluated if supported by LOGBOOK. For example, the log usually provides no data when the ship is not moving. Therefore, Distance through water is almost always red during testing.
Or switch to the Conditions card to make settings for automatic log entries. The default conditions should usually be suitable. Learn more about the conditions for log entries here: The Conditions Card.
The green and unfilled marker □ in the NMEA button shows that the connection to the NMEA network is established and data is being received, but no regular automatic log entries are being created yet.
The setup is now complete.
Step 1 is only required on the first day of a new passage. On subsequent days, all steps listed here under Step 1 are no longer necessary.
When starting LOGBOOK for the first time, a first voyage and a first passage are already prepared so that you can start data recording as quickly as possible.
Switch to the focus view with the Focus button at the top in the Ship section or with the Focus button in the timeline. The focus view is the view for editing during sailing. Entries can only be made in the day's data sheet Day and in log entries while in focus view.
When starting a new passage, LOGBOOK displays a notice regarding the timezone. LOGBOOK automatically selects the system timezone of the Primary Device (the device on which the NMEA data are received) as the ship timezone. If you want to use a different timezone for the passage, the system time of the Primary Device must be set accordingly. For guidance, the associated current ship time is also displayed here in addition to the timezone.
LOGBOOK Displays the Wrong Timezone
In rare cases, the operating system of the Primary Device may not transmit the timezone correctly to LOGBOOK. In this case, you have the option to set a different timezone in Ship Settings on the Settings card. This timezone also only applies to passages started after the change. A change has no effect on an already started passage.
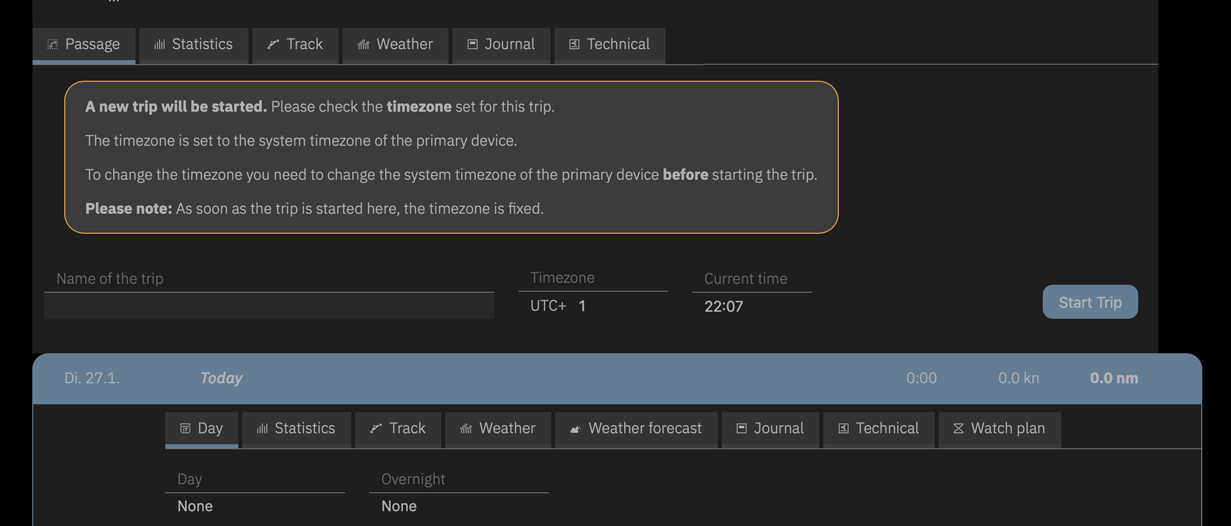
Be Sure to Check Timezone Before Starting the Passage
After starting the passage, the timezone is immutable and does not change during the running passage even if the computer's system time changes. To change the timezone of LOGBOOK, a new passage must be started.
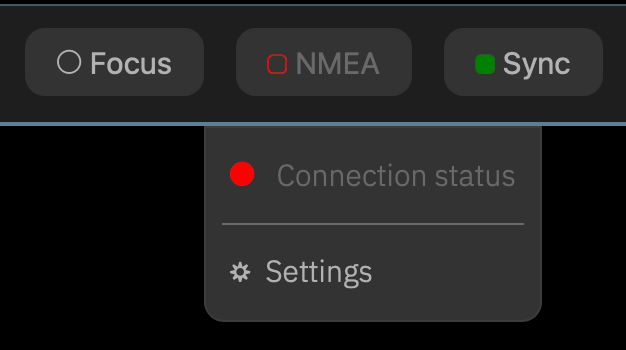
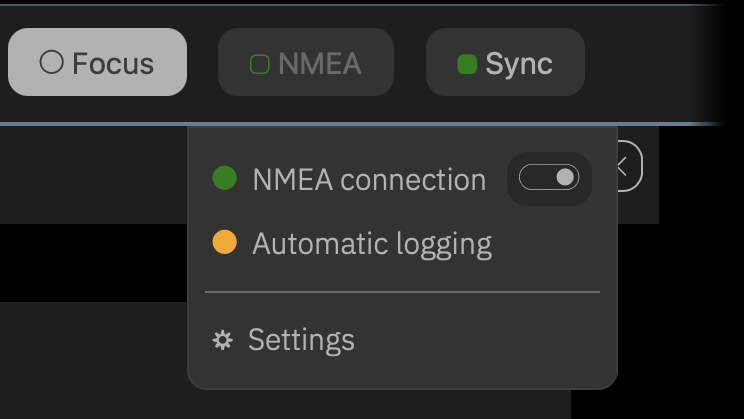
Now you just need to make sure before departing that the reception of NMEA data is activated. If the NMEA menu button shows a green, unfilled marker □, LOGBOOK is ready to go.
If the marker is orange □, data recording must be activated. Make sure your NMEA data source is turned on. Then go to the NMEA connection entry in the NMEA menu, which should also currently show an orange marker ● (NMEA configured but not active).
By clicking on the menu entry, which is a toggle switch, data recording is started and the marker changes to green ●. At the same time, the Automatic logging menu entry is displayed and shows an orange button. This means that LOGBOOK is now receiving data from the NMEA and is waiting for the ship to start moving.
LOGBOOK creates a first entry with time and the title Started NMEA connection for, but without position or other NMEA data yet.
In the focus view, the screen display focuses on the current day and the log row, the colored highlighted row directly below the last log entry. The log row displays the values currently read from the NMEA.
LOGBOOK now captures and analyzes NMEA data every 30 seconds.
As soon as you start an engine, this is detected and an entry is created. This only works if the NMEA also contains engine data. If not, you must trigger a manual log entry when turning on an engine. Read more about this here.
As soon as the ship starts moving, LOGBOOK automatically creates the first log entry and the ship status displayed to the left of the timeline changes to  In motion.
After departure, the NMEA menu button shows a filled green marker ■ and the Automatic logging menu entry shows a green dot ●. This means that automatic log entries are now active.
During sailing, LOGBOOK creates a log entry every full or half hour (depending on the selected setting). LOGBOOK detects whether the ship is moving or not and automatically creates an entry both when departing and when stopping.
If the NMEA data contains engine data, an entry is also created each time an engine is turned on or off.
In the settings (menu NMEA, Settings, card Conditions), you can additionally activate that a log entry is also created for larger course changes.
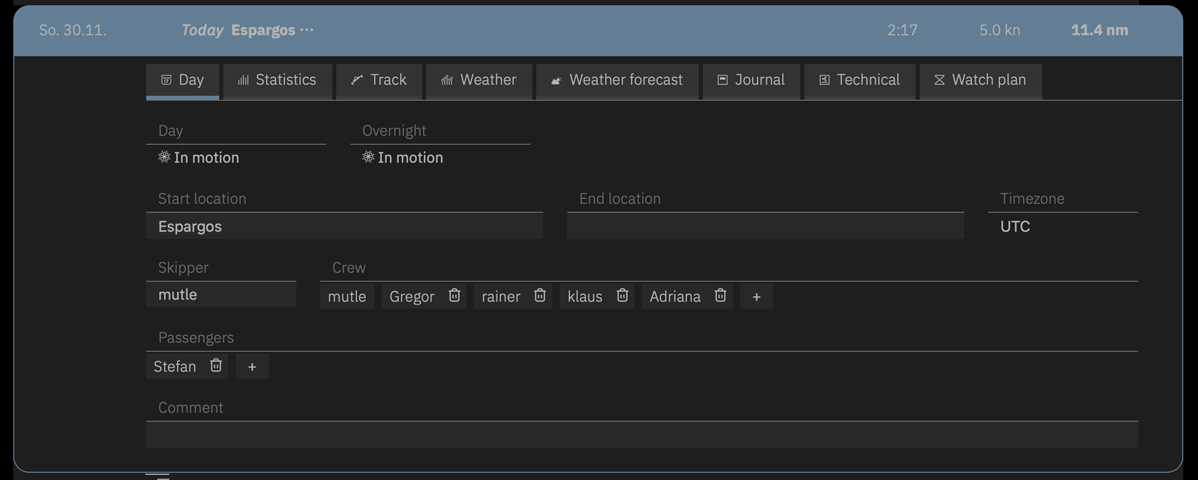
Before departing or even during sailing, you should enter some important data on the day data sheet on the Day card. This important data are the start location, the skipper, and the persons in the crew and passengers, if applicable. This data must be entered on the current day. It cannot be entered later. Read more about this here: The Day Card.
Create Person List Directly During Input
With a new, empty logbook, the person list is still empty. However, persons can be easily created during input using the Add Person entry at the top of the selection list.
If you want, you can also set a name for the voyage and the passage. However, you can also make these entries at any time later.
Automatic Transfer of Day Data to the Next Day
On subsequent days, most fields are already filled with the entries from the last day (departure location is automatically the destination of the previous day), so only changes need to be recorded. Skipper, crew, and passengers are also carried over from the previous day and may then need to be adjusted.
In addition to the data automatically captured via NMEA, each log entry can also contain some information that is not included in the NMEA. These include, for example, weather observations, information about waves and currents, changes to the set sails, and a remark. If this information is desired, you must enter it manually.
Input should be made promptly, as timestamps record whether entries were made directly or later. Later changes to log entries can be interpreted as manipulation if the logbook is to serve as evidence.
Automatic log entries can be supplemented for a maximum of 60 minutes. Once a new automatic log entry has been created, the previous automatic log entry is locked for any changes.
To supplement a log entry, open it by clicking on the entry's row. The possible information is divided across 3 cards. Fields with automatically captured data cannot be edited. Editable fields are easily recognized by the highlighting of the field area.
Typical manual additions are on the Navigation card for sail configuration, remarks, and possibly engine status, as well as on the Environment card for observations of weather and sea state.
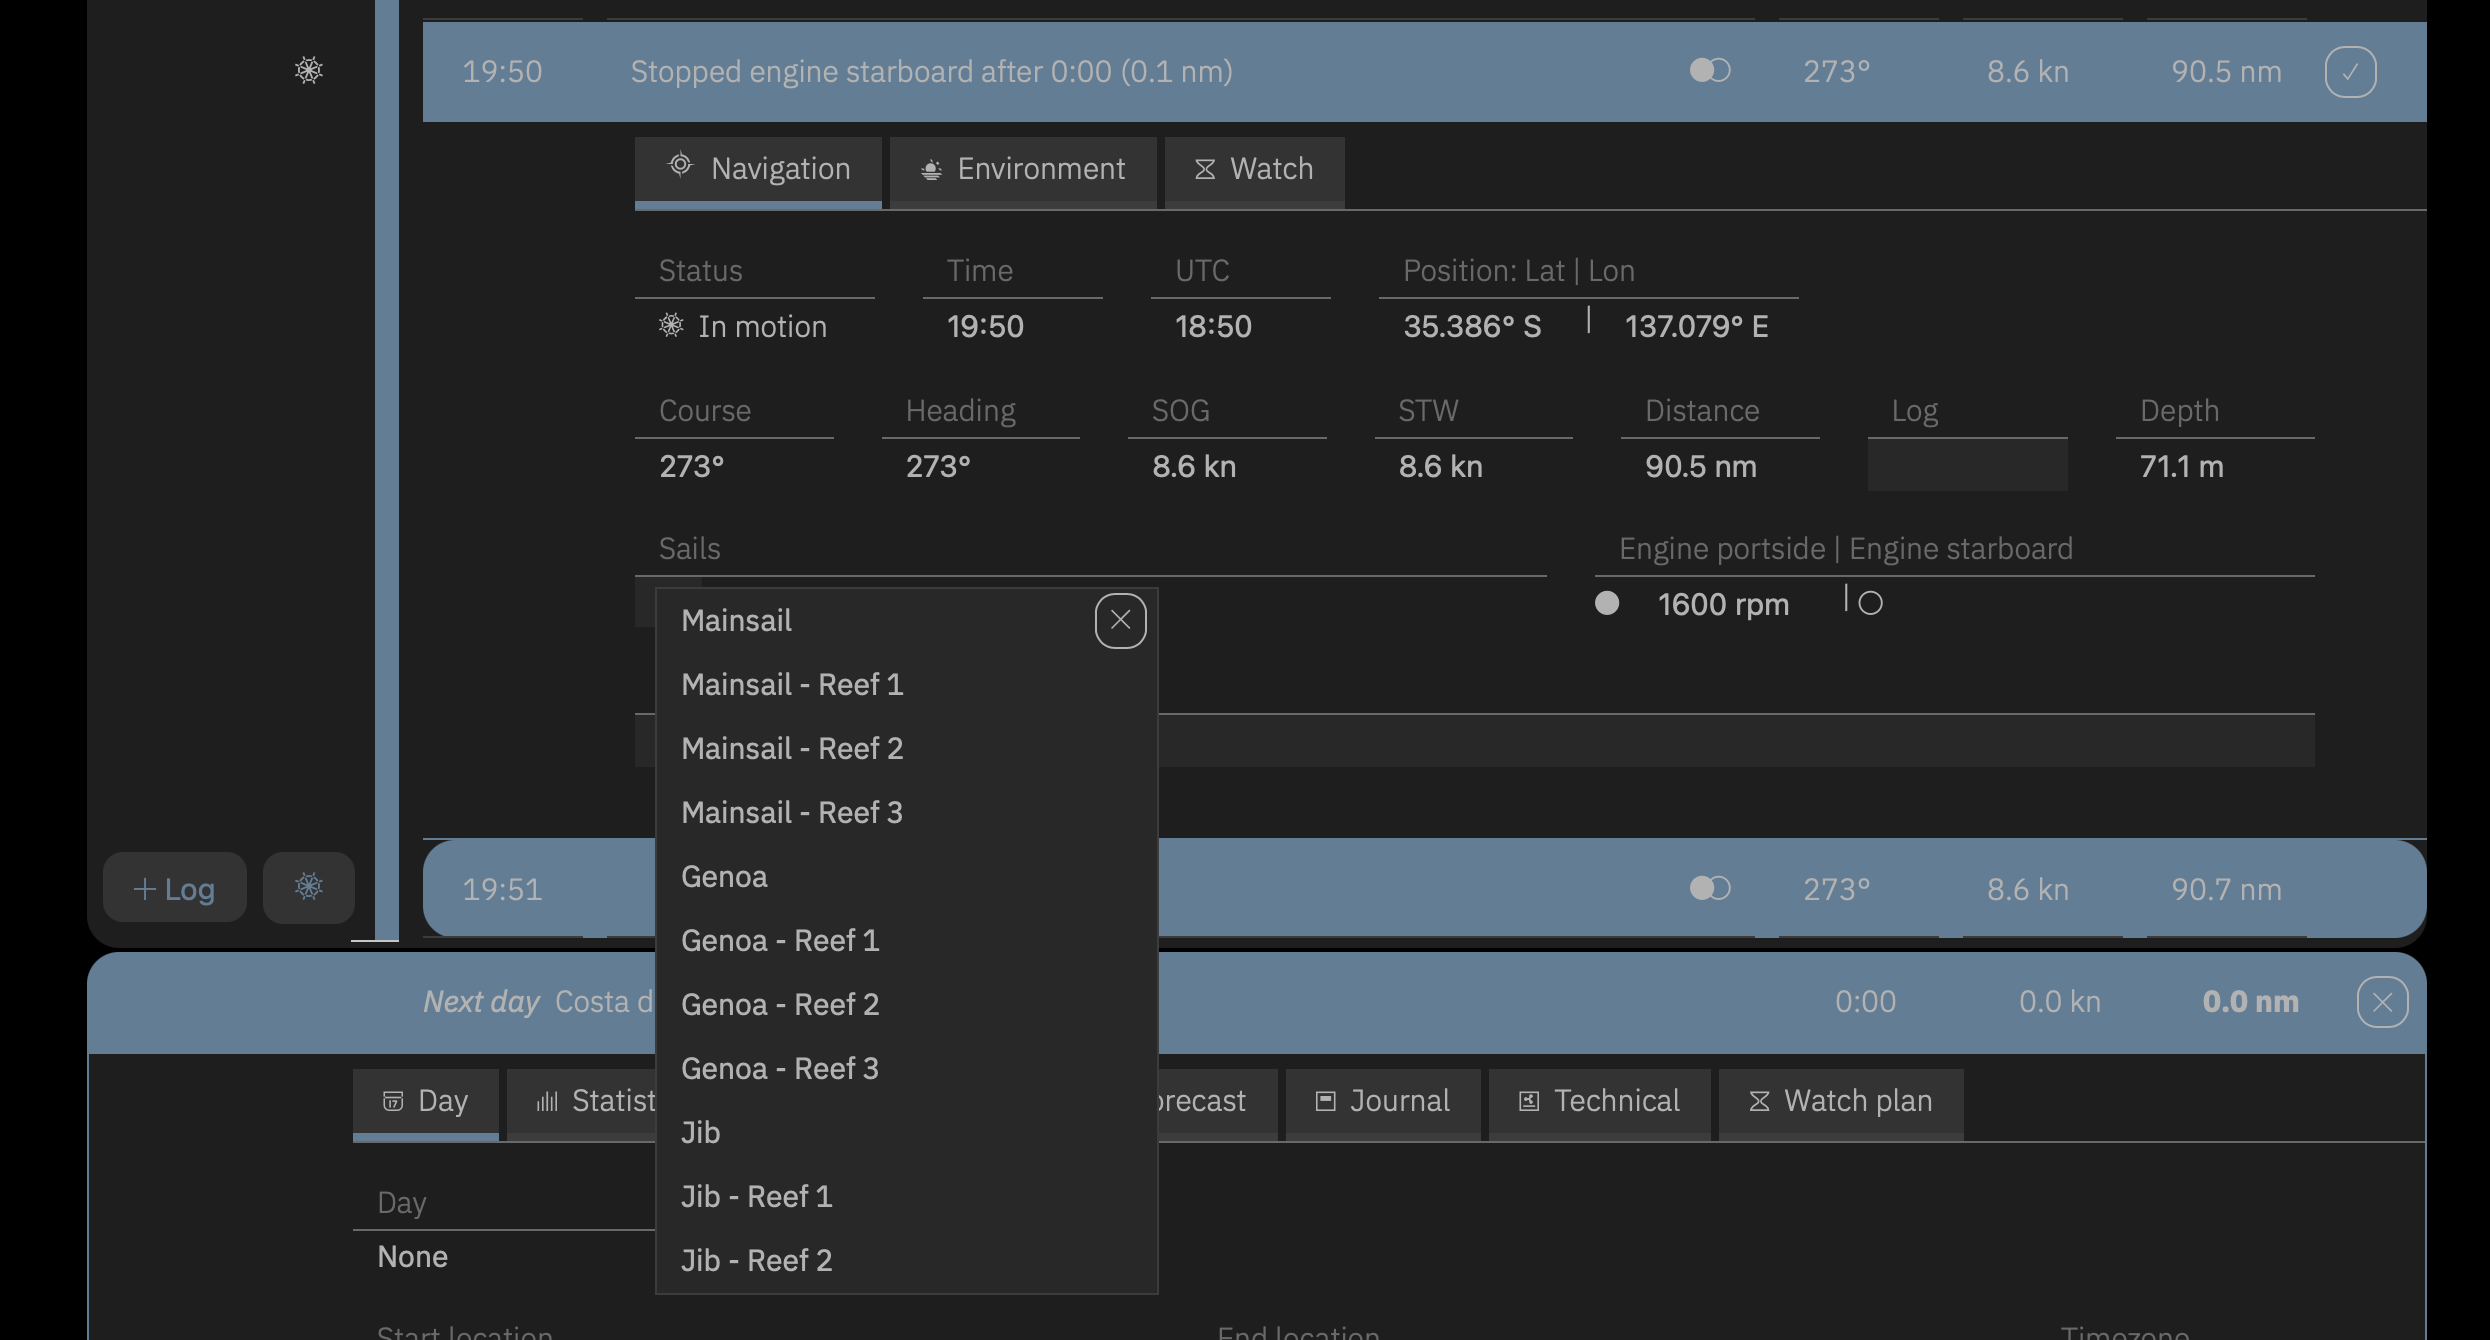
To record the sail configuration, set sails in the Sails field using the +-button. The button provides a selection list with all sails configured in the ship data and their associated reef levels. When creating a sailboat, Mainsail and Genoa with 3 reefs as well as Jib with 2 reefs are automatically set up. Additional sails must be manually created in the ship data before they can be selected here (see The Sailing Card). With the  button, set sails are taken down again. Find out more about recording sail configuration here: Enter Sail Configuration.
On the Watch card, more extensive observations can be documented in addition to the remarks on the Navigation card.
#
Regardless of the conditions selected in the NMEA dialog on the Conditions card for automatic log entries, a log entry can be triggered manually at any time with the + Log button to the left of the log row.
Manual log entries are useful, for example, when sails are set or taken down or when an observation is to be recorded.
If the NMEA does not contain engine data, a manual log entry should be created each time an engine is turned on or off. LOGBOOK can determine the engine operating times and distances traveled with the engine from these entries.
For this purpose, there is a button directly in the log row for each engine with which the status of the engine can be changed and a manual log entry is created. The icon on the button shows the current engine status. In the manual log entry, the RPM can then also be entered for each engine.


The steps for manually creating an entry when turning an engine on and off are described in the section How to manually create an entry when turning an engine on/off.
Manual log entries can be edited for a maximum of 60 minutes. Once a new manual log entry has been created, the previous manual log entry is locked for any changes. Automatic log entries created in the meantime have no influence on this.

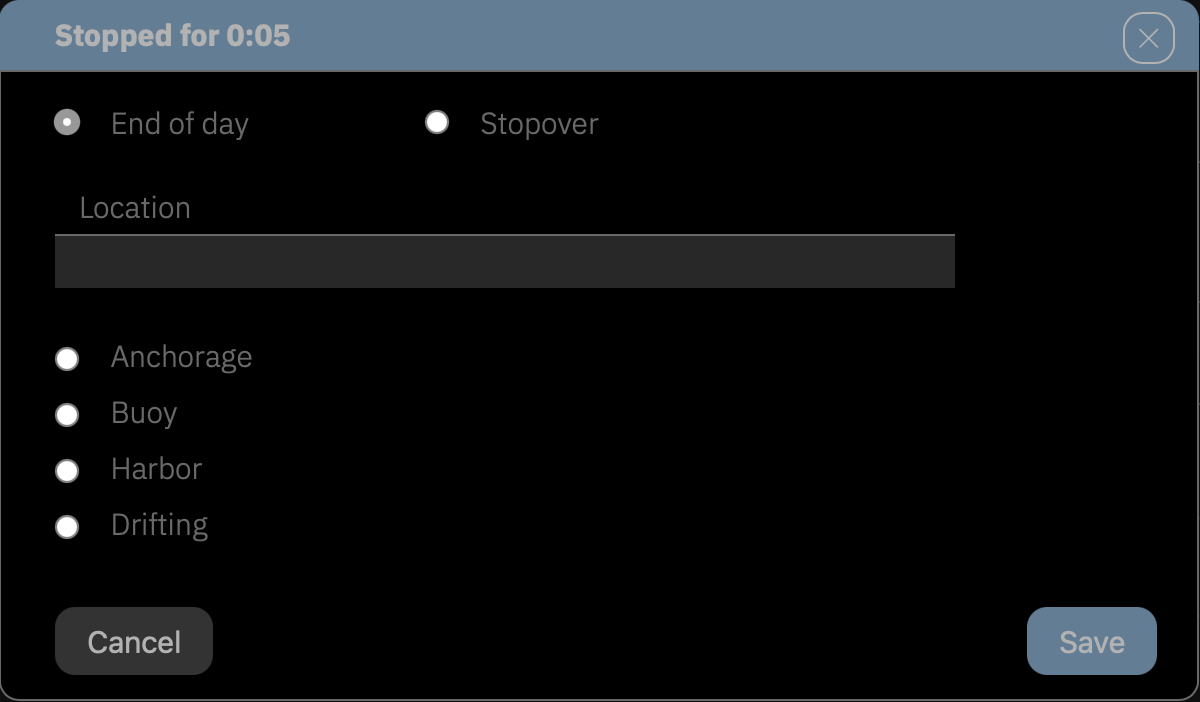
To end the day, select the End of day option. Then enter the name of the current location. Choose whether you are anchoring, in a harbor, etc.
After closing the dialog, the symbol for the selected ship status is displayed in the log entry's row.
LOGBOOK retroactively changes the ship status of the log entry that was automatically created when stopping when closing the dialog. So it doesn't matter if you don't have time for your entry while mooring. LOGBOOK automatically records the time when sailing ends and gives you the opportunity to record details for this entry later. The time when the ship came to a standstill is then used in the calculations as the end of sailing.
When turning off data recording – either with the toggle switch NMEA connection from the NMEA menu or by turning off the NMEA source – it is documented in a log entry (without NMEA data) that data recording has ended.
When data recording is turned off, the NMEA connection menu item and also the menu button show an orange marker ●, the marker on the menu button is orange and unfilled □. The Automatic logging menu option is disabled.

Data Security
If you had no internet connection during sailing, it is recommended to close the app only after your recordings have been synced to the LOGBOOK cloud. Learn more about synchronization and the functions in the Sync menu here: The Sync Menu Button.
End LOGBOOK and NMEA or Not – Your Decision
Depending on whether you are in a harbor, at anchor, or at a mooring buoy, you should decide whether LOGBOOK and data recording should remain active or whether you want to turn everything off.
Even without movement, LOGBOOK continues to watch over your ship and reports, for example, if the ship's position has changed too much or the water depth becomes too shallow. With the selection of End of day in the stop dialog, the regular log entries are deactivated in any case, even if data recording remains active. The marker of the menu entry Automatic logging is orange ●.
However, should the ship start moving again, this is automatically detected and automatic log entries are reactivated.
The new day is already prepared. On the Day card, everything is filled in as it was on the previous day, and the departure location is the destination of the previous day. If necessary, you can still make changes to the crew, etc.
Whether you had closed the LOGBOOK app or it was open the whole time, if the NMEA data source is turned on, you can immediately continue with the log entries for the new day.
LOGBOOK automatically reconnects to the NMEA after closing the app and/or turning off the NMEA data source and regularly searches for NMEA data. As soon as the connection can be re-established, the NMEA button shows green again. If the button's marker remains orange, you must activate the NMEA connection toggle switch from the NMEA menu again.
And as soon as the ship starts moving again, automatic log entries are started, and at the end of sailng, the necessary steps to end the day and automatic log entries can be performed again in the stop dialog.
Important: Disable Sleep Mode on the Primary Device
It is very important that your Primary Device does not enter sleep mode during sailing. While the device is in sleep mode, no data is received, and LOGBOOK therefore cannot create automatic log entries.
If you need to save power, we recommend dimming the screen as much as possible or enabling automatic sleep mode for the screen only.
In general, the Primary LOGBOOK should remain in the foreground while NMEA data is being received and analyzed. Briefly switching to other apps is not a problem, but depending on device load, it may result in fewer NMEA data points being captured.
iPad Sleep Mode Is Disabled Automatically
Because iPads are typically configured to enter sleep mode after a short time, LOGBOOK automatically disables this behavior as soon as the Primary LOGBOOK is running on the iPad and navigation is active.
According to international maritime regulations, a logbook is documentation of the voyages of a specific ship. Each logbook is thus connected to a single ship. If logbooks are to be kept for multiple ships, there must be a separate logbook for each ship.
This is exactly how it is designed in LOGBOOK. LOGBOOK allows you to keep logbooks for multiple ships. However, a separate, self-contained logbook is created and maintained for each ship. Switching between individual logbooks is done by selecting the ship in the Account Settings view.
The logbook created with LOGBOOK complies with official logbook guidelines. All entries are timestamped and thus serve as reliable evidence. Automatically captured data cannot be changed at all, manually entered data relevant as evidence can only be changed for a specified period.
When you first start LOGBOOK, your first ship is created. Only the ship's name, ship type (sailboat or motorboat), and the number of engines need to be entered. All other data can be entered later at any time in the Ship data view.
An internet connection is required for creating a ship as well as for opening and closing a ship's logbook.
If a new logbook is to be created for another ship, the current logbook must first be closed. Only one logbook can be open at a time.
After a security prompt, the connection to NMEA is disconnected for Primary LOGBOOK, or the connection to Primary LOGBOOK is disconnected for a LOGBOOK Companion, and the logbook is closed.
LOGBOOK then switches to the Account Settings view.
Depending on how much data is already stored in the ship’s logbook, closing a ship’s LOGBOOK may take a little longer. The process is only complete when the ship’s button in the Account Settings view is no longer highlighted in color.
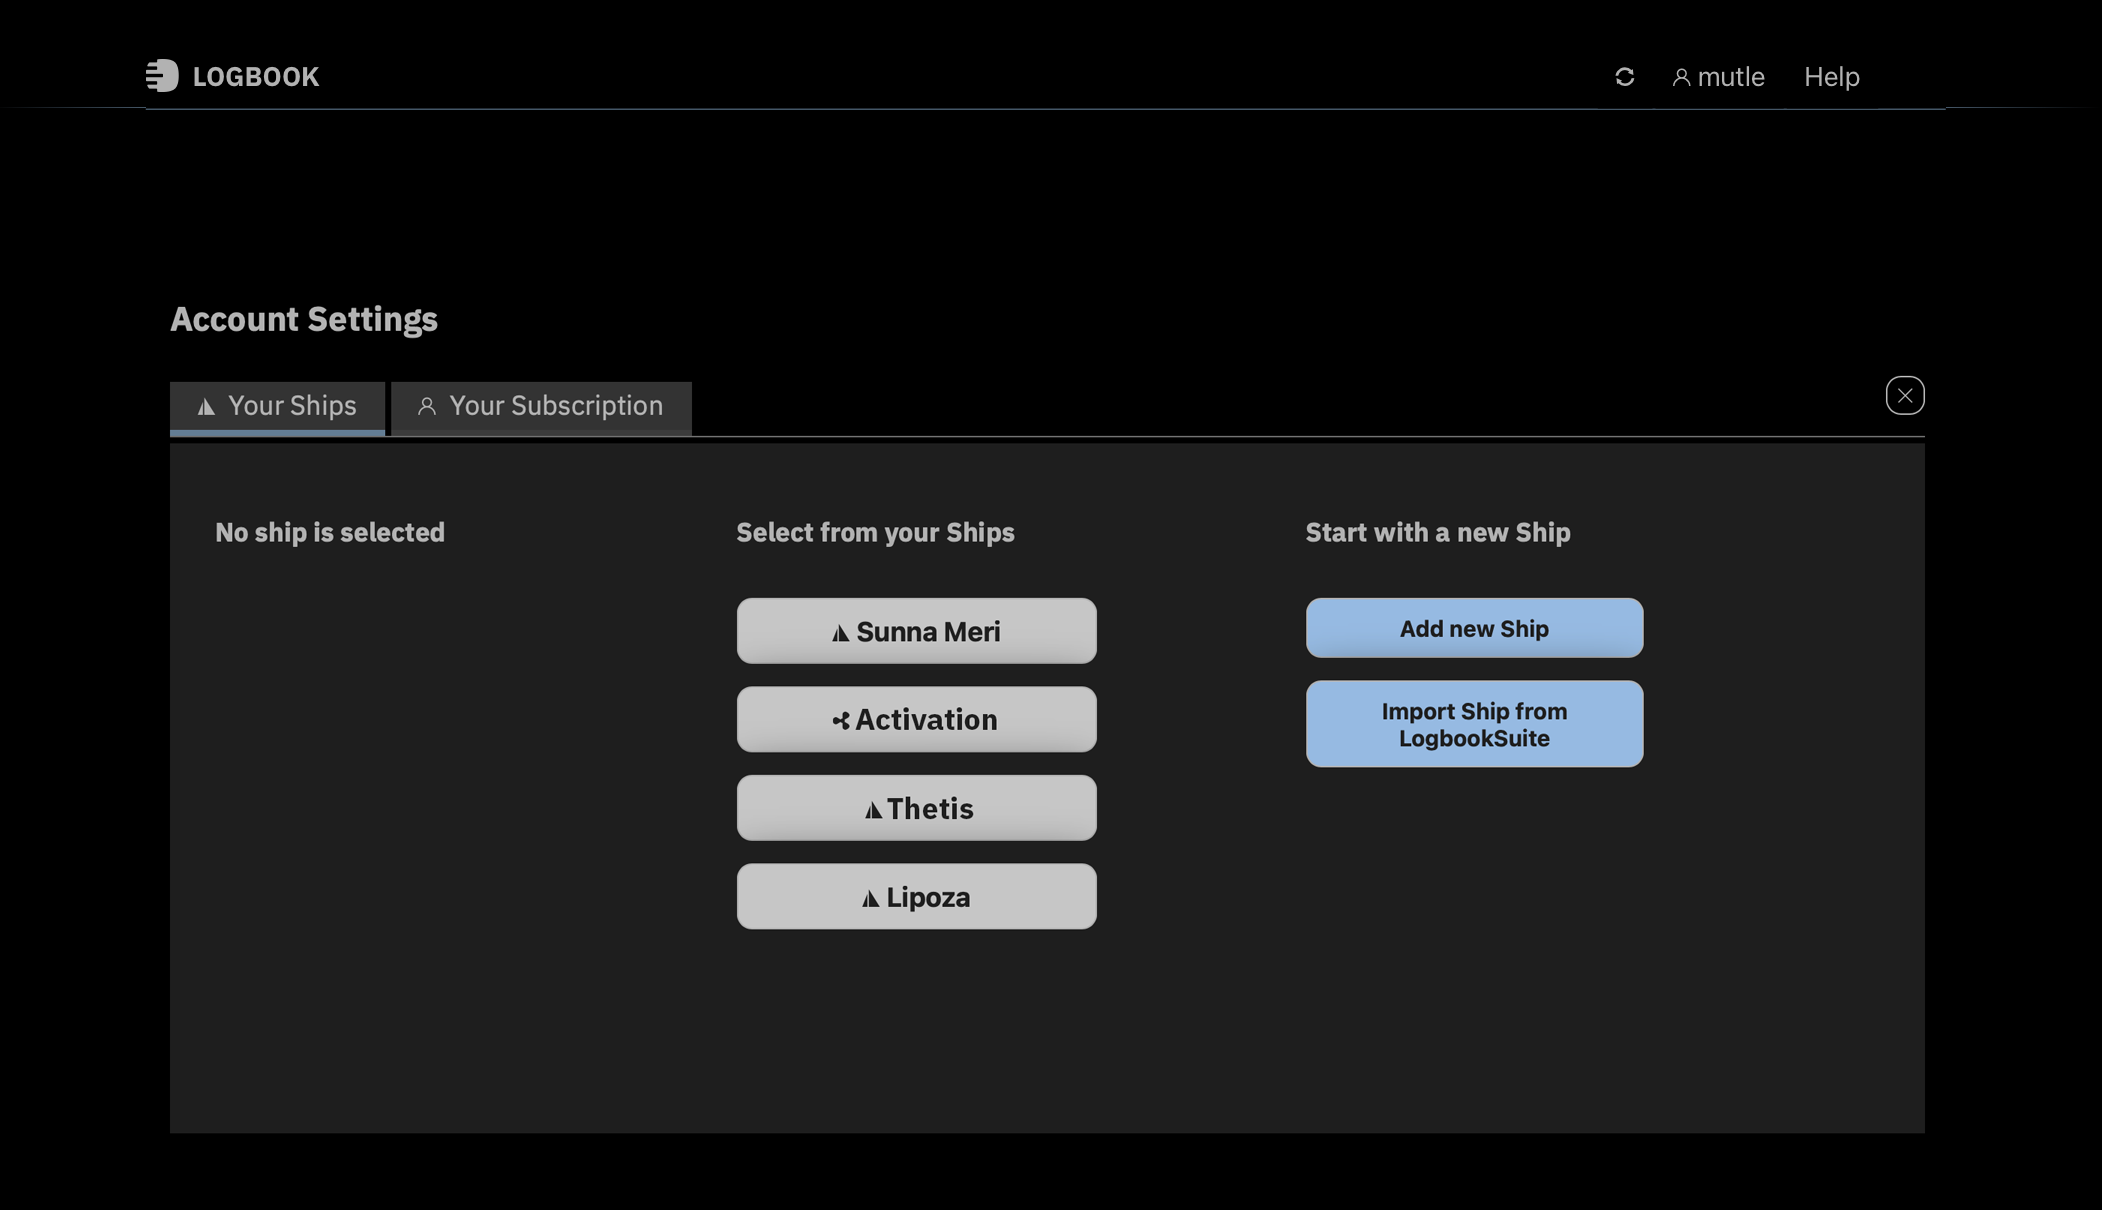
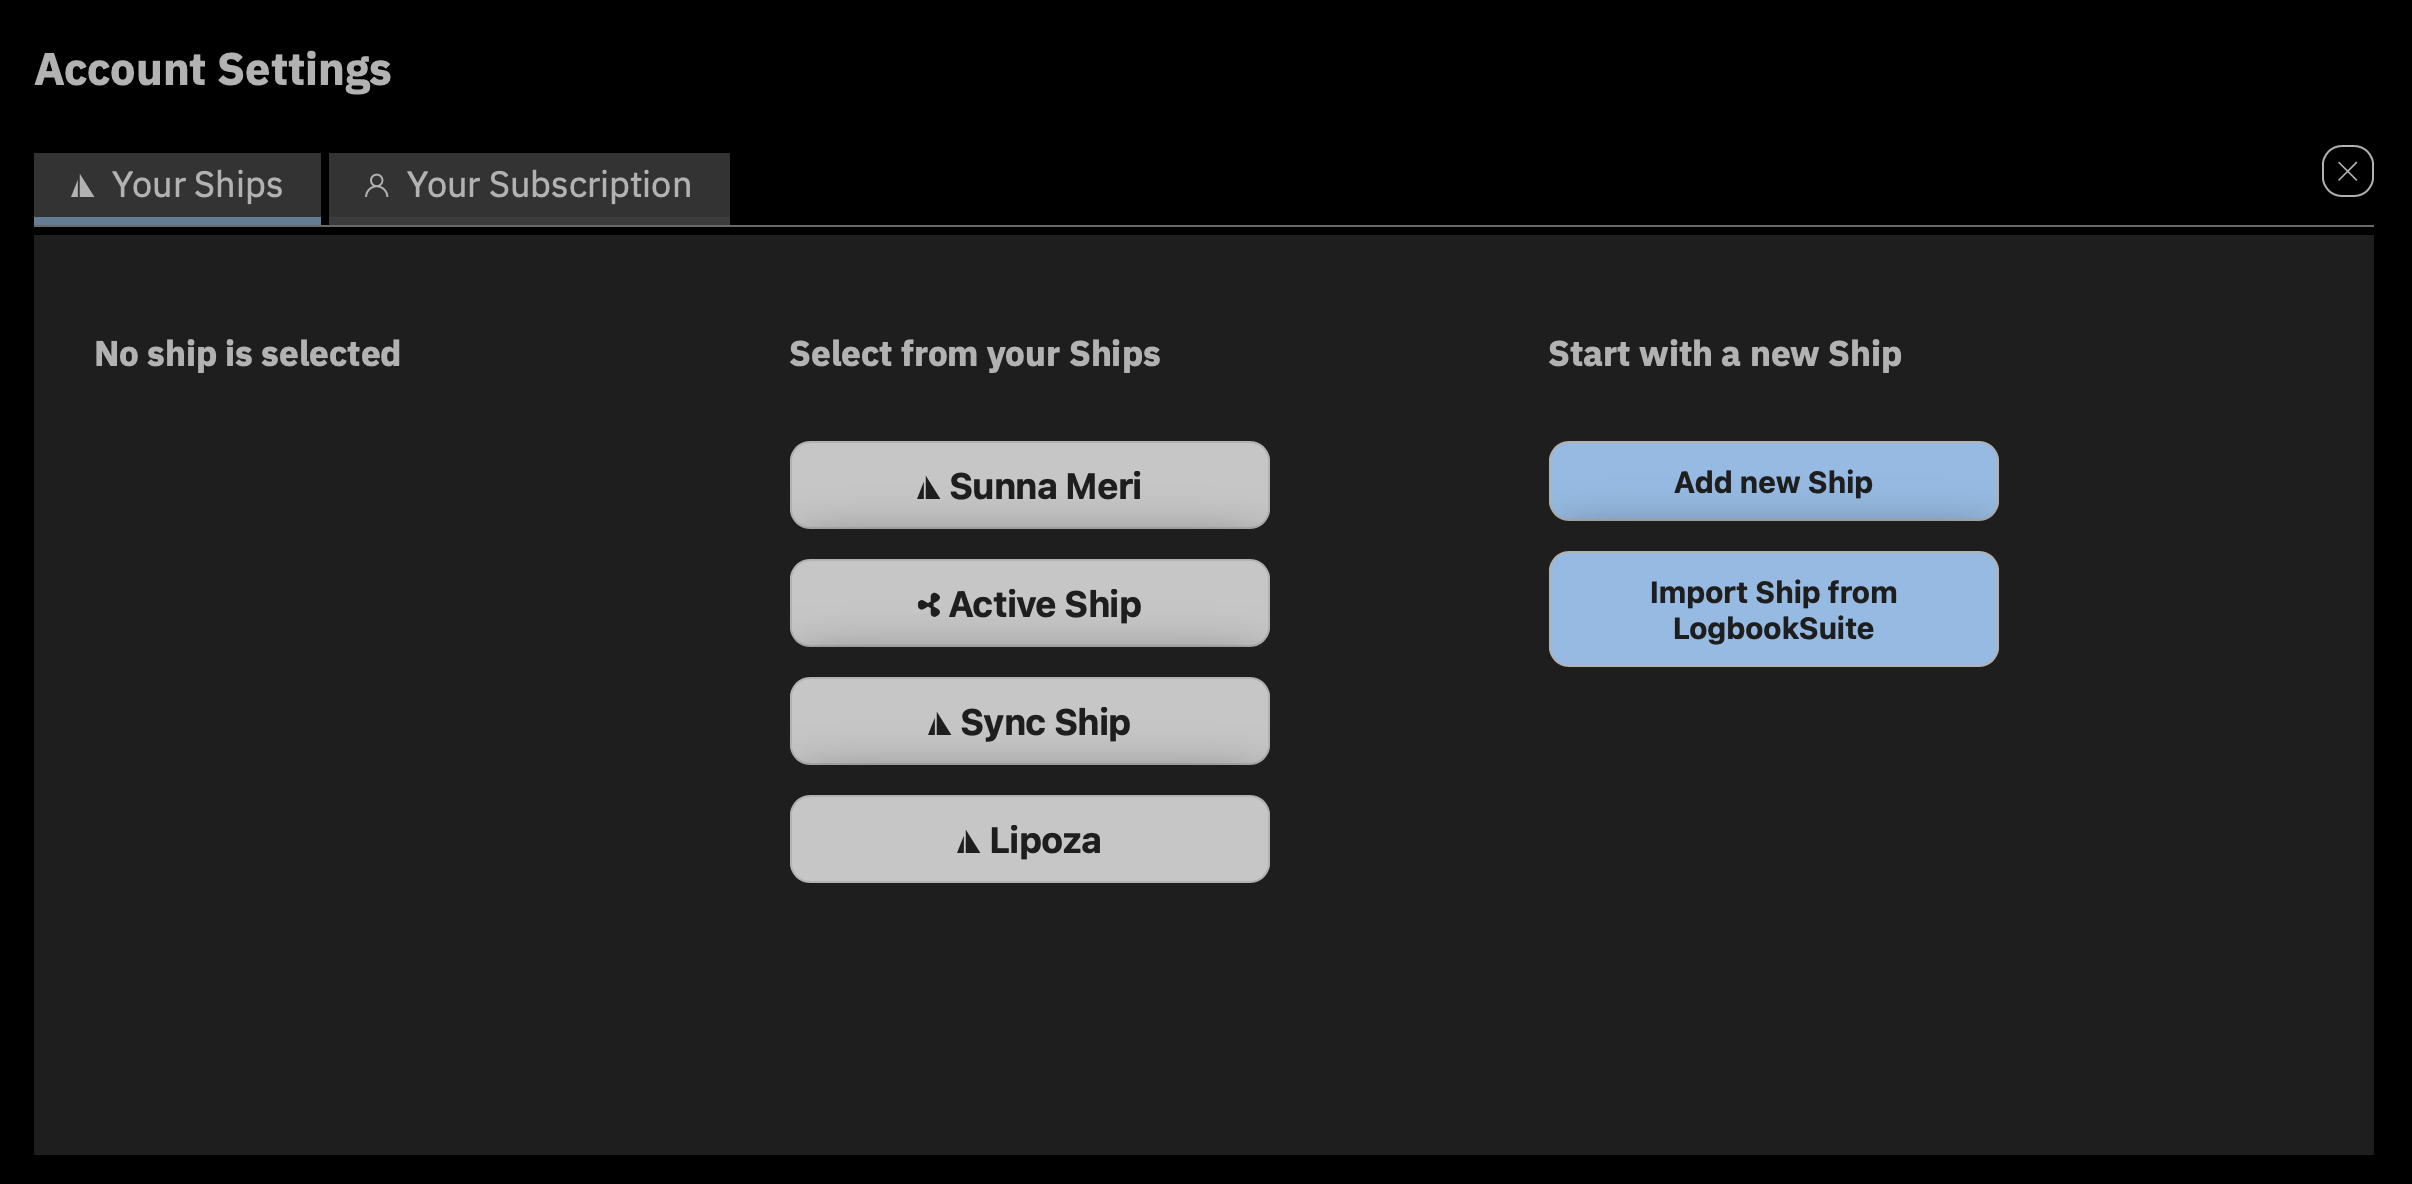
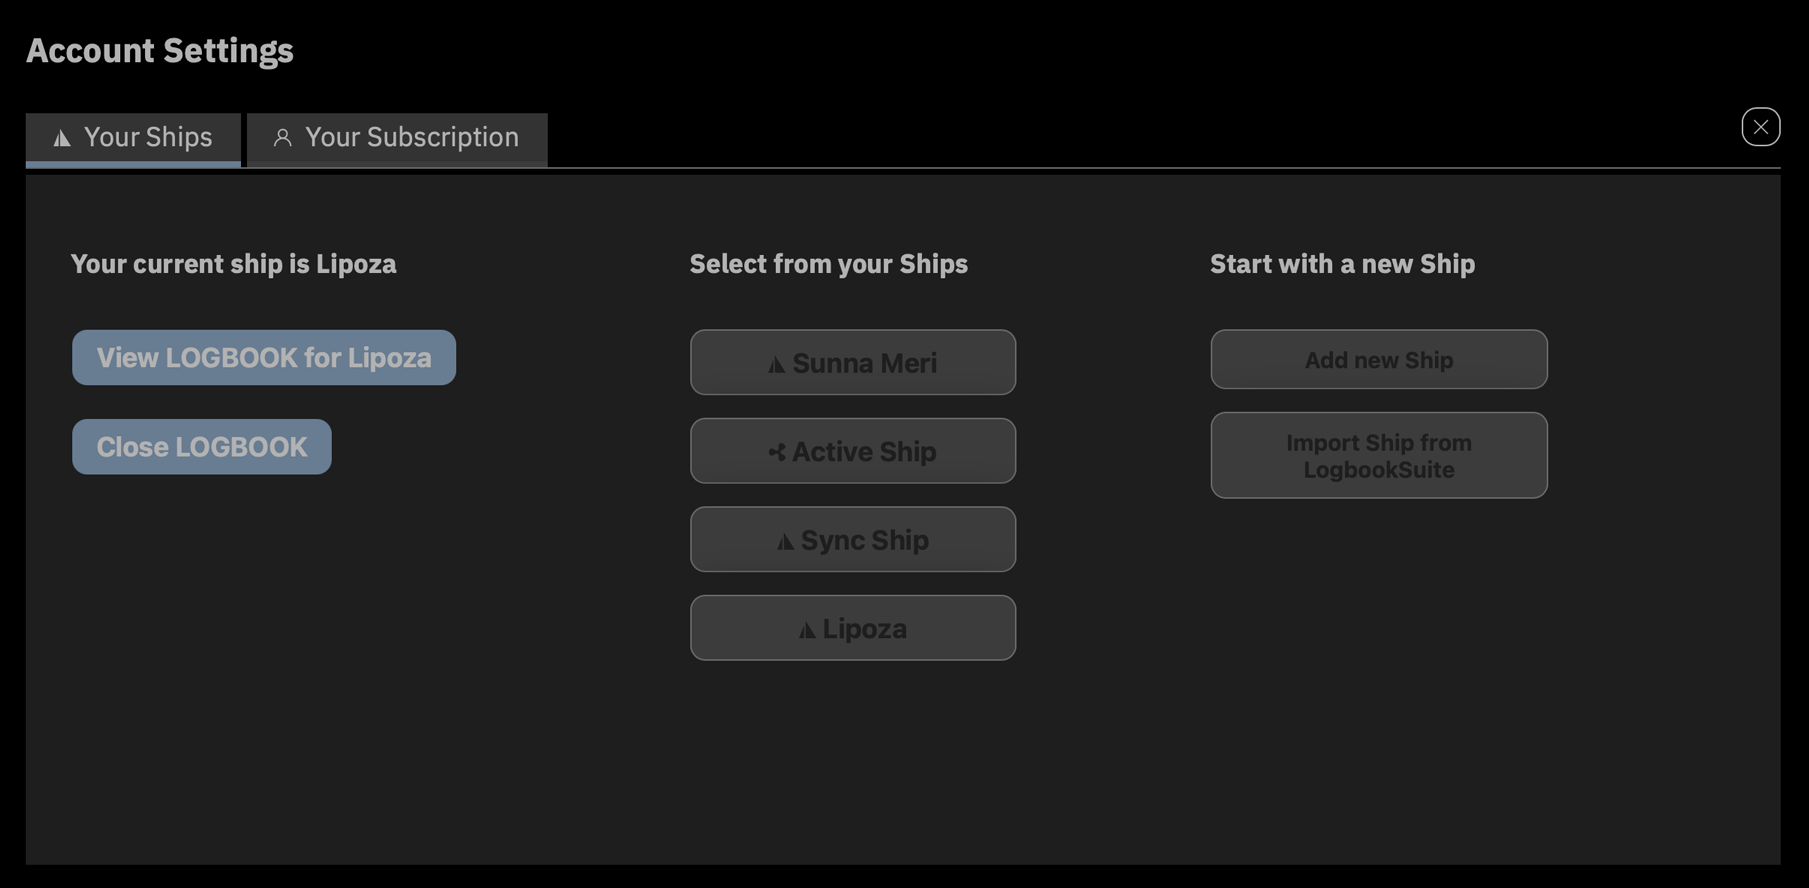
Instead of closing the logbook via the menu item from the Ship menu, you can also first switch to the Account Settings view with Account Settings from the Account menu (the menu that shows your login name) and close the logbook of the active ship there with the Close LOGBOOK button displayed in the left column. After that, the Add new Ship and Import from LogbookSuite buttons are available for creating or importing a new ship, or one of the listed ships can be selected.
Please note that closing a ship and creating a new ship require an internet connection. Once the ship is created, further entries can be made without an internet connection.
If your account has access to the logbooks of multiple ships, you will find a list of all ships in the Account Settings view and can open the LOGBOOK of the desired ship here. However, the last active logbook must first be closed (in the ship menu or in the left column of the Account Settings view), see the previous section. Generally, an internet connection is required to switch to another ship.
When LOGBOOK is displayed via the cloud in a browser outside the ship, the Ship menu shows all available ships and you can switch directly between ships. Here too, only one ship's logbook is open at a time.
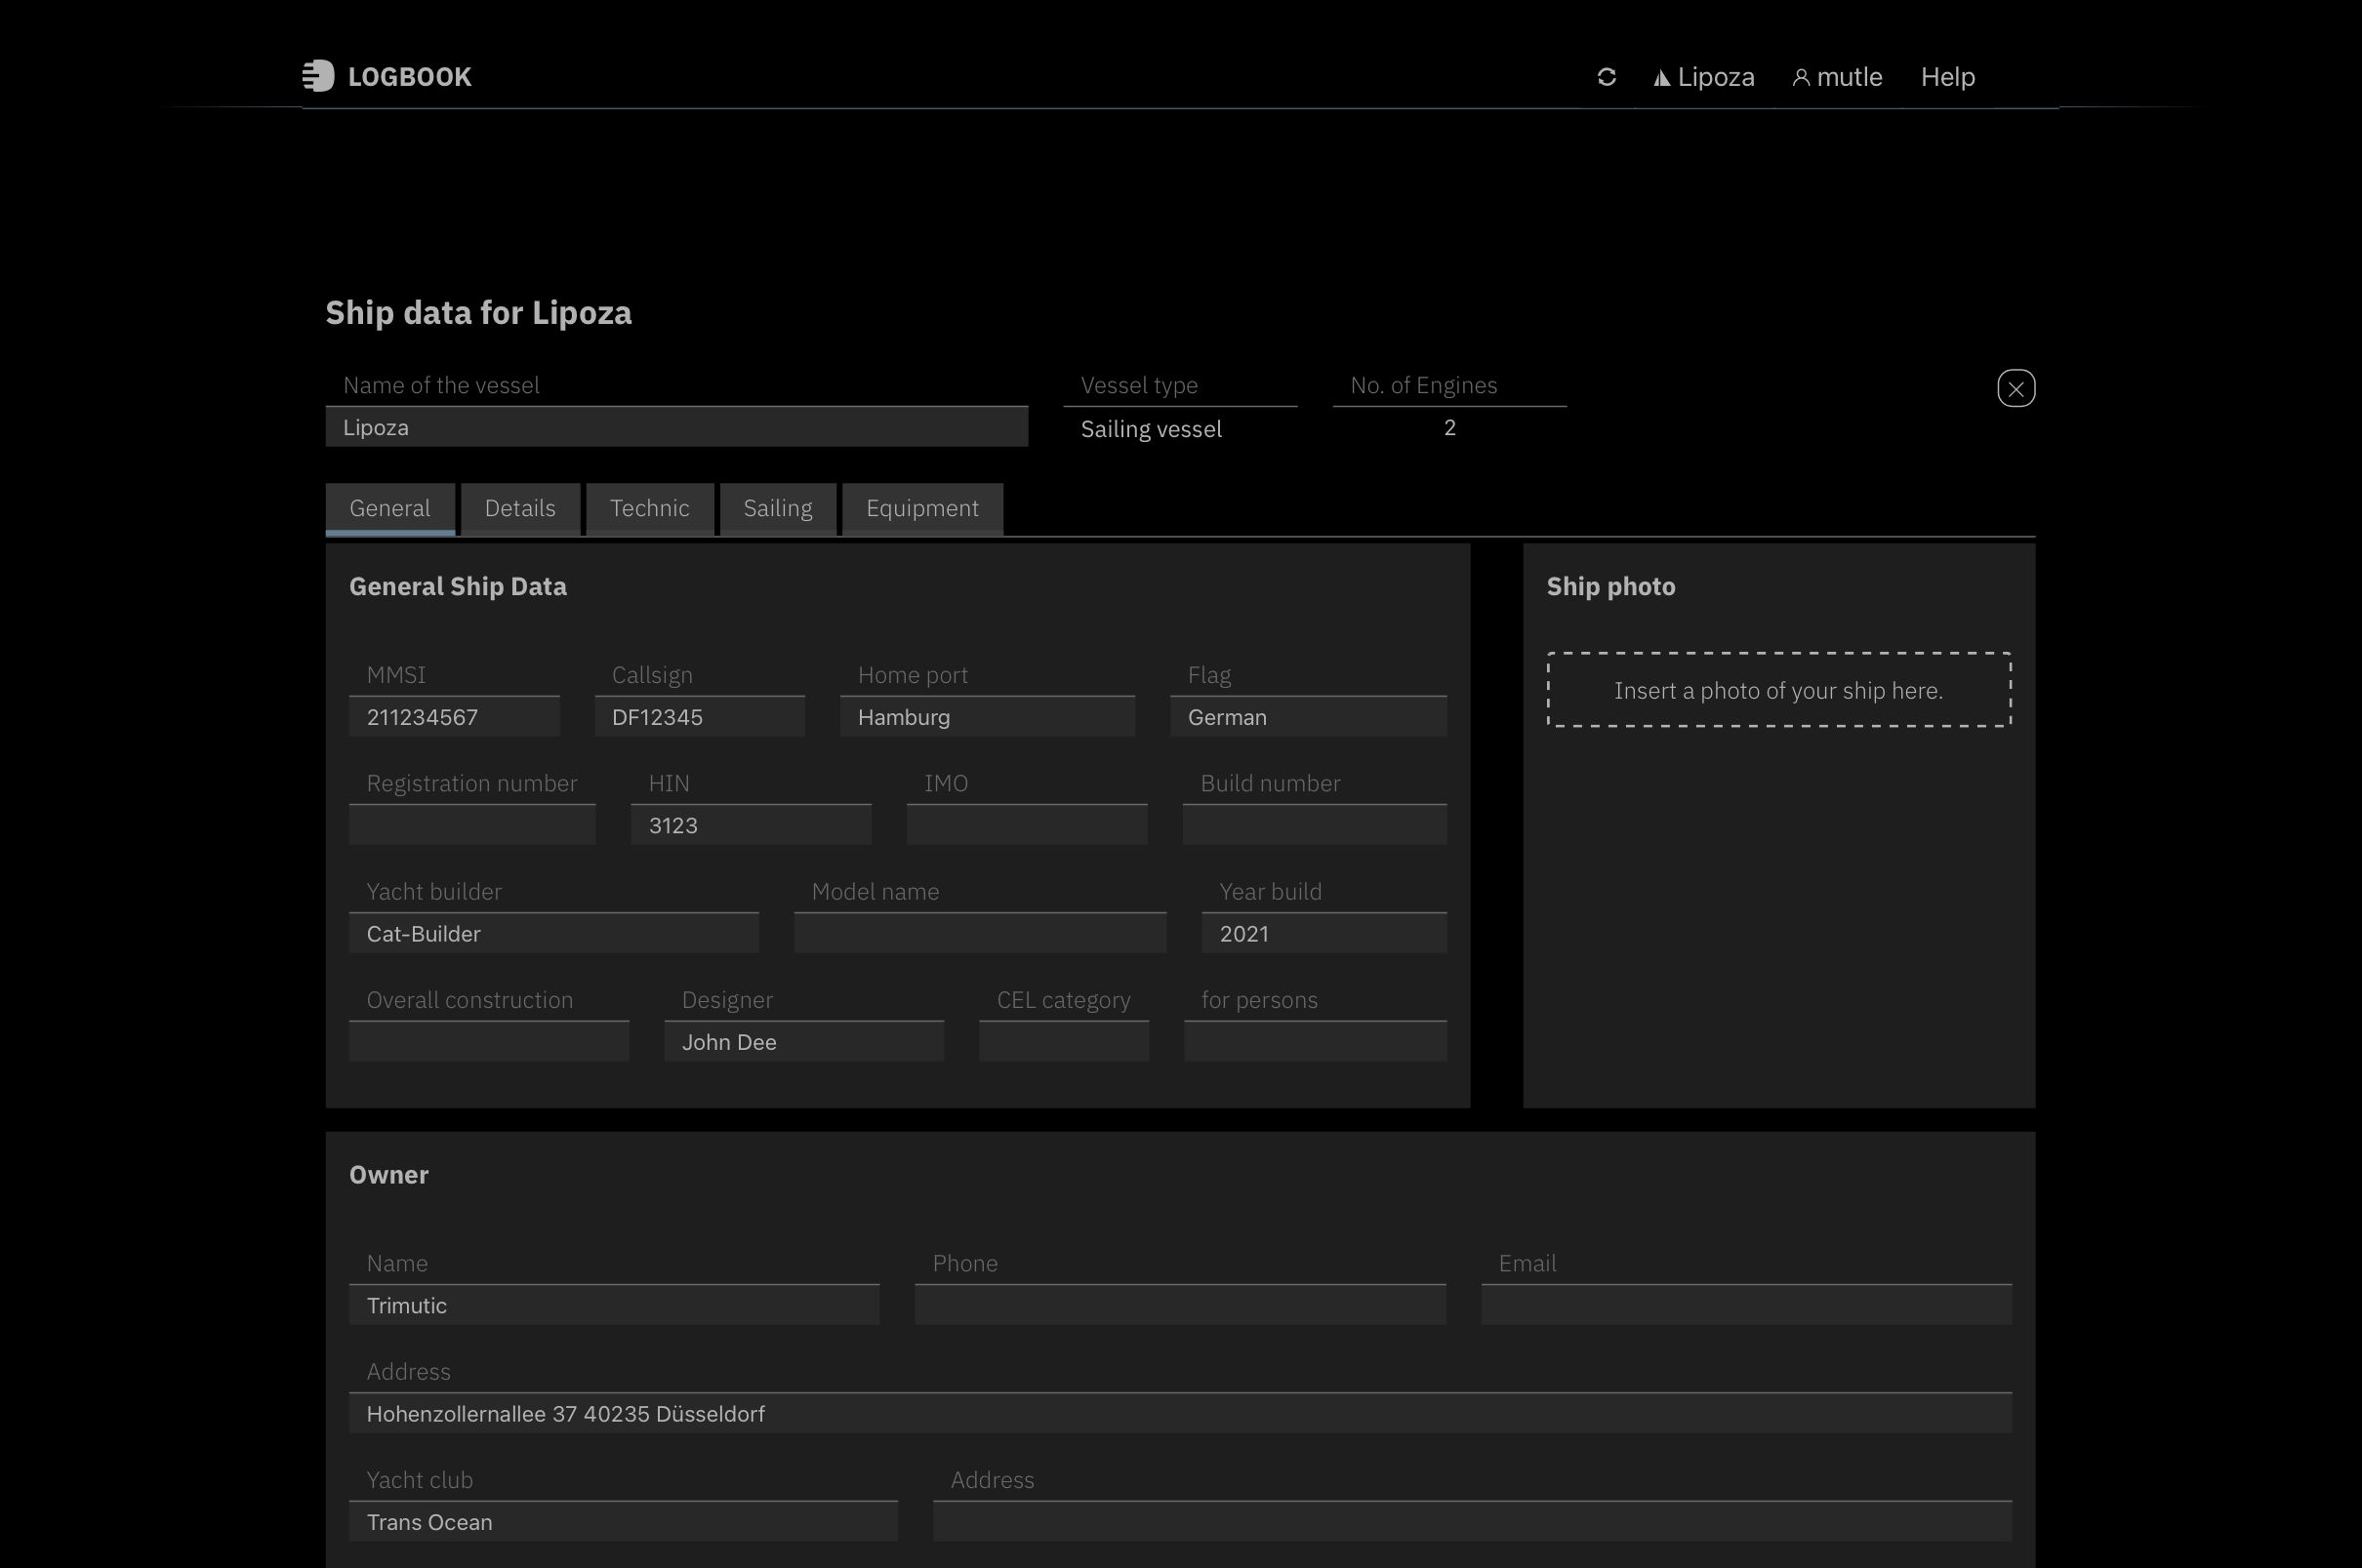
With the [Name of ship] Ship data function from the Ship menu (the menu with your current ship's name), the ship data is displayed instead of the timeline. In this view, extensive information about the ship and the ship's equipment can be recorded.
The top row is identical to the Create new Ship view when creating the ship. While the ship's name can still be changed, the ship type and number of engines are no longer editable.
In the area below this row, extensive information about the ship and its equipment can be compiled on 4 or 5 cards, depending on the ship type. The information includes, where appropriate, installation location, manufacturer, exact type designation, and serial number. If this information is carefully entered, all important info is collected in one place and always quickly accessible.
Whenever there are multiple devices or items of a similar type, they can be added individually to the list with the + Add [Object] button. The button creates a new empty area for data entry. Usually, the first field offers a selection list with possible objects. Each object can be deleted again with the at the right end of the row.
The General Ship Data card summarizes general information about the ship such as registration details, shipyard information, and owner details. Multiple photos of the ship can also be added here.
In the lower area under Insurances, there is the possibility to record all insurances with insurance company and insurance number.
On the Details card, additional data on the size, shape, and equipment of the ship can be compiled.
The Technic card is divided into the sections Engines, Generators, Steering systems, and Tanks.
The engines are already set up. Only supplementary data needs to be entered. Since the number of engines has a significant influence on the options and fields in the logbook, their number must be specified when creating the ship. The value is unchangeable, so neither additional engines can be added, nor can an already created engine be deleted.
With more than one engine, it makes sense to give the engines names such as "Port" and "Starboard" on a catamaran. These names are then displayed in all views in the labels for the engine data and make it easier to distinguish between engines.
The Generators section is still empty. If generators are present, all important information can be recorded here.
In the top row of the Steering systems section, general information about the ship's steering can be entered, with Add steering system information about bow thrusters and similar devices can be recorded.
In the Tanks section, the number of tanks and the total volume can be entered for the various tank types. Below, more detailed information about each individual tank can be recorded.
The Sailing card is only displayed for sailing ships. Here, in the upper area, information about masts, rigging, and deck equipment (including, for example, winches) can be entered.
Important on this card is the Sailing section, where the various sails available on the ship are recorded. For a new ship, the three most common standard sails Mainsail, Genoa, and Jib are already set up. If they are not needed, they can also be deleted.
In the logbook, only the sails set up here in the ship data can be selected for log entries under Sails. The sail selection list offers a separate entry for each reef status of the sail. Therefore, it should be checked for the prepared sails whether the correct number of reefs is preset.
Important Note
Be sure to set up all sails here that you need for recording sail settings in the log entries. Make sure that sufficient reef stages are activated. Only sails set up here can be selected for log entries.
On the Equipment card, all other equipment can be recorded, such as batteries and solar panels under Electric equipment, ship electronics under Nautical equipment, and safety equipment such as EPIRB, life jackets, fire extinguishers, etc. under Safety equipment. There is also a section for information about the available anchors.
And everything that cannot be assigned to any of the mentioned topics can be recorded under Other equipment.
The menu item [Name of ship] Ship data from the Ship menu (the menu with your current ship's name) opens a dialog where settings can be made that apply to the entire logbook of the ship.
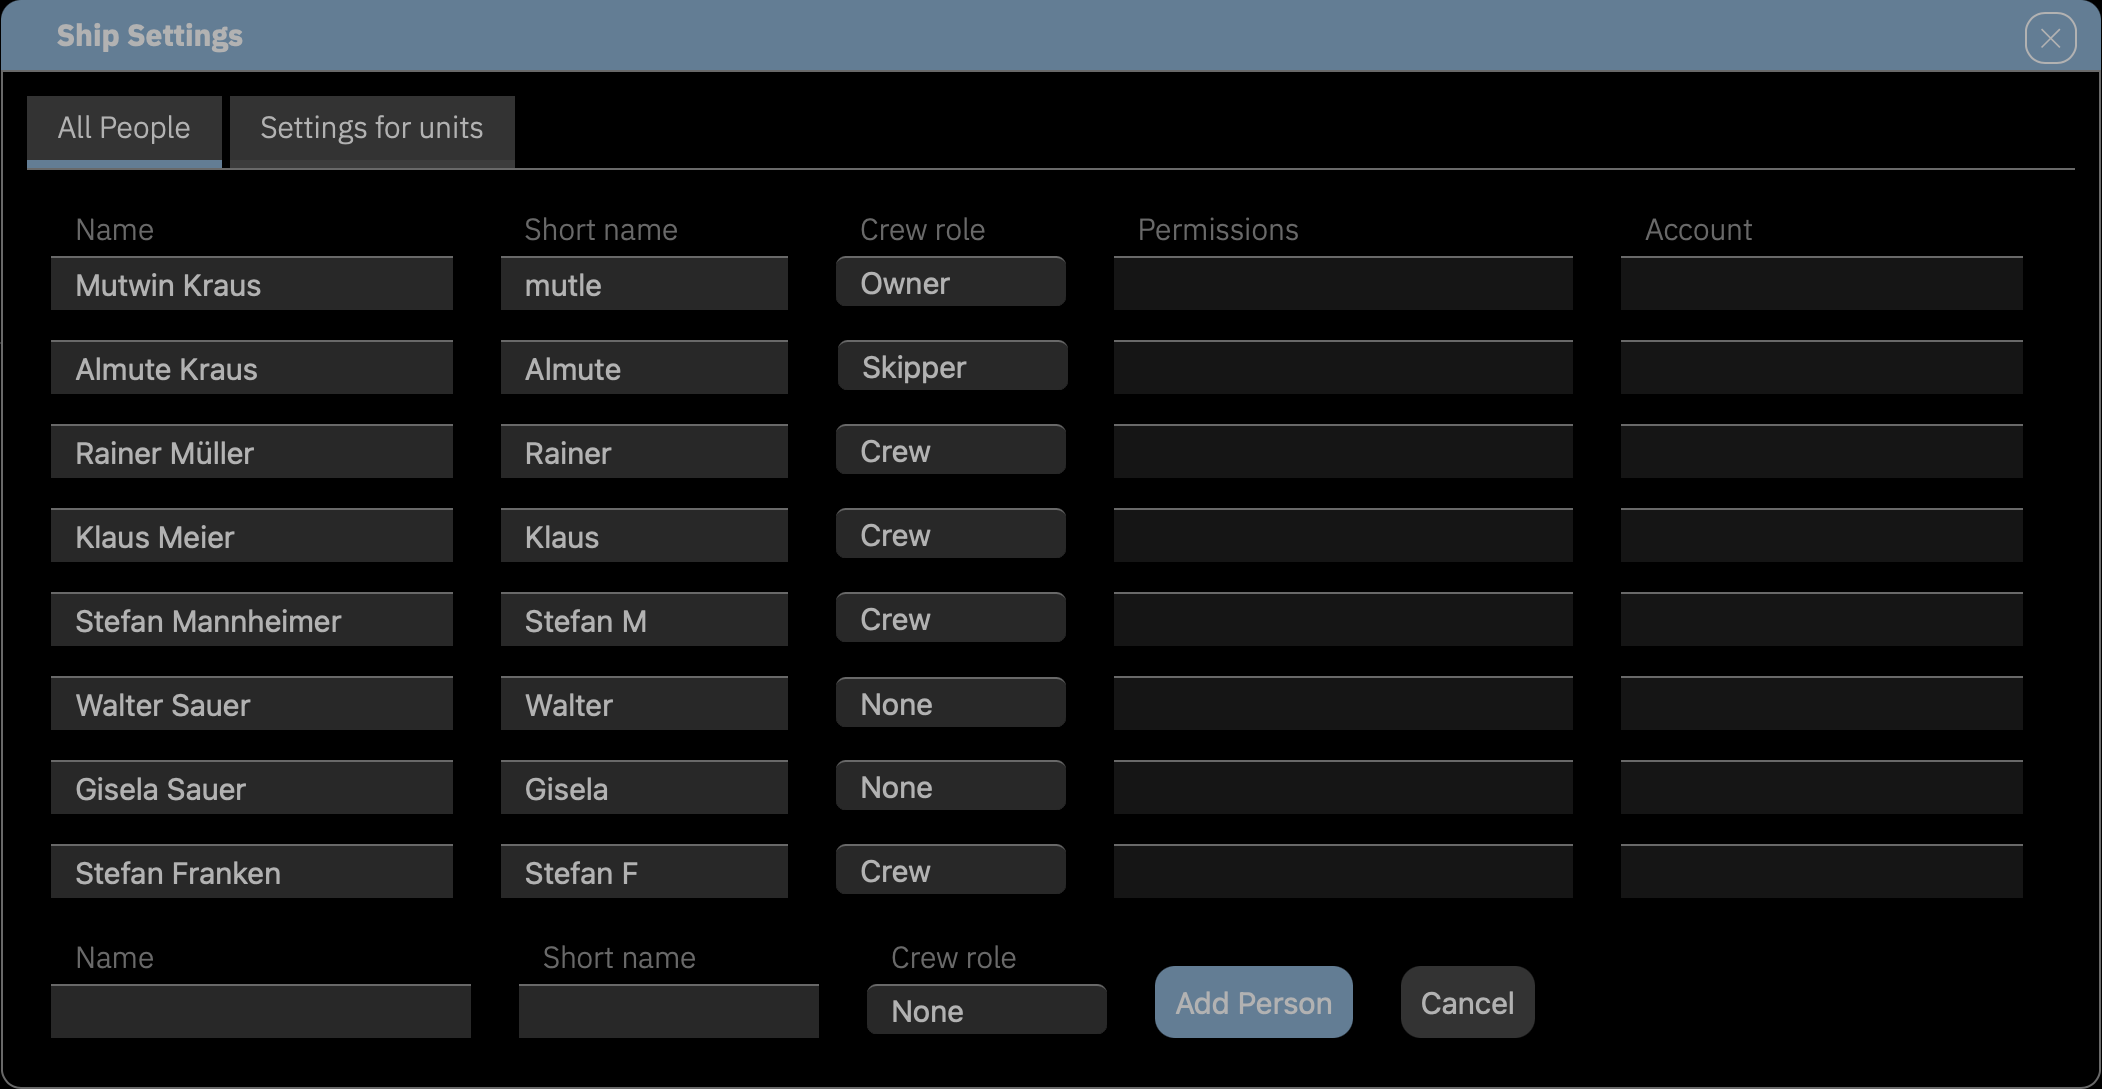
The last card of the ship data (All persons) contains the list of all persons who should be selectable in this logbook as skipper, crew members, or passengers.
Persons can be added to the list with the Add Person button. For each person, their full name and a short name of up to 10 characters must be entered.
Additionally, a crew role is selected for each person. Persons with the crew role None are only available for selection in the Passengers selection list. Persons who should also take over a watch must have at least the crew role Crew. Skipper automatically also have the subordinate crew role Crew.
With the toggle button Activate/Deactivate, you can control which persons should be available for selection in the selection lists on the day data sheet. Deactivated persons are moved to the lower part of the list.
On the Settings for units card, you can set the units of measurement that LOGBOOK uses by default within this ship's logbook. Regardless of the defaults set here, different units can be selected in many places (for example, in the ship data).

The Settings menu item opens a dialog with ship-specific settings. On the All People card, all persons who can be used in the ship's crew lists are listed. At the bottom of the list is a button to add more persons to the list (more on this under Persons list, Skipper, Crew and Passengers).
The LOGBOOK app has two separate menu areas. At the top in the title bar of the app window are menus for selecting general functions that affect the entire app.
In the Ship area below, buttons provide access to menus with functions that are needed while working in the logbook. The display of the menu buttons is context-dependent and only the menu buttons whose functions are currently available are shown. Likewise, the menus themselves only show functions available in context.
The following section first describes all functions of the general menus in the title bar of the app window, then the menus of the buttons in the Ship area.
In rare cases, the display may not automatically update after an entry, even though the data has already been saved. This can be seen, for example, when newly created entries do not yet appear in selection lists (e.g., newly created persons in the crew list).
In such cases, clicking the  Refresh button helps. This updates the display and makes all already saved changes visible.
The Ship menu displays the name of the currently selected ship in the title.
The first menu item (Ship data) provides access to the ship data of the current ship (more on this under The ship Data).
On the second card (Settings for units), you can set the units of measurement used by default in this logbook.
The Settings card offers the option to manually set the time zone that LOGBOOK will use for the next passage. This option should only be used if the operating system of the Primary Device does not transmit the correct time zone to LOGBOOK when creating a new passage.
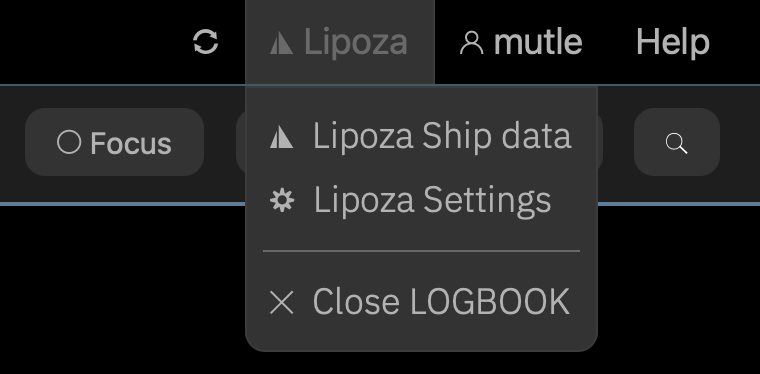
With Close LOGBOOK, the ship's logbook is closed and you switch to Account Settings to open the logbook of another ship there.
This menu command starts the web browser and opens the account settings with the list of all available ships in LOGBOOK Cloud.
This menu command starts the web browser and opens the ships list in LOGBOOK Cloud.
The Account menu displays the username of the currently logged-in user in the title.
Account Settings opens the view of the same name, where account settings can be made. The Account Settings view is only available to the admin user.
On the first card, you can switch between available ships, create a new ship, or import a ship from Logbook Suite (more on this under Switch/Select ship).
The second card shows information about the current subscription. From here, changes to the account and subscription can also be made (internet connection required).
For example, after enabling edit mode with Edit account, you can change your Short name. It may be up to 10 characters long and must not contain spaces. The name shown here was automatically generated at login from the first 10 characters of your name. In LOGBOOK, all entries you make are signed with Short name.
You can also change your name and the account name here; only your email address cannot be changed.
Save saves the changes to your account settings and transfers them to the LOGBOOK Cloud.
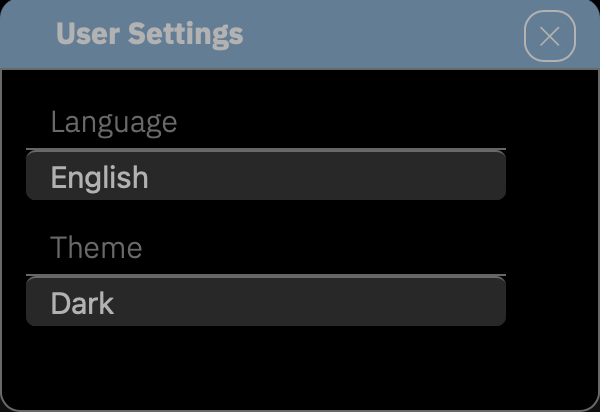
User Settings displays a dialog where the user can set the theme and language for the user interface. The settings in the User Settings dialog only apply to the active user on the active device. Each user can therefore use LOGBOOK with their preferred theme and in their desired language.
With Logout, the current user can log out of LOGBOOK without logging in another user directly.
Via the Help menu, there is direct access to this app documentation as well as to the Q&A section on the TRIMUTIC website.
Contact support starts an email inquiry to support and About LOGBOOK displays a dialog with the software version number and some additional information.
The Actions menu is shown only in focus mode. It contains the two menu items Voyage and Passage.
+ Voyage creates a new voyage. If there is still an active voyage and possibly also an active passage, these are ended first.
+ Passage creates a new passage. If there is still an active passage, it is ended first.
+ Voyage and + Passage are only selectable when automatic log entries have been stopped. With active log entries, the menu items appear dimmed (more on starting a new passage or voyage under Passages and Voyages).
The Focus button switches between the timeline view, which shows the entire timeline of a voyage, and the focus view, which focuses on the current day. The focus view is the view for editing during sailing. Entries can only be made in the day’s data sheet Day and in log entries while in focus view.
The focus view shows the log row with current navigation data and buttons for manual entries and currently pending actions.
Via the functions in the NMEA button menu, the NMEA connection of LOGBOOK can be configured and data retrieval and automatic log entries can be started and stopped.
The marker on the menu button shows the status of the NMEA connection:
□ no NMEA connection configured
□ NMEA connection configured, but currently no data is being received or the NMEA data source is not active
■
NMEA connection active, data is being received, but currently no automatic log entries are being created, LOGBOOK analyzes the received data and starts automatic log entries if applicable
■
NMEA connection configured, data is being received and automatic log entries are active
NMEA connection, the top menu item in the NMEA button menu, is a toggle switch with which data retrieval from the NMEA can be turned on and off when an NMEA data connection exists.
The marker of the NMEA connection menu option indicates whether the connection to the NMEA data network is correctly configured and whether it is activated.
● no NMEA connection configured
● NMEA connection configured, but currently no data is being received
● NMEA connection configured, data is being received
If the NMEA connection is already set up, data reception can be turned off (orange) and on (green) via the menu entry.
Automatic logging, the second menu item in the NMEA button menu, is merely a status display showing whether LOGBOOK is currently creating automatic log entries according to the settings in Settings or whether the received NMEA data is only being analyzed. Whether automatic log entries are active or not is determined by LOGBOOK based on the received data.
Whenever the ship is moving while NMEA data reception is running, automatic log entries are active. The marker is then green. This status remains with the NMEA data source switched on until the ship has a status other than In motion or  Drifting. Only the activation of another ship status stops the automatic log entries.
With active NMEA data recording without automatic log entries, the marker is orange. In this case, LOGBOOK analyzes the received data and issues warnings if applicable (e.g., with active anchor watch when the water depth becomes too shallow). And if the ship starts moving again, the automatic log entries are automatically reactivated. The marker then changes to green.
When NMEA data recording is not configured or deactivated (i.e., when the NMEA connection marker is red or orange), the Automatic logging menu item is disabled and appears dimmed.
● NMEA connection active, but currently no automatic log entries are being created.
● NMEA connection active, automatic log entries activated.

Right: Data is being received, but no automatic log entries created
Settings opens a dialog where the connection from LOGBOOK to the NMEA can be set up, tested, and configured. The dialog is divided into three cards. During the initial setup, you are guided through the settings. All options of the dialog are described in the Quickstart Set up connection.
The NMEA settings only apply to the active ship and are only saved as long as the ship's logbook is active. If you switch to another ship in LOGBOOK, the settings for the NMEA connection are deleted and must be reconfigured when the ship is reactivated.
In case of regularly switching between multiple ships, it is therefore recommended to take screenshots of the respective settings.
On the Connection card, the connection is configured through which LOGBOOK can access the data of the NMEA data network or GPS device. LOGBOOK enables connection via USB, WiFi, or Ethernet.
When LOGBOOK is used with multiple networked devices, there is always only one device with which the connection to the NMEA is established. This so-called Primary Device runs the Primary LOGBOOK.
The second card (Test and Data) is used to test the connection. When data is received, it is analyzed and the card shows for which data the NMEA provides values (green dot).
Important:
If the engines are connected to the NMEA data network, they only send data when turned on in most installations. When the engine is off, the NMEA usually contains no engine data at all, not even data with the value 0. If you are not sure whether your NMEA contains engine data, you should switch on the engines for your first NMEA data test.
The third card (Conditions) defines the conditions for the log entries automatically generated by LOGBOOK.
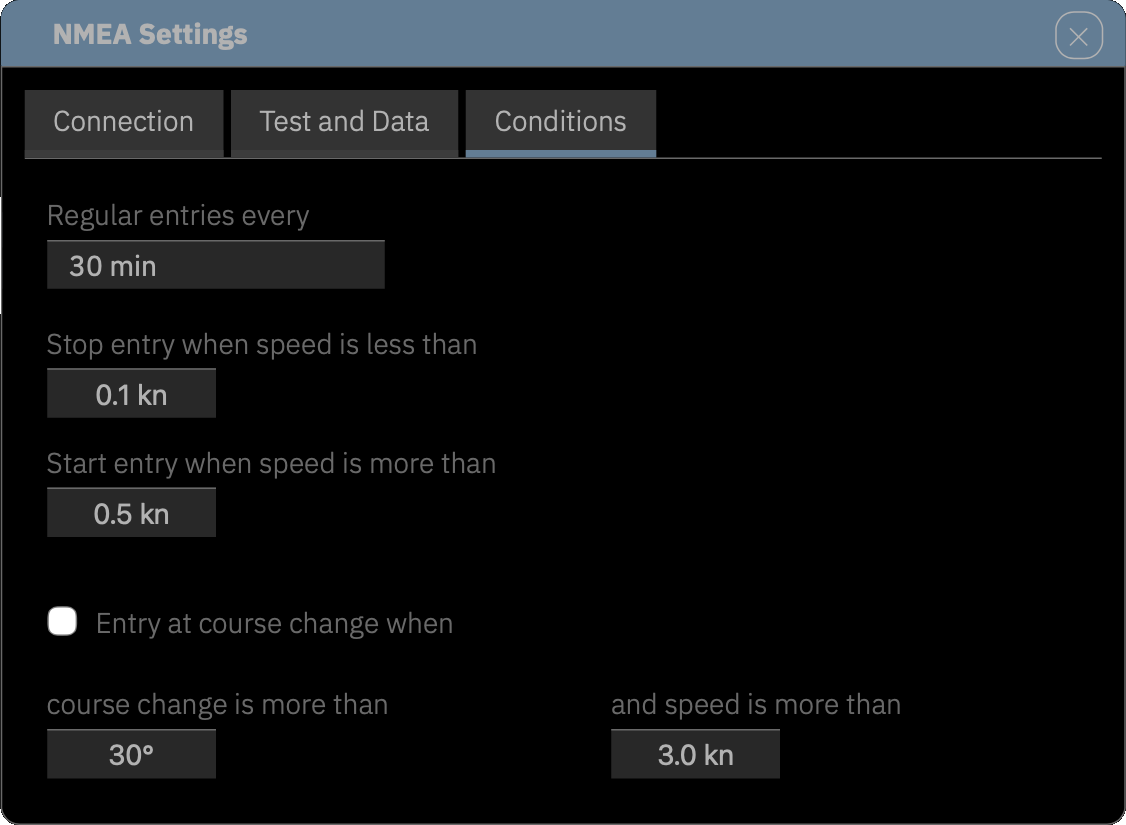
Basically, LOGBOOK creates a log entry every full hour. With the 30 min option, an additional log entry can be created at the half hour (i.e., an entry every 30 minutes).
LOGBOOK automatically detects when the ship is underway and when it is not. A log entry is created at the beginning and end of each travel interruption. The duration of the interruption is subtracted from the total time when calculating travel time.
In the dialog, you can specify the speeds below which (Stop entry when speed is less than ) a stop entry is created and above which (Start entry when speed is more than ) the ship is underway again. The default values of 0.1 kn and 0.5 kn have proven effective and should only be changed if they have proven unsuitable for the ship. They usually also work well when the ship is at anchor.
With Entry on course change when , LOGBOOK creates a log entry for course changes larger than the specified angle. The minimum angle should not be chosen too small, otherwise ship movements due to wind and waves can generate log entries. Our default of 30° should not be undercut under any circumstances.
Additionally, a speed can be specified under and speed is more than above which log entries are created at all for course changes. This prevents an extremely large number of log entries from being created, for example, when maneuvering in the harbor and during anchoring maneuvers.
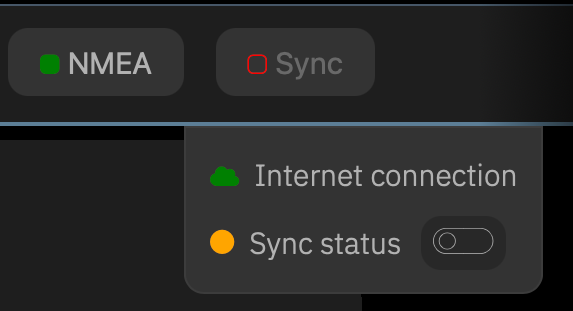
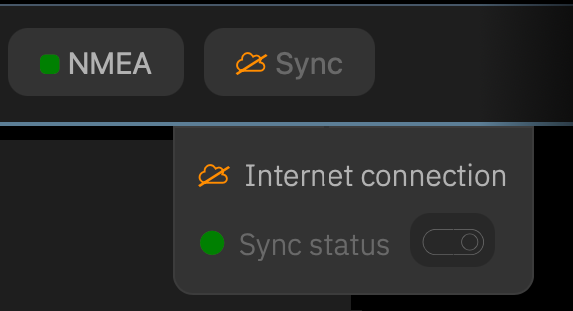
A green, filled marker ■ on the Sync menu button indicates that the Primary Device is connected to the internet and data is being synchronized with the LOGBOOK Cloud. The marker turns orange when there were problems with the last synchronization, and red when synchronization has been disabled by the user. If the marker shows a crossed-out cloud  , there is currently no internet connection.
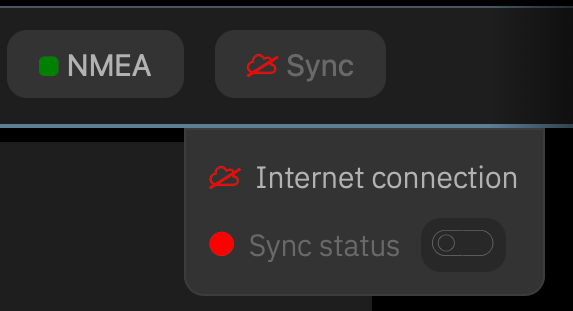
The menu has two menu items. The Internet connection menu item shows whether the Primary Device is connected to the internet (green cloud or red, crossed-out cloud).
The second menu item, Sync status, is a toggle switch to turn synchronization with the LOGBOOK Cloud on and off. When synchronization is active, the marker of the menu item is green; when synchronization is turned off, it is red. If synchronization is turned on but couldn't synchronize, the button is orange instead of green.
When synchronization is active, LOGBOOK automatically establishes a connection to the LOGBOOK Cloud as soon as an internet connection exists. Changed data is regularly uploaded to the LOGBOOK Cloud. If internet and synchronization are enabled but the last synchronization could not establish a connection to the LOGBOOK Cloud, this is indicated by an orange marker and will be retried next time.
If synchronization is manually turned off by the user, automatic checking for an internet connection is also disabled.
Disabling synchronization during sailing
Disabling synchronization can be useful if the Primary Device is configured in such a way that there is generally no internet connection during sailing. This saves regular checking for an internet connection.
In this case, however, after completing the voyage, don't forget to establish a connection between the Primary Device and the internet as soon as possible and reactivate synchronization via the Sync status menu item. Only then will the newly recorded data be securely stored in the LOGBOOK Cloud.
In summary, there are the following states of the Sync button:
■ Internet connection and sync active
■ Internet connection and sync active, but last synchronization failed
□ Internet connection active, sync disabled
no internet connection, sync enabled and waiting for internet connection
no internet connection, sync disabled

Right: Internet connection active and synchronization disabled
Right: No internet connection and synchronization disabled
In this section, you will find detailed descriptions of LOGBOOK's views and the information stored there.
In the timeline itself, only the most important data is displayed for each element (voyage, passage, day, log entry). LOGBOOK shows additional data on the corresponding data sheets.
For voyage, passage, and day, the data sheet is displayed with the arrow button ![]() . Clicking on the reverse arrow button
. Clicking on the reverse arrow button ![]() hides the data sheet again. For voyage and passage, the data area shifts the following rows downward; for day, the button switches between the day's data sheet and the list of log entries. In the focus view, the current day's data sheet always remains visible above the log entries so that the input fields there are quickly accessible.
hides the data sheet again. For voyage and passage, the data area shifts the following rows downward; for day, the button switches between the day's data sheet and the list of log entries. In the focus view, the current day's data sheet always remains visible above the log entries so that the input fields there are quickly accessible.
The data sheet of a log entry is displayed and hidden by clicking on the entry line.
The data sheets contain multiple cards with data, settings, and displays.
At the very top of the window, directly below the menu bar, is the Ship area. Here LOGBOOK displays important information about the ship: the vessel type and ship name, as well as additional information such as call sign, MMSI, etc., which can be added later. To the right of the information are menu buttons that provide access to functions appropriate for the current situation.
Extensive additional information about the ship can be entered in the ship data, which is displayed instead of the timeline via the menu command
In the overview, all voyages are displayed along the timeline with name and time period. By clicking on a voyage, LOGBOOK switches from the overview to the display of the selected voyage. LOGBOOK then shows a section of the entire timeline that extends from the first to the last day of the voyage. As a title, the name of the voyage and the date of the first and last day are displayed above the timeline.
The button ![]() to the left of the voyage name displays and hides the voyage's data sheet. The data sheet contains multiple cards.
to the left of the voyage name displays and hides the voyage's data sheet. The data sheet contains multiple cards.
On the Voyage card, a name for the voyage can be set.
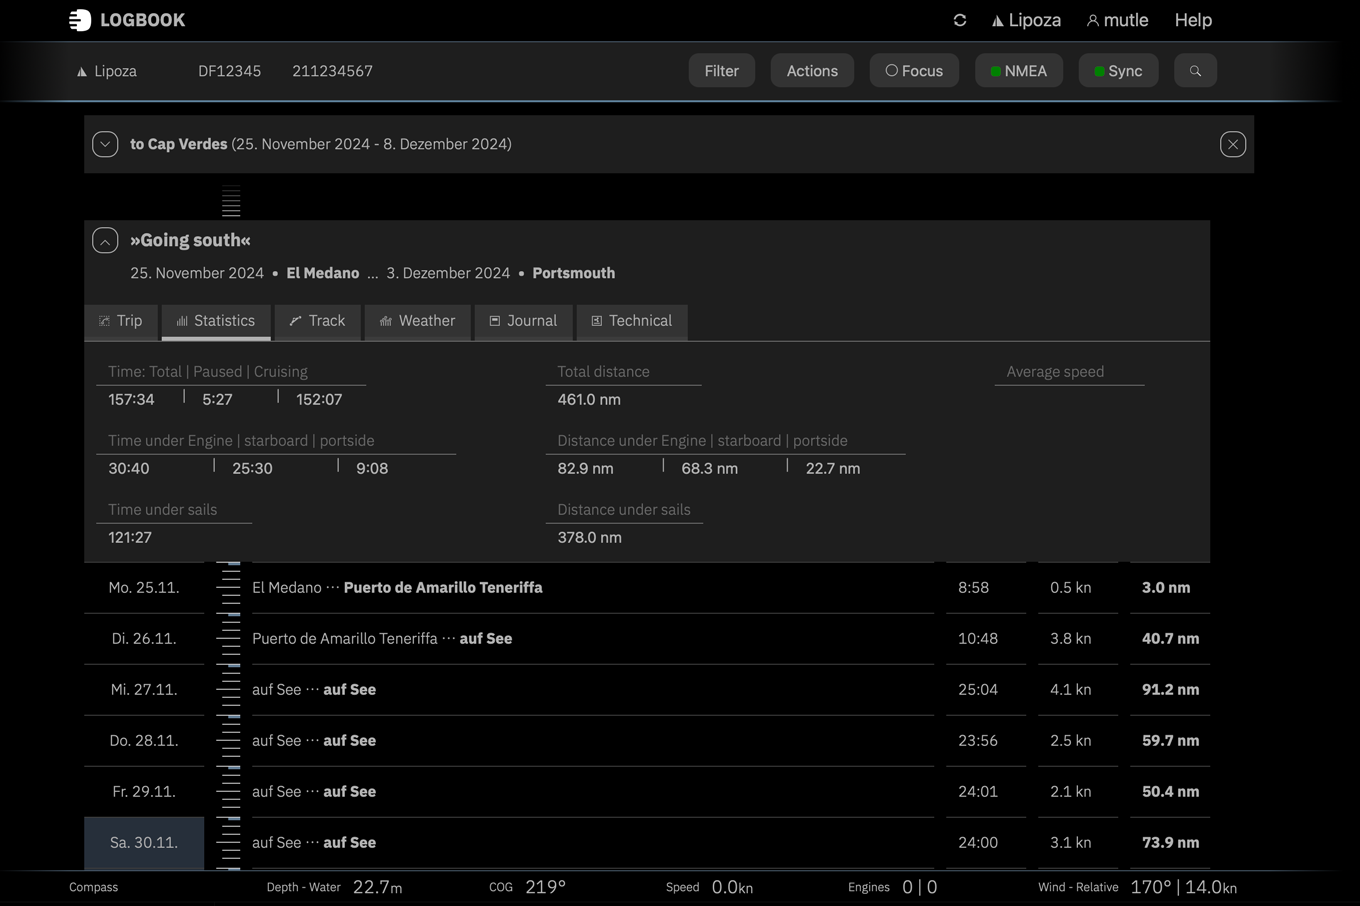
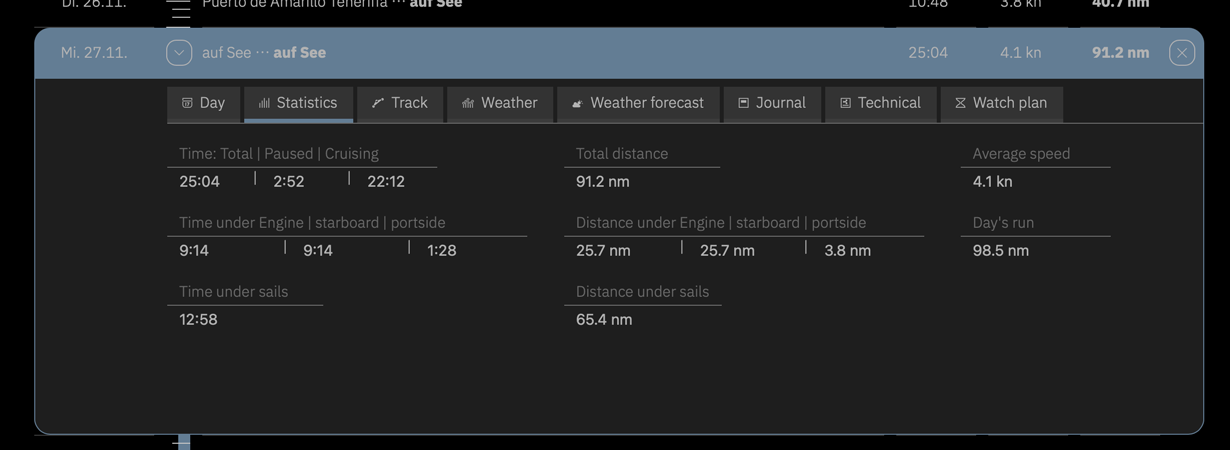
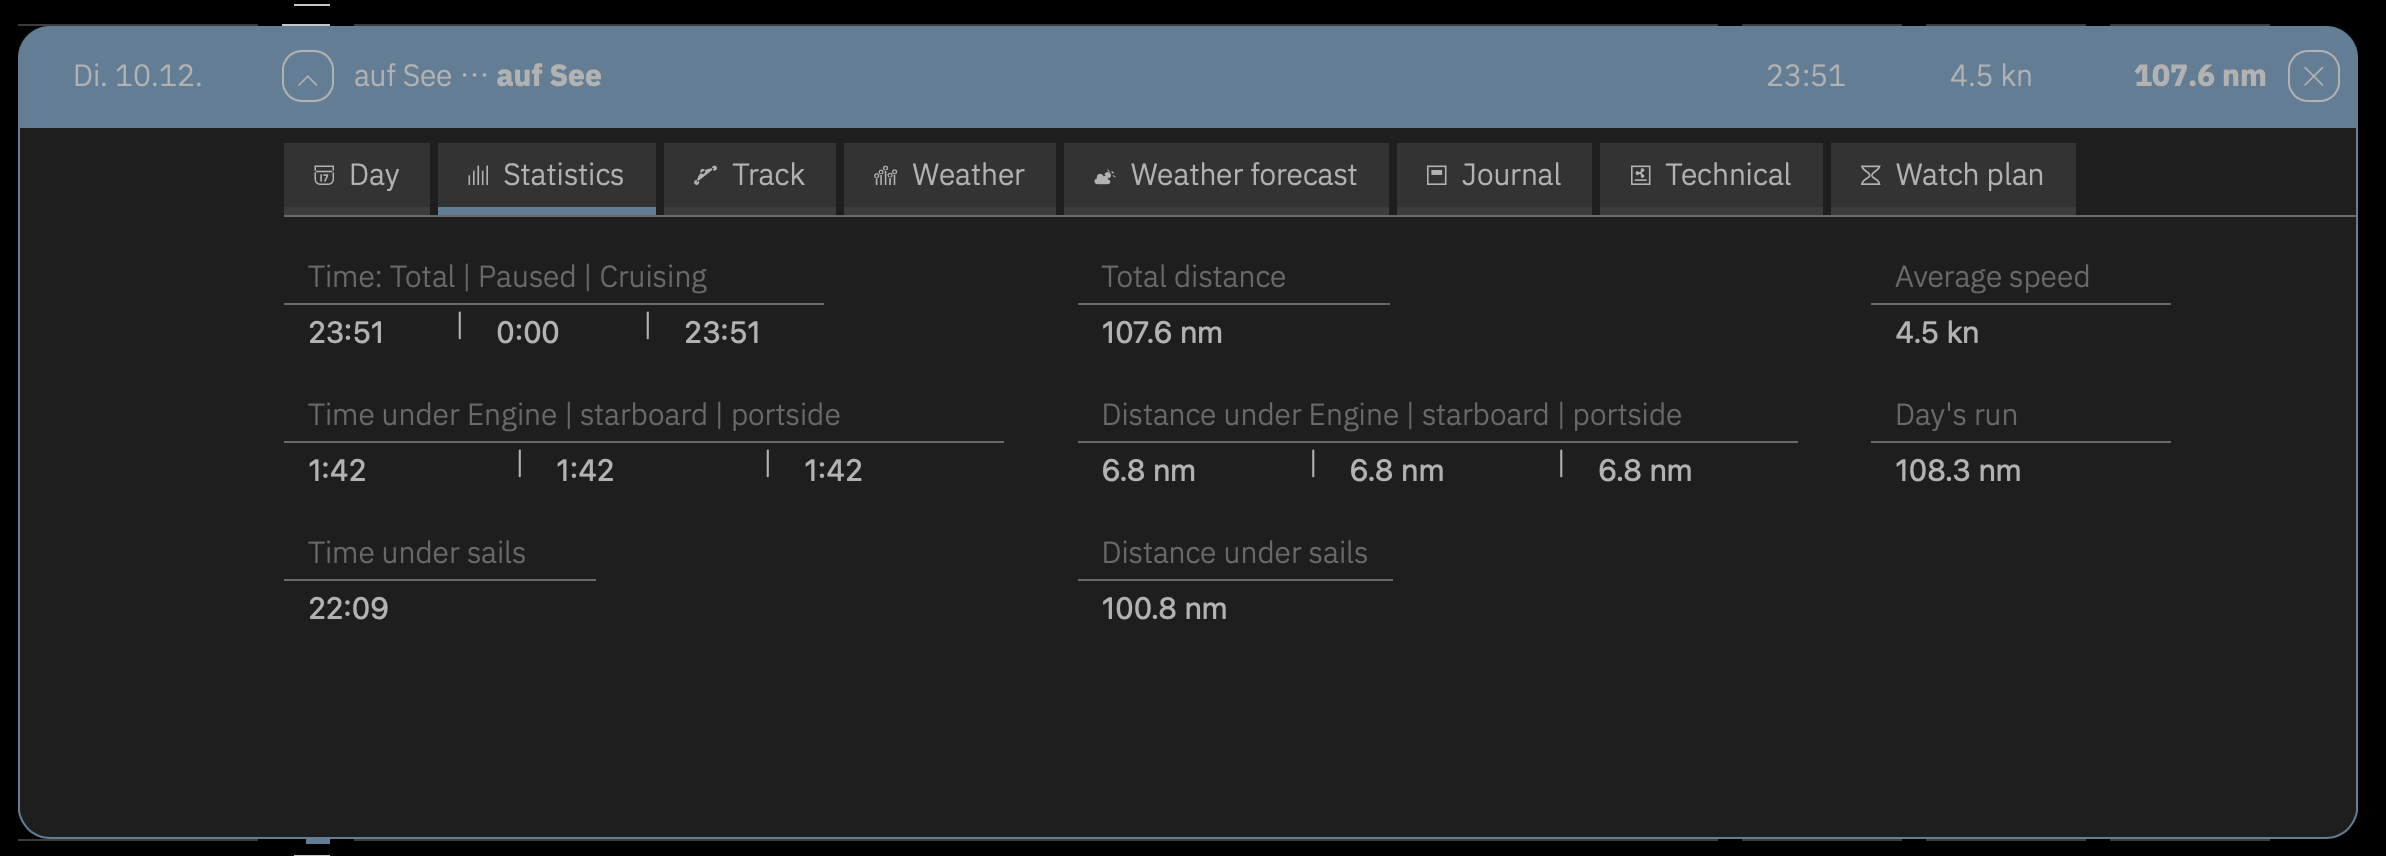
The Statistics card shows the summary and evaluation of the voyage. This includes the total time, total distance, and where applicable, the distance and times under engine and under sail. All fields on this card are calculated by LOGBOOK and are not editable.
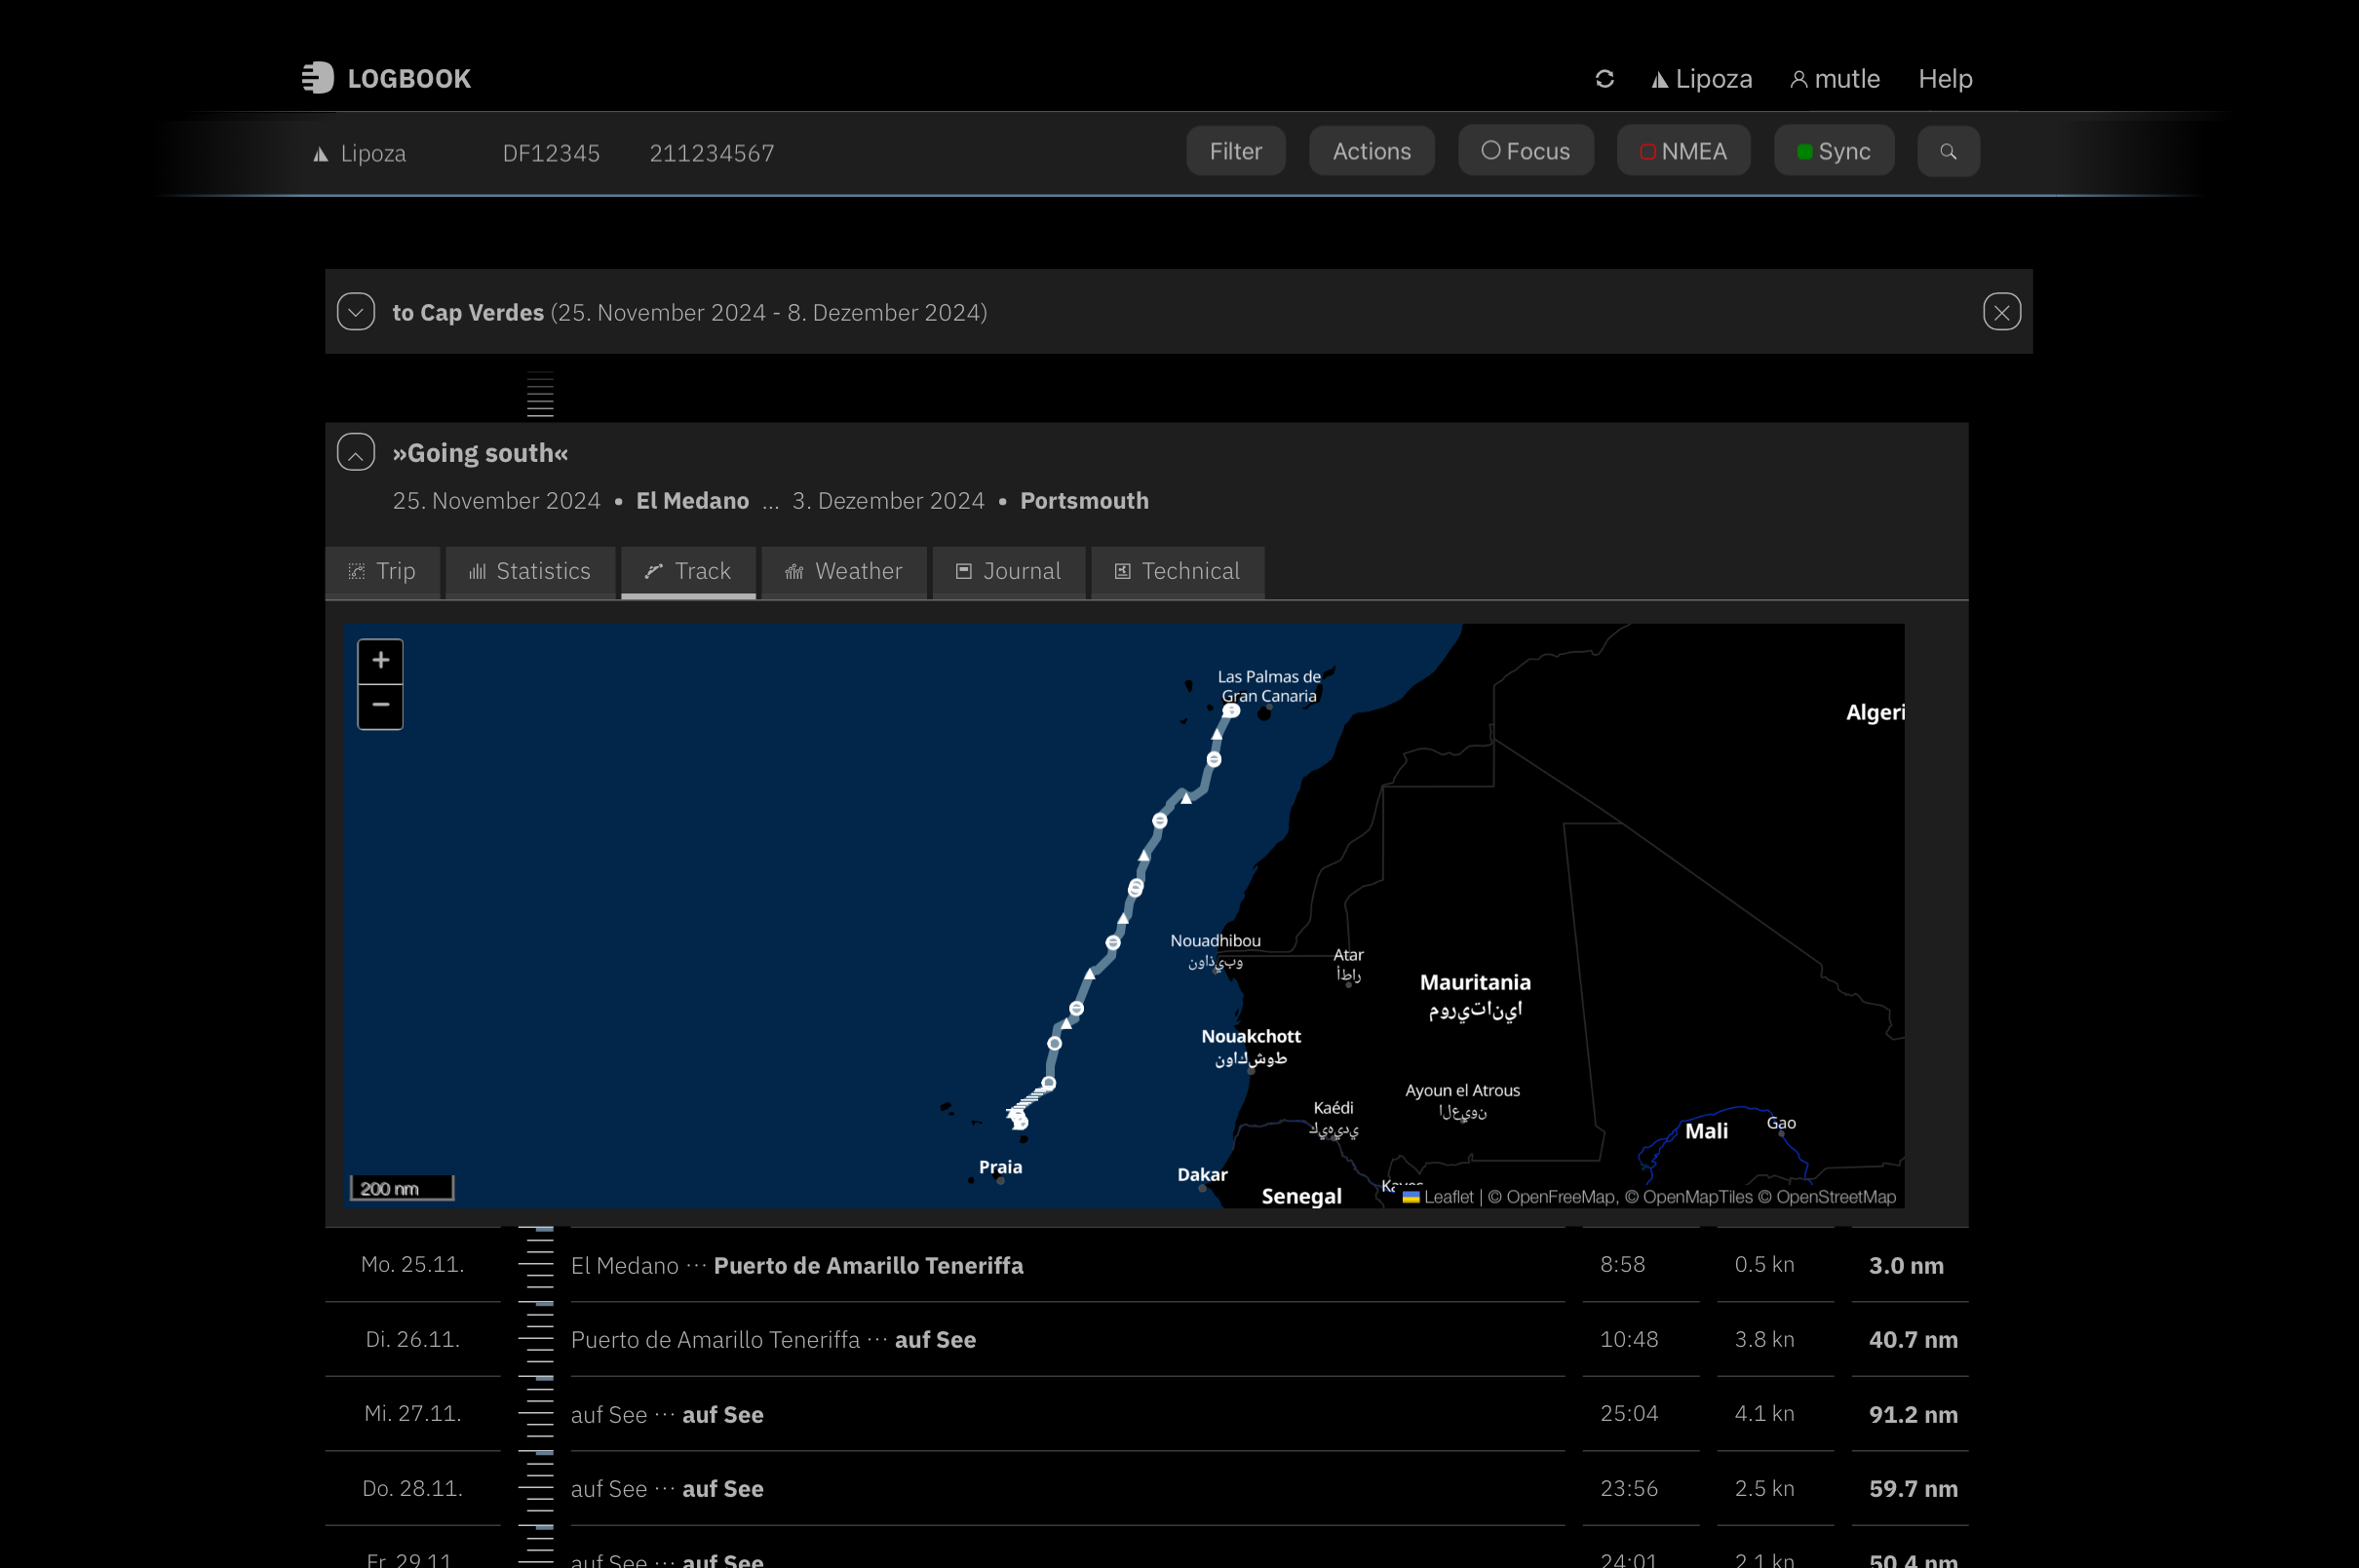
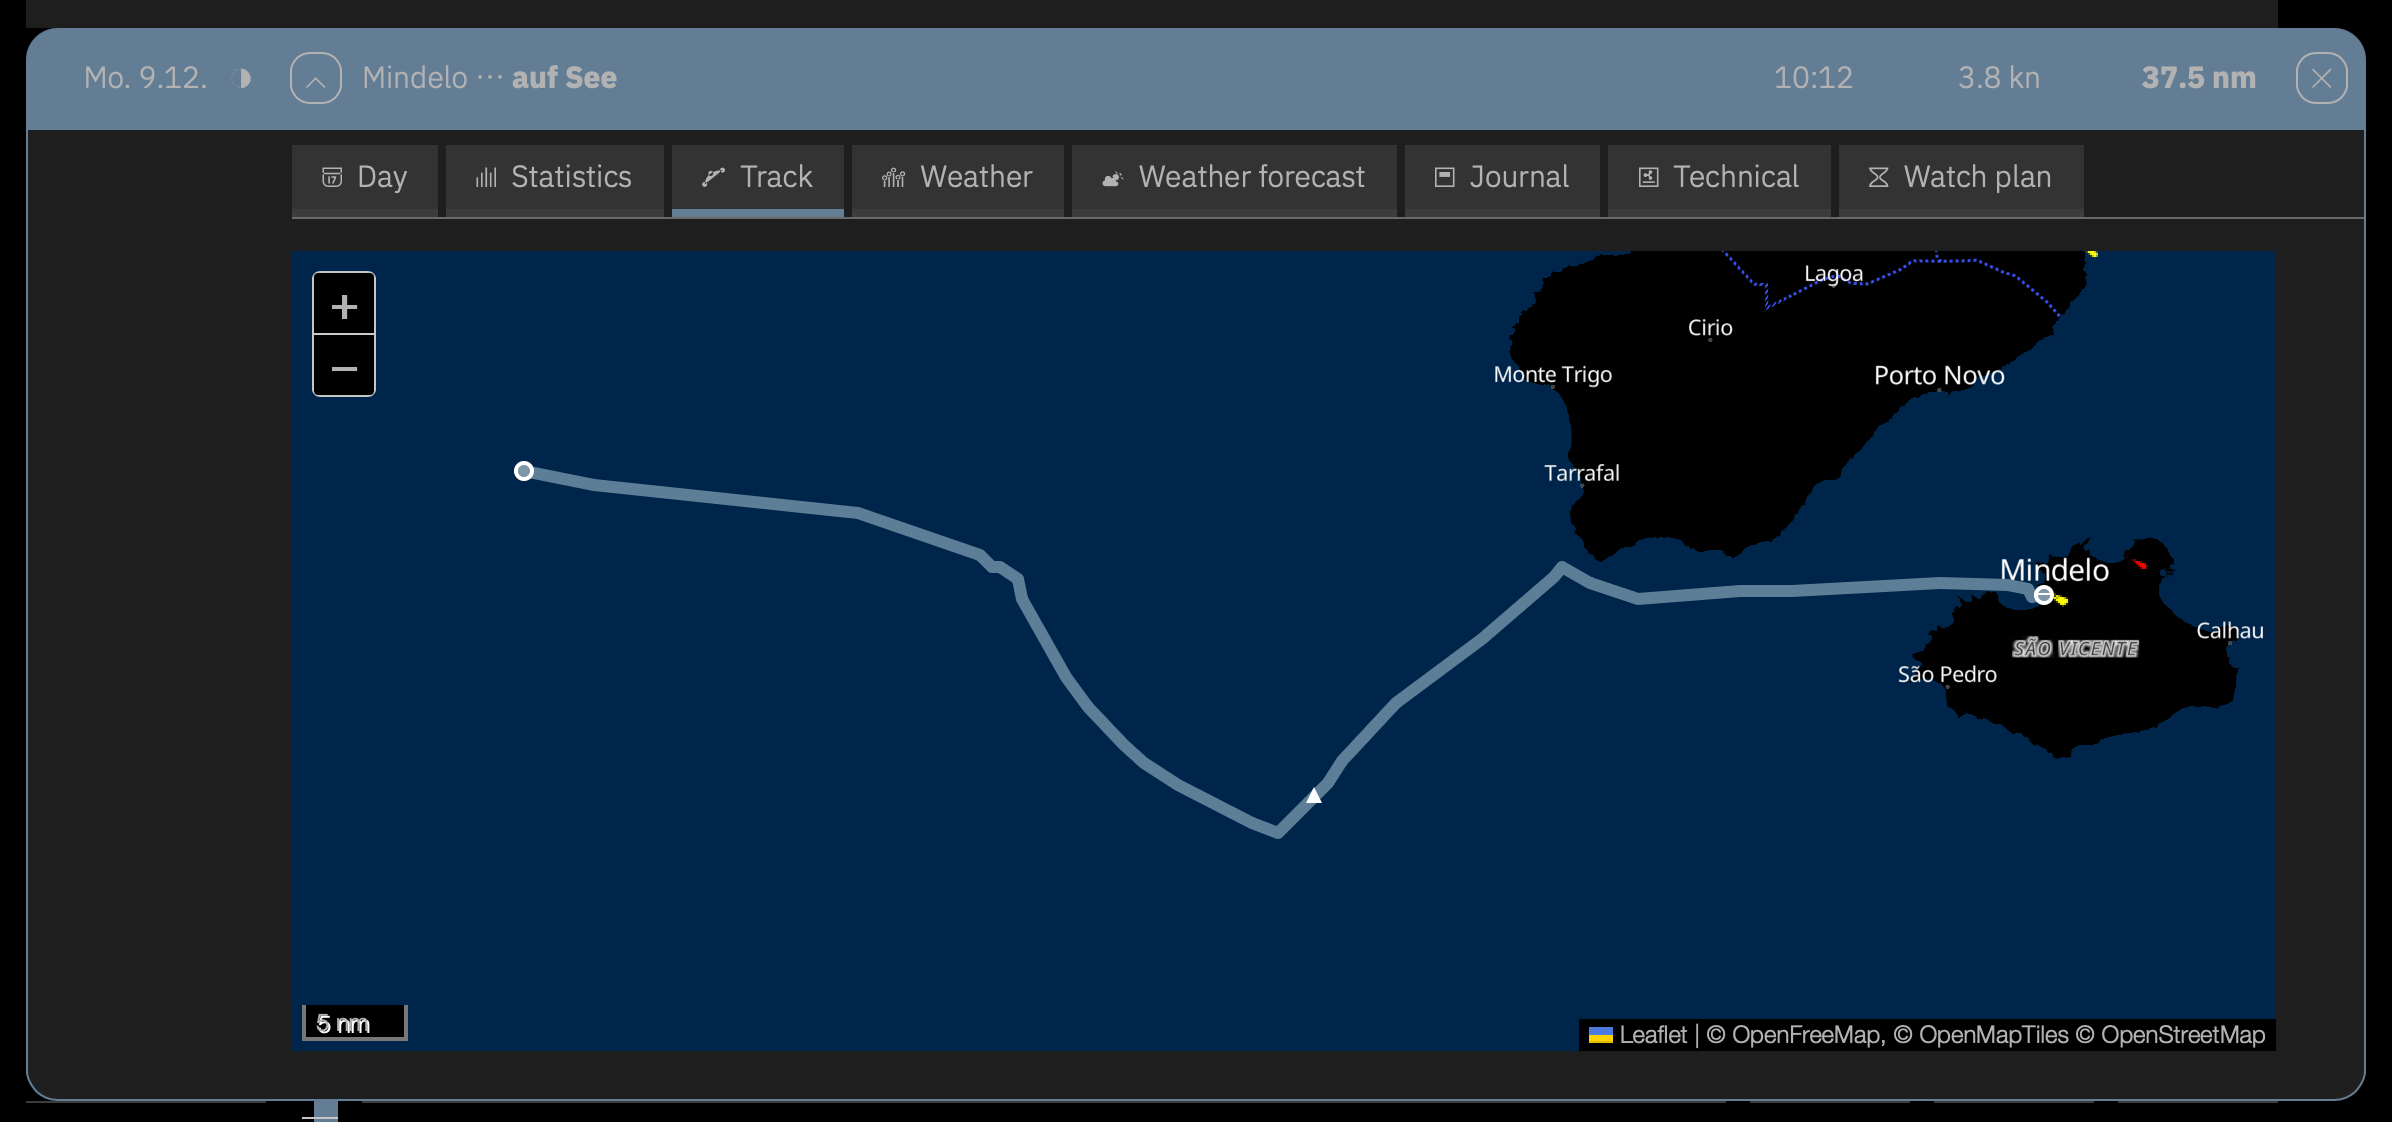
On the Track card, the track of all completed days of the voyage is displayed on a nautical chart. Points mark the locations recorded in the logbook. The marks on the track line correspond to the hours. The lines for 4:00 h, 8:00 h, 12:00 h, 16:00 h, and 20:00 h are slightly longer, similar to the timeline. Arrows indicate the direction of the individual track sections.
The Voyage plan card allows for planning the voyage in advance. A date or other free time specification can be entered in the first field, a location targeted for this date in the second field, and a comment on this section of the voyage in the last field. Additional rows are added with the Add new note button below the last row.
On the Print card, you can print an overview of the voyage using the Print this voyage button. At the top of the print window, the Print Settings dialog appears. There are no additional options for printing the voyage. The print preview shows exactly what will be printed. The layout includes the voyage's track, overall statistics, and a brief list of passages. The Print button opens the operating system's print dialog, which typically also allows creating a PDF.
Directly below the voyage area begins the first passage of this voyage. The title line shows the passage's name as well as the location and date at the start and end of the passage.
With the arrow ![]() to the left of the name, the passage's data sheet is displayed.
to the left of the name, the passage's data sheet is displayed.
On the Passage card, a name for the passage can be assigned. Under Timezone, when starting a new passage, the ship timezone is set to the system time of the Primary Device. For verification, Current time shows the current time in this timezone.
Caution: After starting data recording, the timezone can no longer be changed.
LOGBOOK Displays the Wrong Timezone
In rare cases, the operating system of the Primary Device may not transmit the timezone correctly to LOGBOOK. In this case, you have the option to set a different timezone in Ship Settings on the Settings card. This timezone also only applies to passages started after the change. A change has no effect on an already started passage.
The Statistics card shows an evaluation of all times and distances of the passage, evaluations for the individual engines and for sailing. During an ongoing passage, the current total and average values up to the last log entry are always displayed here. All fields on this card are calculated by LOGBOOK and are not editable.
On the Track card, the track all completed days of the passage is displayed on a nautical chart. Points mark the locations recorded in the logbook. The marks on the track line correspond to the hours. The lines for 4:00 h, 8:00 h, 12:00 h, 16:00 h, and 20:00 h are slightly longer, similar to the timeline. Arrows indicate the direction of the individual track sections.
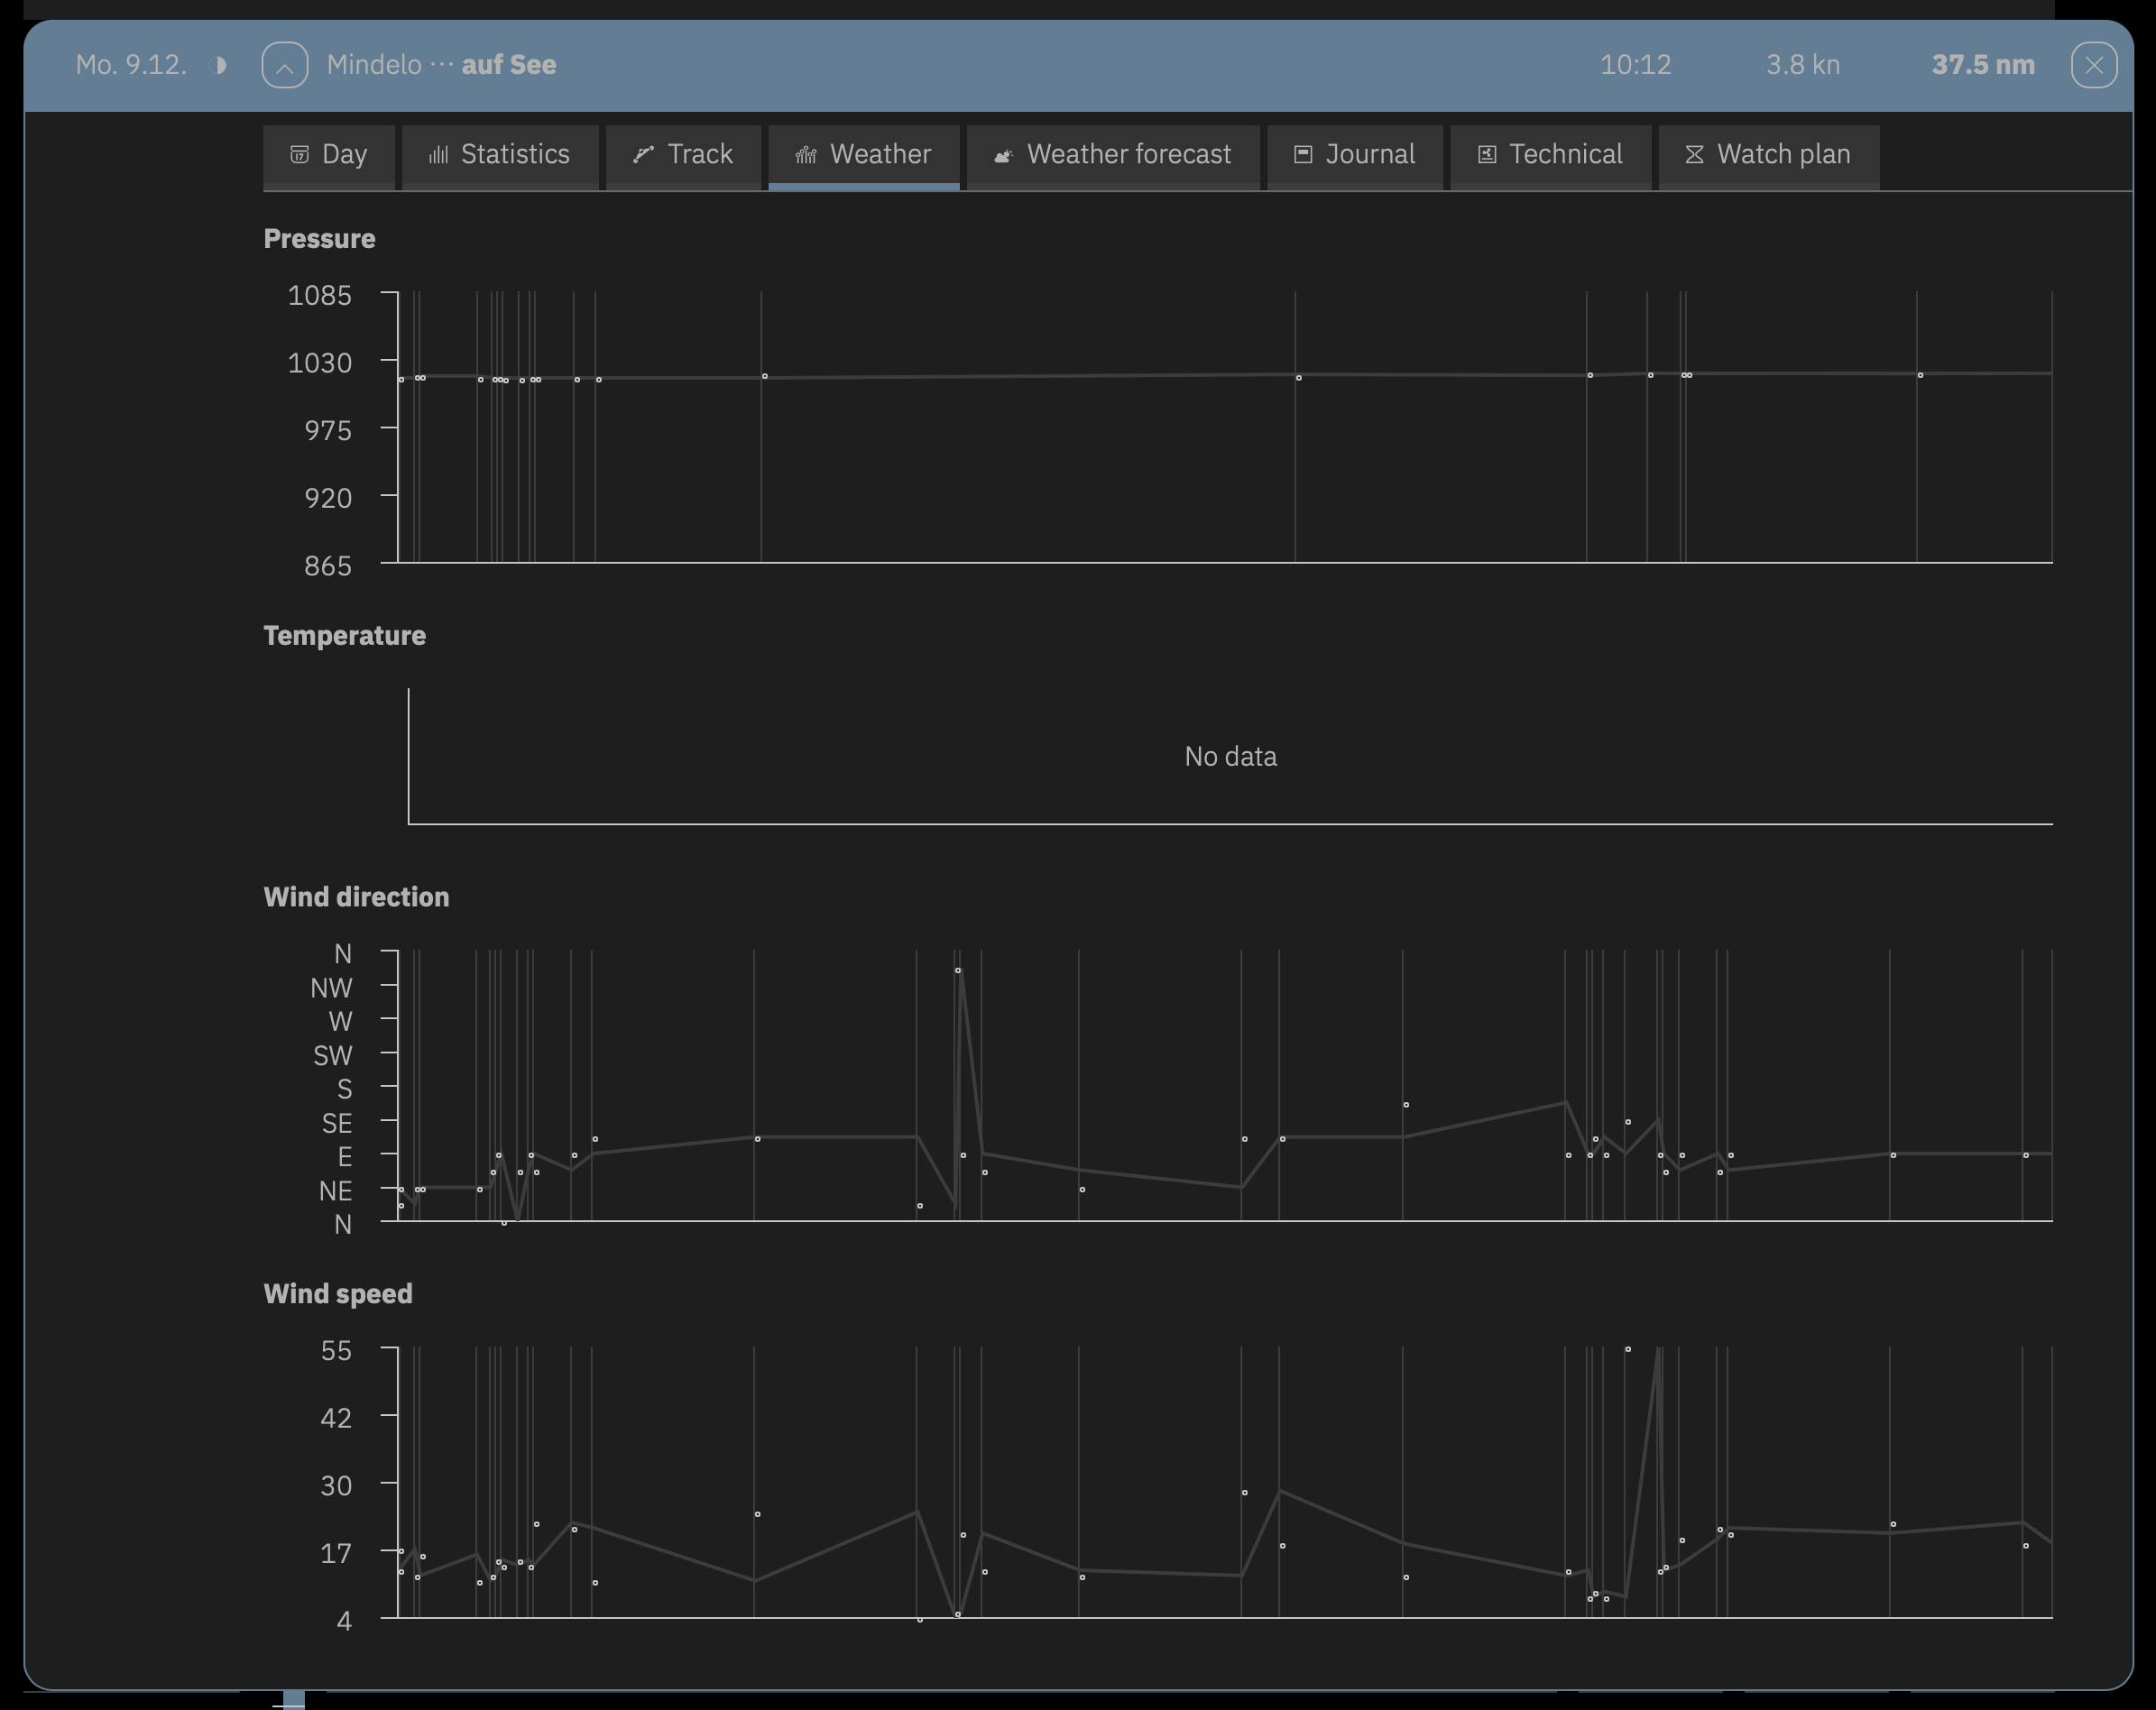
On the Weather card, curves show the progression of air pressure, air temperature, wind speed, and wind direction during the passage. The curves are generated from the values recorded during the passage.
The Journal card is intended for personal comments on the passage. A heading, longer text, and images can be inserted on the card.
With the Add button additional journal entries for the passage can be recorded.
The lower part of the card provides access to all journal entries that were recorded on the Journal cards of the passage's days. The entries are directly linked to the respective day's card.
The Technical card is used to record technical problems that affect the entire passage. Each technical note consists of a title and description and can be supplemented with photos or PDFs.
With the Add, additional technical notes can be recorded.
The lower part of the card provides access to all technical notes that were recorded on the Technical cards of the passage's days. The entries are directly linked to the respective day's card.
On the Print card, the print function for passages is started. The printout can include either all passages of the voyage (Print all passages of this voyage) or only the current passage (Print this passage).
The Print Settings dialog offers various options that determine what should be printed. For example, you can choose between a short list of days and a detailed list with statistics, etc. The print preview shows exactly what will be printed. The Print button opens the operating system's print dialog, which typically also allows creating a PDF.
Along the timeline of a voyage, all days of the voyage are listed. For days that have entries in LOGBOOK, the line shows the following information from left to right:
The values displayed for the current day are always the current total values, even if the day has not yet been completed. The time period during which the ship was underway on the respective day is highlighted in color on the timeline. The marks divide the day into 4-hour sections.
For days without entries, the timeline is shortened and only the weekday, date, and moon phase are displayed in small font, no other data. For longer periods without entries, the timeline can be compressed even further so that there is not a separate line for each day.
Additional information about the day can be displayed by clicking on the day's line. When a day is selected (colored header), an arrow button is displayed in the header instead of the timeline, which can be used to switch between the day's data sheet and the list of all log entries for the day. (You can read more about log entries here: The Log Entries).
The log entries are listed arranged along the timeline according to the time. The timeline is stretched where necessary. The area of the timeline for which there are log entries is highlighted in color.
The day data sheet shows all entries and evaluations related to the entire day on multiple cards.
Days can only be edited in focus view
Entries on the day data sheets are only possible in focus view. Since the focus view only shows the current, previous, and next day, this also means that additions to the entries on the day data sheet are only possible for the current and next day. For older days, all fields on the day data sheet are locked.
On the first card of the day data sheet, the start and destination locations can be entered, as well as the names of the persons who are on board on this day. When starting a new day, LOGBOOK automatically inserts the destination location of the previous travel day as the start location. Skipper, crew, and passengers are also transferred from the previous day. These entries can be edited in the focus view.
The ship status during the day and during the night displayed with icon and text in the Day and Overnight fields is automatically determined during travel and when ending the day.
The Timezone is identical for all days of a passage and was set when starting the passage.
Under Comment (at the very bottom of the data sheet), a free comment with a brief remark about the day can be entered. This comment is also displayed in the day line.
Correctly recording time-based and day-based remarks
More extensive remarks that relate to the entire day can be entered on the Journal or Technical cards.
Time-based comments should be recorded directly in the log entry in the Comment field or, if applicable, on the Watch card.
Under Skipper, the name of the person in charge of the ship on this day is entered, under Crew all crew members (persons who take on tasks during travel), and under Passengers all passengers, i.e., all fellow travelers who do not take on tasks on board.
For Crew and Passengers, the + button displays a person selection list. Multiple persons can be selected in sequence. For Skipper, the selection list is opened by clicking on the field, since only one person can be entered here.
In the selection lists, the persons from the ship's person list who have an appropriate crew role and have not already been added to the field are listed. Any number of persons can be added to the Crew and Passengers fields. When selecting a person as skipper, this person is automatically also inserted into the crew list.
For all three selection lists, the Add Person entry at the top of the selection list opens a dialog that can be used to add a new person to the ship's person list. In the dialog, the full name and a short name up to 10 characters long must be entered.
The new person automatically receives the crew role corresponding to the field from which they were created. The crew role determines for which function the person is available for selection in LOGBOOK going forward. After creating the new person, they appear directly in the field. Only the short name is displayed.
With to the right of the name of a person inserted in the field, this person can be removed from the field again.
Changes to the Crew During Travel
The entry under Skipper and the lists Crew and Passengers are a very important component of a legally valid logbook. Therefore, LOGBOOK creates a log entry documenting the change for every modification made to these fields while the ship is underway.
We strongly recommend checking the entries in these fields before starting. This prevents apparent discrepancies regarding the persons on board.
The person list belongs to the ship data and can be displayed via the Ship data menu command from the Ship menu. Here, the name and short name can be changed and, if necessary, the crew role can also be adjusted. All changes are directly reflected in the LOGBOOK display. Additional persons can be added with the Add Person button. The crew role must also be selected. Persons with the crew role None are only available for selection in the Passengers selection list.
With the toggle button Activate/Deactivate, you can control which persons should be available for selection in the selection lists on the day data sheet. Deactivated persons are moved to the lower part of the list.
The second card Statistics shows an evaluation of all times and distances of the day, evaluations for the individual engines and for sailing. During an ongoing day, the current total and average values from first to last log entry are displayed here. (In contrast, the log row shows the ongoing current values since the first log entry.) All fields on this card are calculated by LOGBOOK and are not editable.
On the Track card, the day's track is displayed on a nautical chart. The marks on the track line correspond to the hours. The lines for 4:00 h, 8:00 h, 12:00 h, 16:00 h, and 20:00 h are slightly longer, similar to the timeline. An arrow indicates the direction of the track.
The map section can be zoomed in and out and can be moved within the window.
On the Weather card, curves show the progression of air pressure, air temperature, wind speed, and wind direction over the day. The curves are generated from the values recorded over the day.
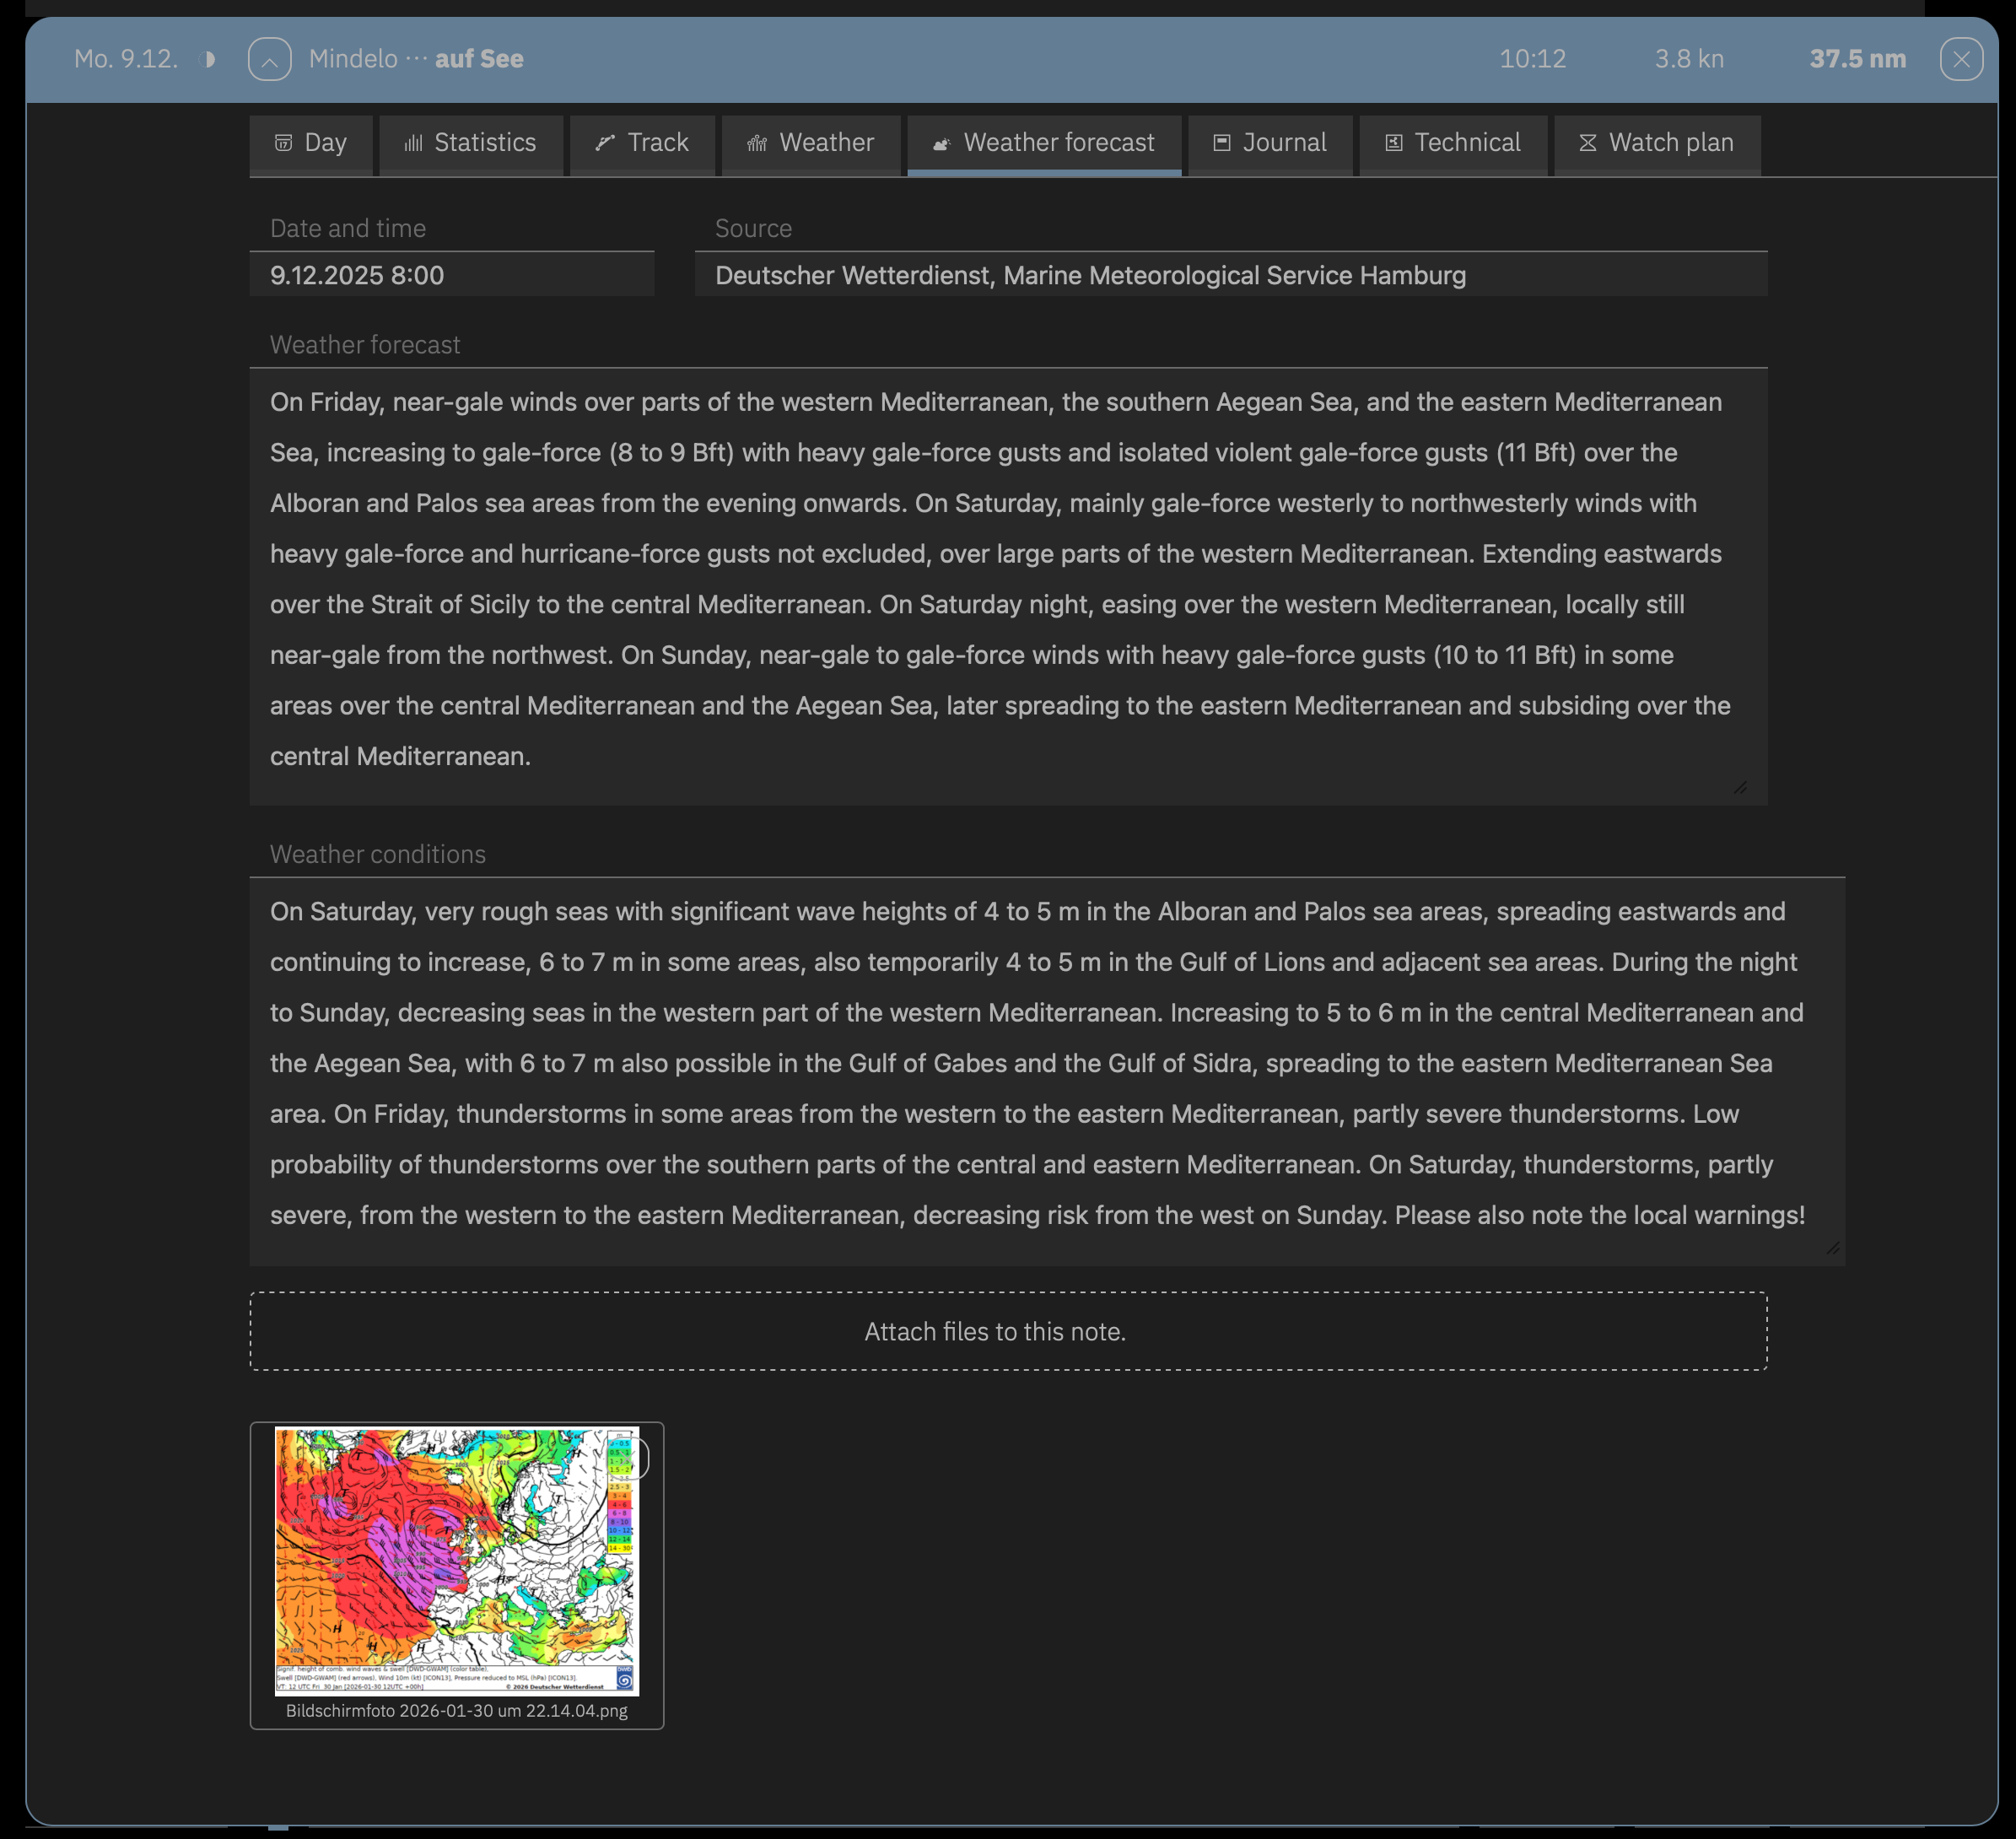
On the Weather forecast card, information from marine weather reports can be compiled. In the top line, Date and time and Source can be entered. Weather forecast is intended for the detailed weather report for the current day, Weather conditions for information about the general weather situation and for a longer-term forecast. The texts can be inserted, for example, from a website with marine weather reports.
Additionally, the card offers image fields where illustrations with weather maps, maps with GRIB data, etc. can be inserted. Clicking on an image displays it enlarged.
The Journal and Technical cards have the same structure as the cards of the same name for the passage. Sets consisting of a title, longer text, and images can be inserted.
The Journal is intended for personal comments about the day, the travel report, etc. Analogously, the Technical card is used for noting technical peculiarities, problems, defects, etc. in text and image.
Clicking on a photo displays it enlarged.

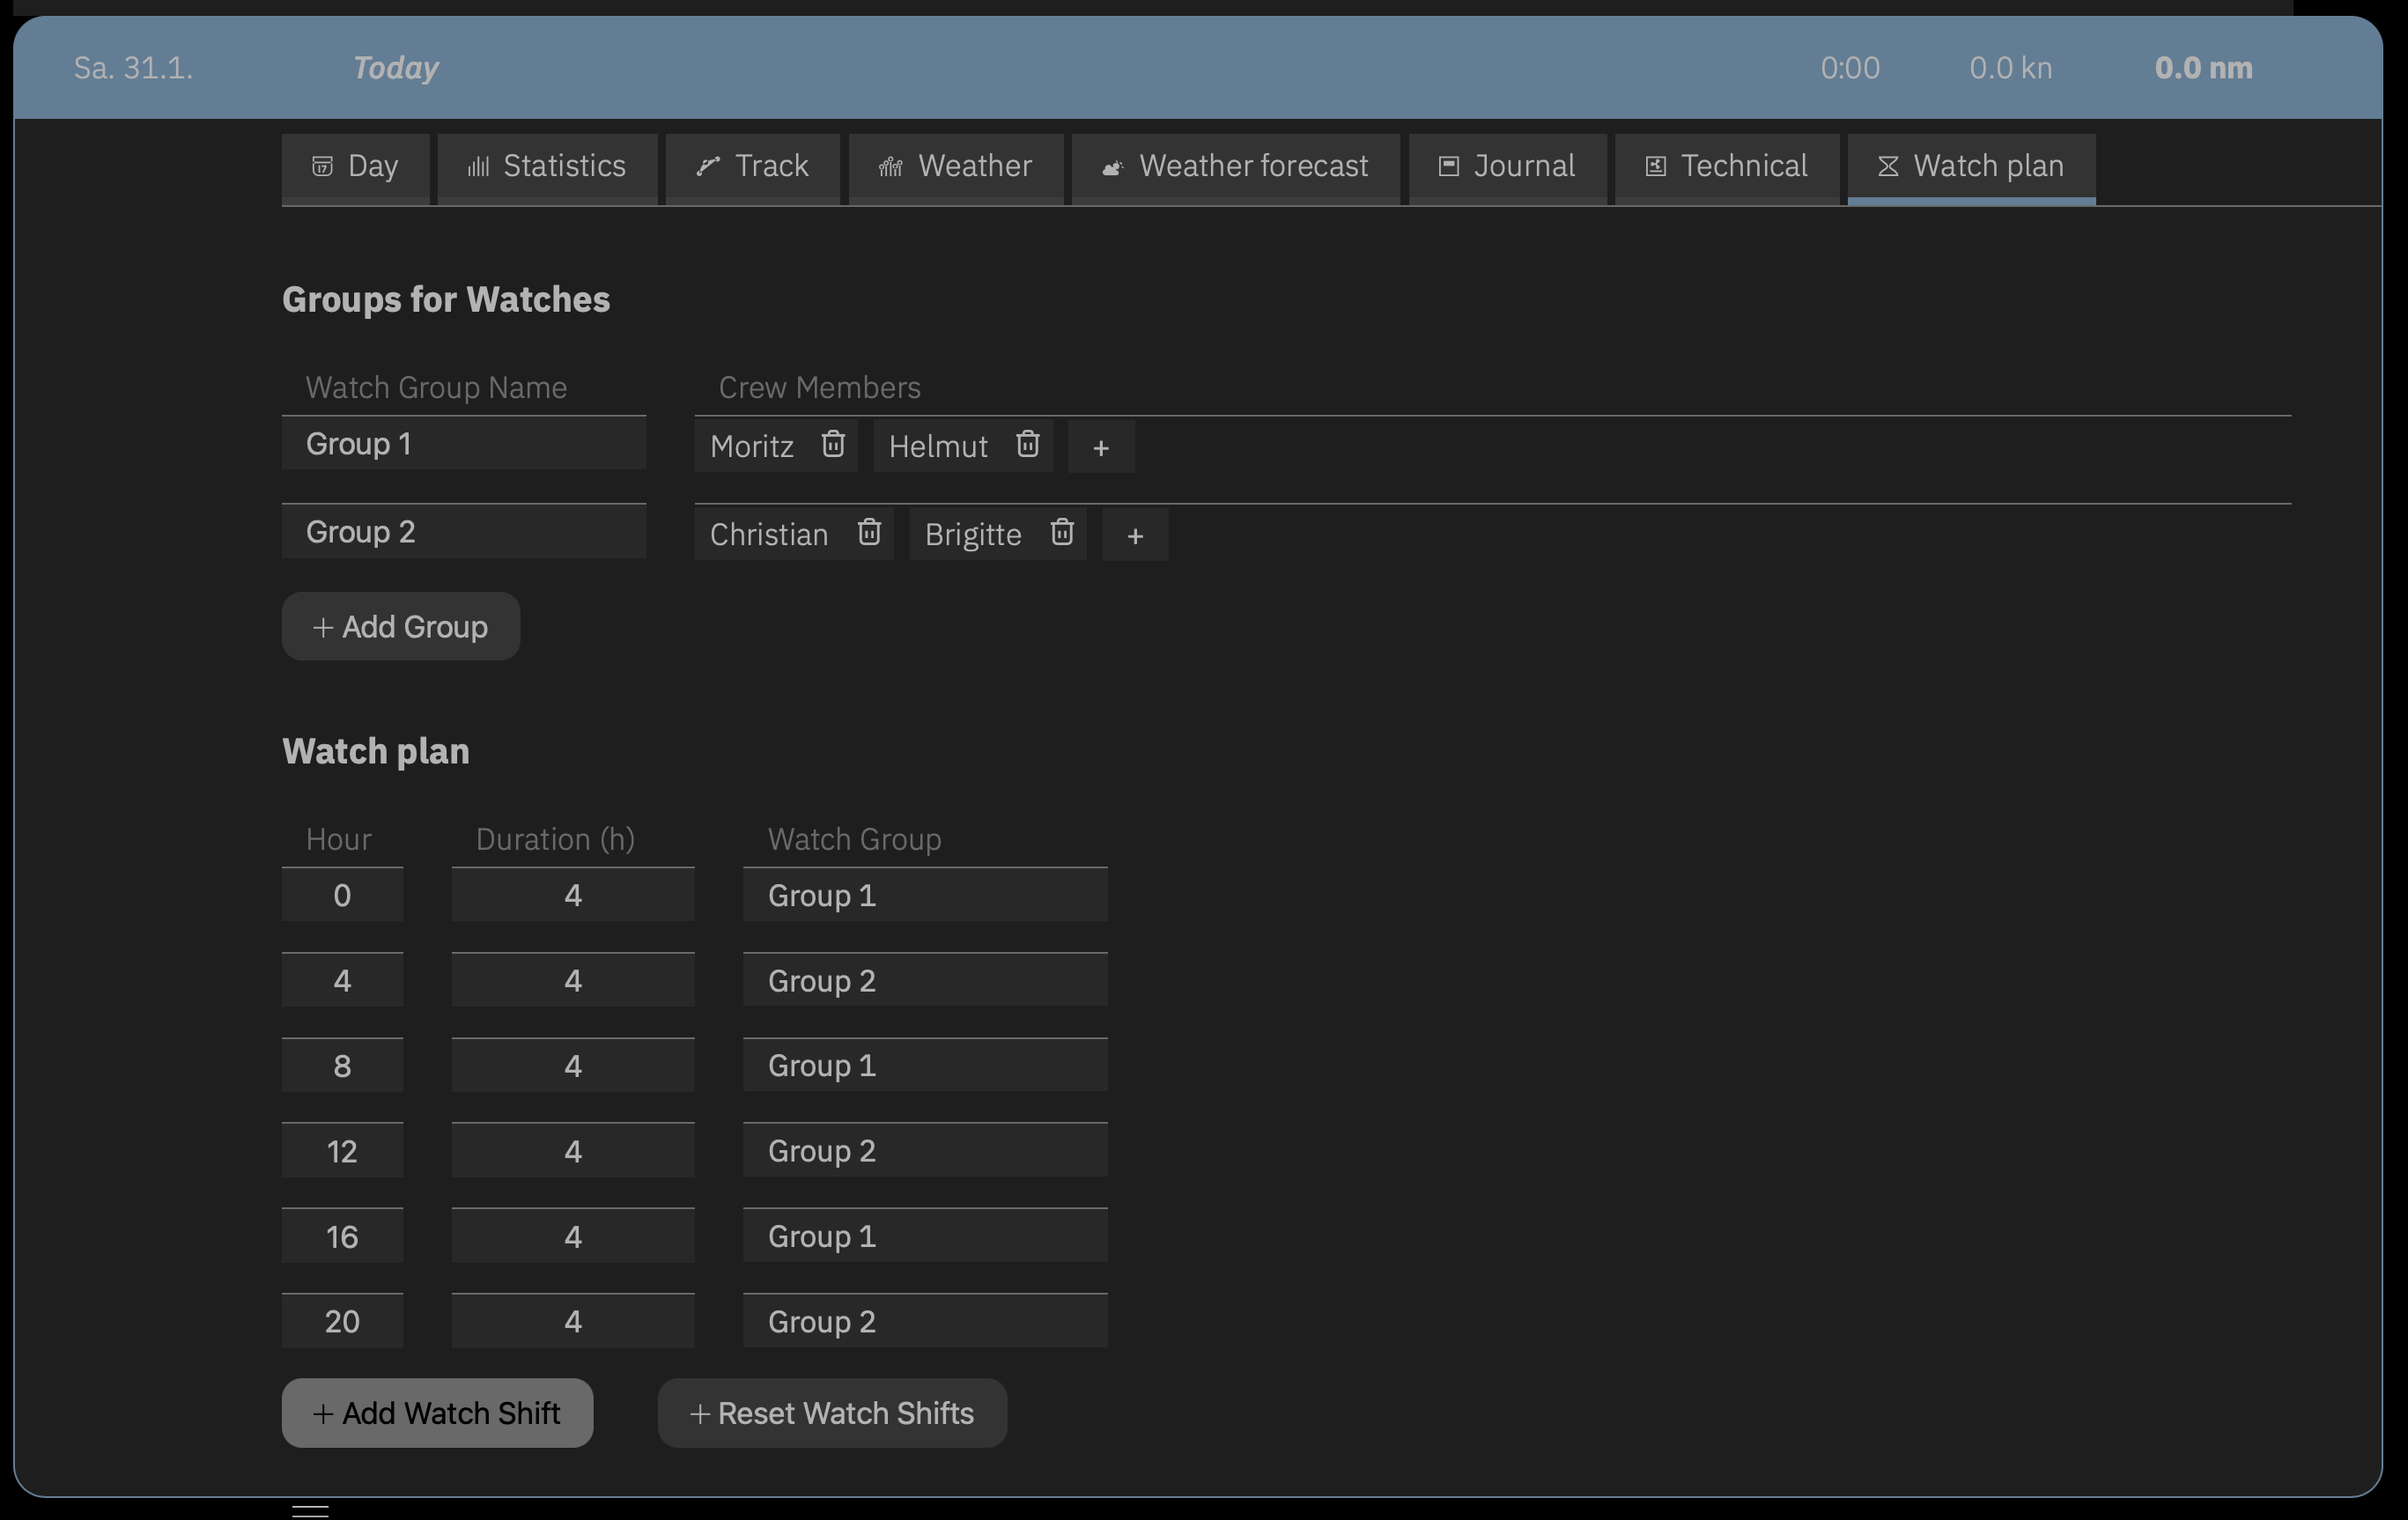
With the functions of the Watch plan card, you can specify who is on watch during which time period.
In the upper area of the card, watch groups are created, i.e., it is determined which persons will take on a watch together. Each watch group receives a unique designation in the first field that may be up to 10 characters long. In the second field, the persons who should be part of the watch group are selected. The selection list of the + button shows all persons from the day's crew list.
In the lower area of the card, the watches during the day can be specified. The first field determines the hour. Usually, watches are distributed starting from midnight, but if travel begins later, the first watch can also start at a different time. In the second field, the duration of the watch is specified in hours, and in the last field, one of the watch groups created above on the card is selected.
The next watch then automatically begins at the hour that results from the previous hour plus duration. Therefore, for this watch, only the duration needs to be entered and the watch group selected.
On the Print card, the print function for days is started. The printout can include either all days of the passage (Print all days of this passage) or only the current day (Print this day).
The Print Settings dialog offers various options that determine what should be printed. Additional information such as Weather forecast, Journal, etc. can be individually activated. If desired, all log entries for the day can also be printed – either just as a list or in full detail. The detailed view also includes the timestamps for creation and last modification of the log entry – which can be important information in case of evidence.
The print preview shows exactly what will be printed. The Print button opens the operating system's print dialog, which typically also allows creating a PDF.
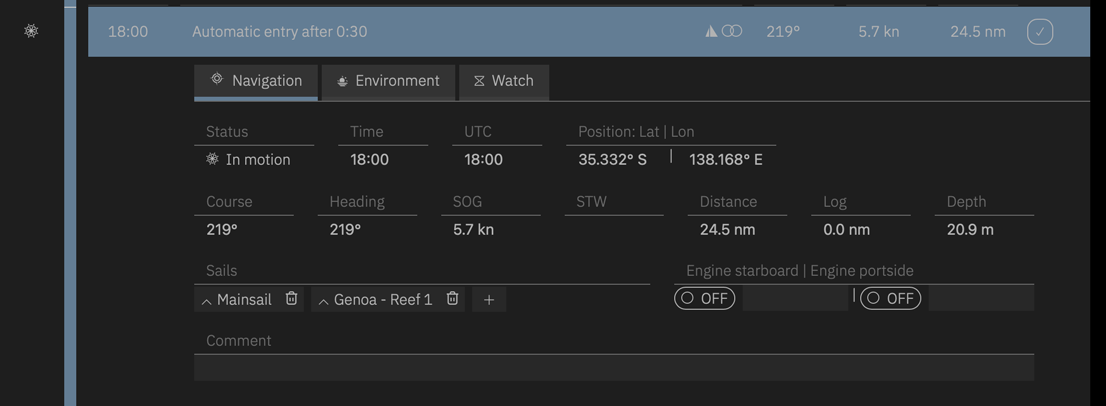
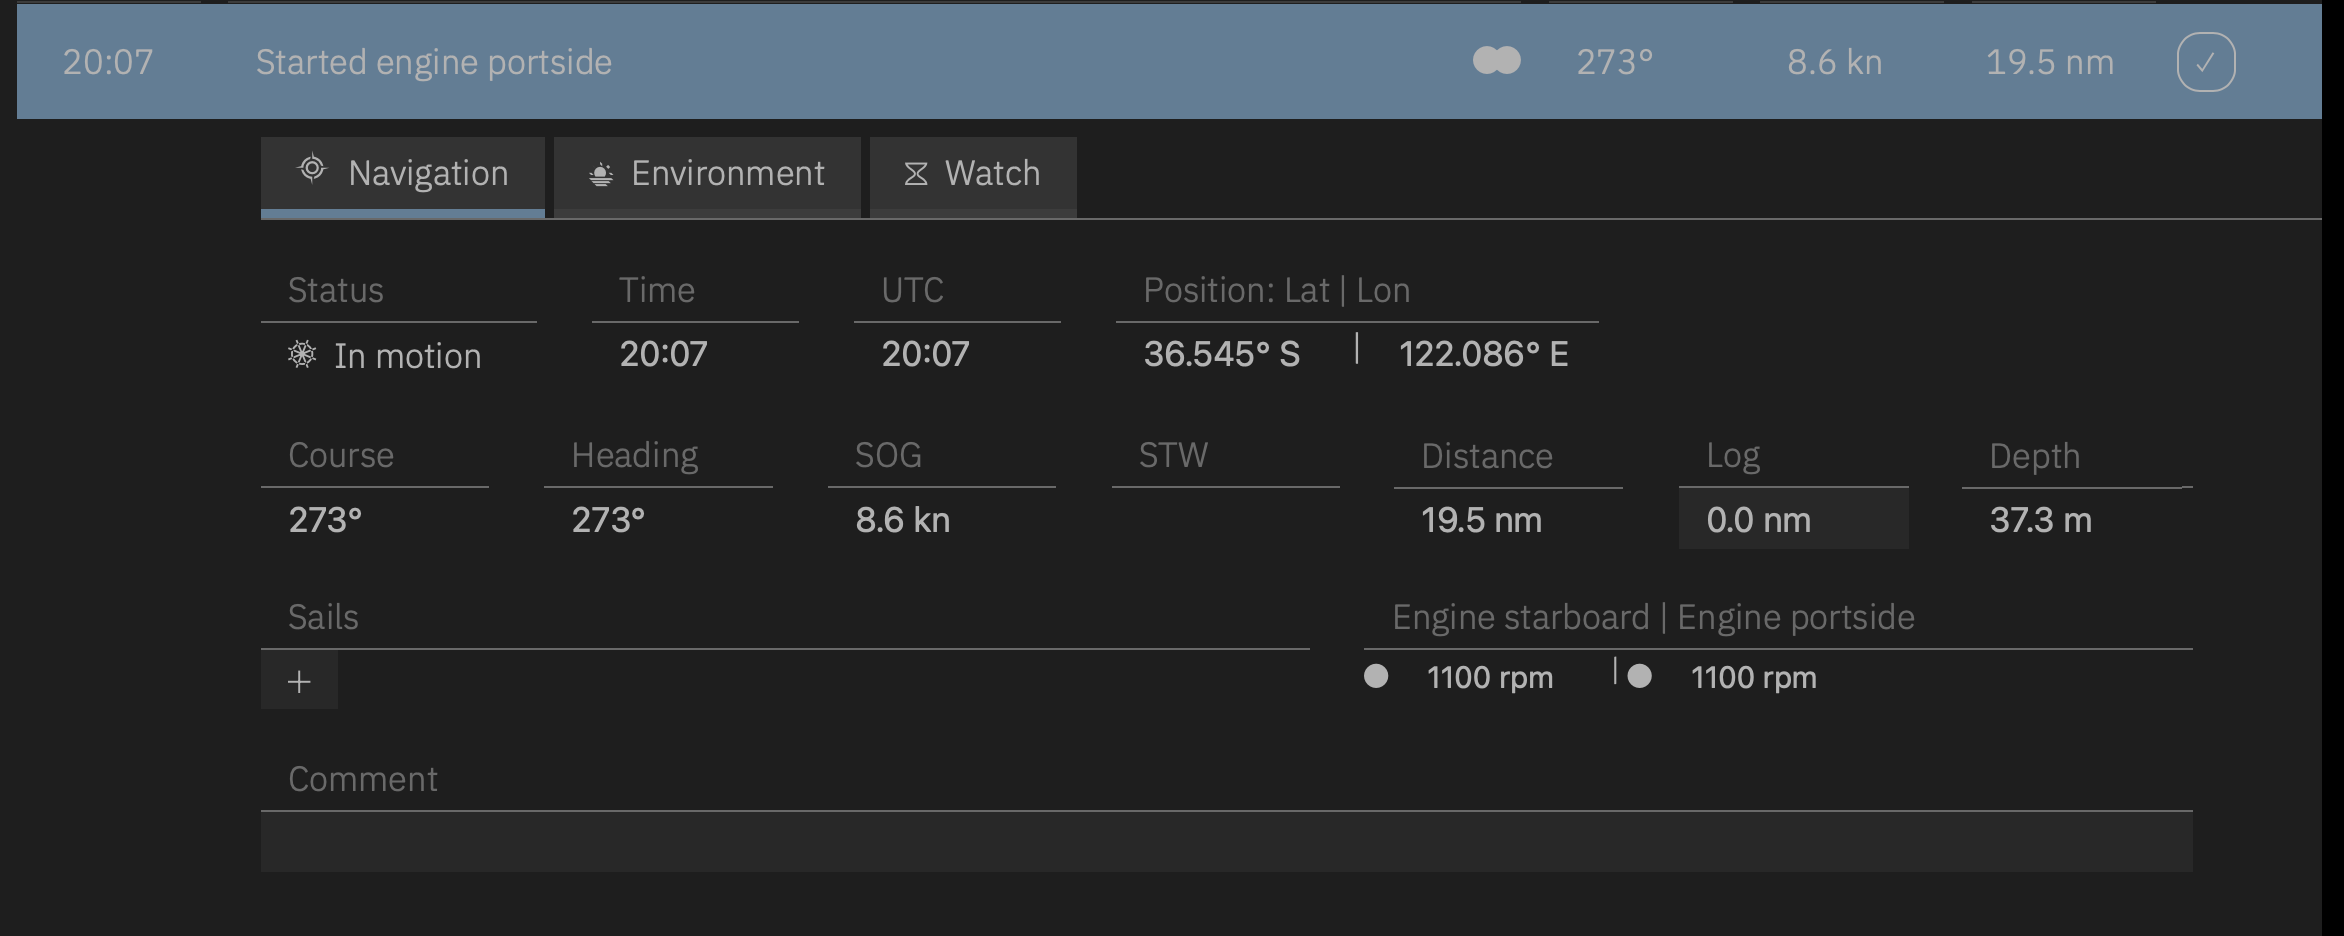
Clicking on a log entry opens the log entry's data sheet. The possible information is divided across three cards: Navigation, Environment, and Watch.
Which fields contain immutable, automatically entered data and which fields allow manual data entry depends on the data present in the NMEA and can be recognized by the field's appearance.
The following conditions apply for manual entries and additions to log entries:
Proceed as follows to make additions to log entries:
Add data that LOGBOOK could not enter automatically. Editable fields are recognizable by their background color.
Close the data sheet after all entries have been made using the close button in the upper right. Closing the data view ends the possibility of editing or supplementing the log entry.
Add Additional Comments via New Manual Log Entry
If a log entry is already locked but you still want to note further details about a special situation (for example, on the Watch card), you should manually create an additional log entry and make your entries in it. In the Comment field of this log entry, you can then refer to the original log entry (for example, by specifying the time).
On the Navigation card, most fields contain non-editable data. Thus, the Status cannot be changed. However, a different ship status can be selected via the status button to the left of the timeline, which automatically creates a new log entry.
All fields with data from GPS (Time, UTC, Position: Lat | Lon, Course, SOG) cannot be changed and can only be filled by LOGBOOK.
Fields with calculated values (STW and Distance) are also unchangeable. Distance indicates the distance traveled over ground during the day and is calculated by LOGBOOK from the captured GPS positions. STW is the speed through water and is calculated by LOGBOOK if there is a log value (distance through water). Otherwise, the field remains empty.
If there is only data from GPS, Heading (the ship's heading, compass course), Log (the total miles displayed by the mechanical log), and Depth are editable. Likewise, the engines can be manually set to Off or On under Engine in this case, and the engine RPMs can be entered.
Depending on which data was recognized when testing the NMEA data (on the Test and Data card of the NMEA Settings dialog), the corresponding fields are locked for editing. So if there is log data, the value for Log cannot be entered manually.
If engine data is present in the NMEA, the switching on and off of engines as well as the RPM are automatically captured by LOGBOOK and cannot be entered or changed by the user.
Information about set sails is generally not present in the NMEA and must therefore always be entered manually in the Sails field. The + button provides all sails set up for the ship for selection; for reefable sails, there is a separate list entry for each reef stage. Of course, multiple sails can be selected.
For newly set sails, an upward arrow is displayed before the sail's name; if the sail was already set when the log entry was created, a dot appears before the name.
Sails are furled again with the button. The sail will continue to be displayed in this entry. A downward-pointing arrow before the name indicates that it was furled. In the following log entry, the sail will no longer appear in the field.
Should the desired sail or the reef stage needed for a sail not be offered in the selection list, the sail must be added to the ship data on the Sailing card. Only sails that are set up in the ship can be entered. When creating a sailing ship, Mainsail and Genoa with 3 reefs as well as Jib with 2 reefs are automatically set up. Learn more about setting up sails in the ship data here: Sails in the Ship Data.
For sailing ships, it is of great interest to the skipper to determine how long and how far the ship traveled under sail and under engine power. Even for motorboats with multiple engines, it can be useful to record operating times and distances traveled separately for each engine.
For this purpose, it is recorded in the log entries on the Navigation card for each engine individually whether it is on or off.
If the NMEA contains the engine RPMs, LOGBOOK always automatically makes a log entry when an engine is switched on or off. The status (on/off) is set and the engine RPM is entered in the corresponding field. No action is required from the user.
However, if the NMEA does not contain engine data, the user must make the log entries manually. That is, with each switching on or off of an engine, a manual log entry is created and the engine status is changed in it. The engine RPM can also be entered if desired.
Engine Off or Data Connection Interrupted?
LOGBOOK detects whether engine data is contained in the NMEA. Depending on how the engine data is captured and transmitted in your ship's NMEA, it may not be apparent when the engine is turned off whether the engine is simply off and LOGBOOK therefore receives no information about the engine status from the NMEA, or whether the data flow may not be functioning properly.
Therefore, it is possible that when the engine is turned off, the button for manual recording of engine status is displayed, even though engine data is actually contained in the NMEA. In this case, check when you next turn on the engine whether the log entry was created automatically.
This creates a manual log entry with time, position, the calculated Distance, and the other data available in the NMEA. Additionally, the engine status (on or off) is changed, which you can also see directly in the title row of the new entry (filled circle for on, circle outline for off).
Afterwards, you can additionally enter the engine RPM on the Navigation card. This entry must be made within the next 60 minutes or before you create the next manual log entry.
Entering RPM with Multiple Engines
If your ship has multiple engines and you press the respective buttons in quick succession when turning on the engines, LOGBOOK creates a separate manual log entry for each turn-on. The first manual log entry can then no longer be edited since another one already exists. Therefore, enter the RPMs for all engines in the last log entry created this way.
Some of the data recorded on the Environment card may be contained in the ship's NMEA. These are Wind: Direction | Speed, Pressure, Air Temnperature, and Relative Humidity. All other data must be entered manually in any case.
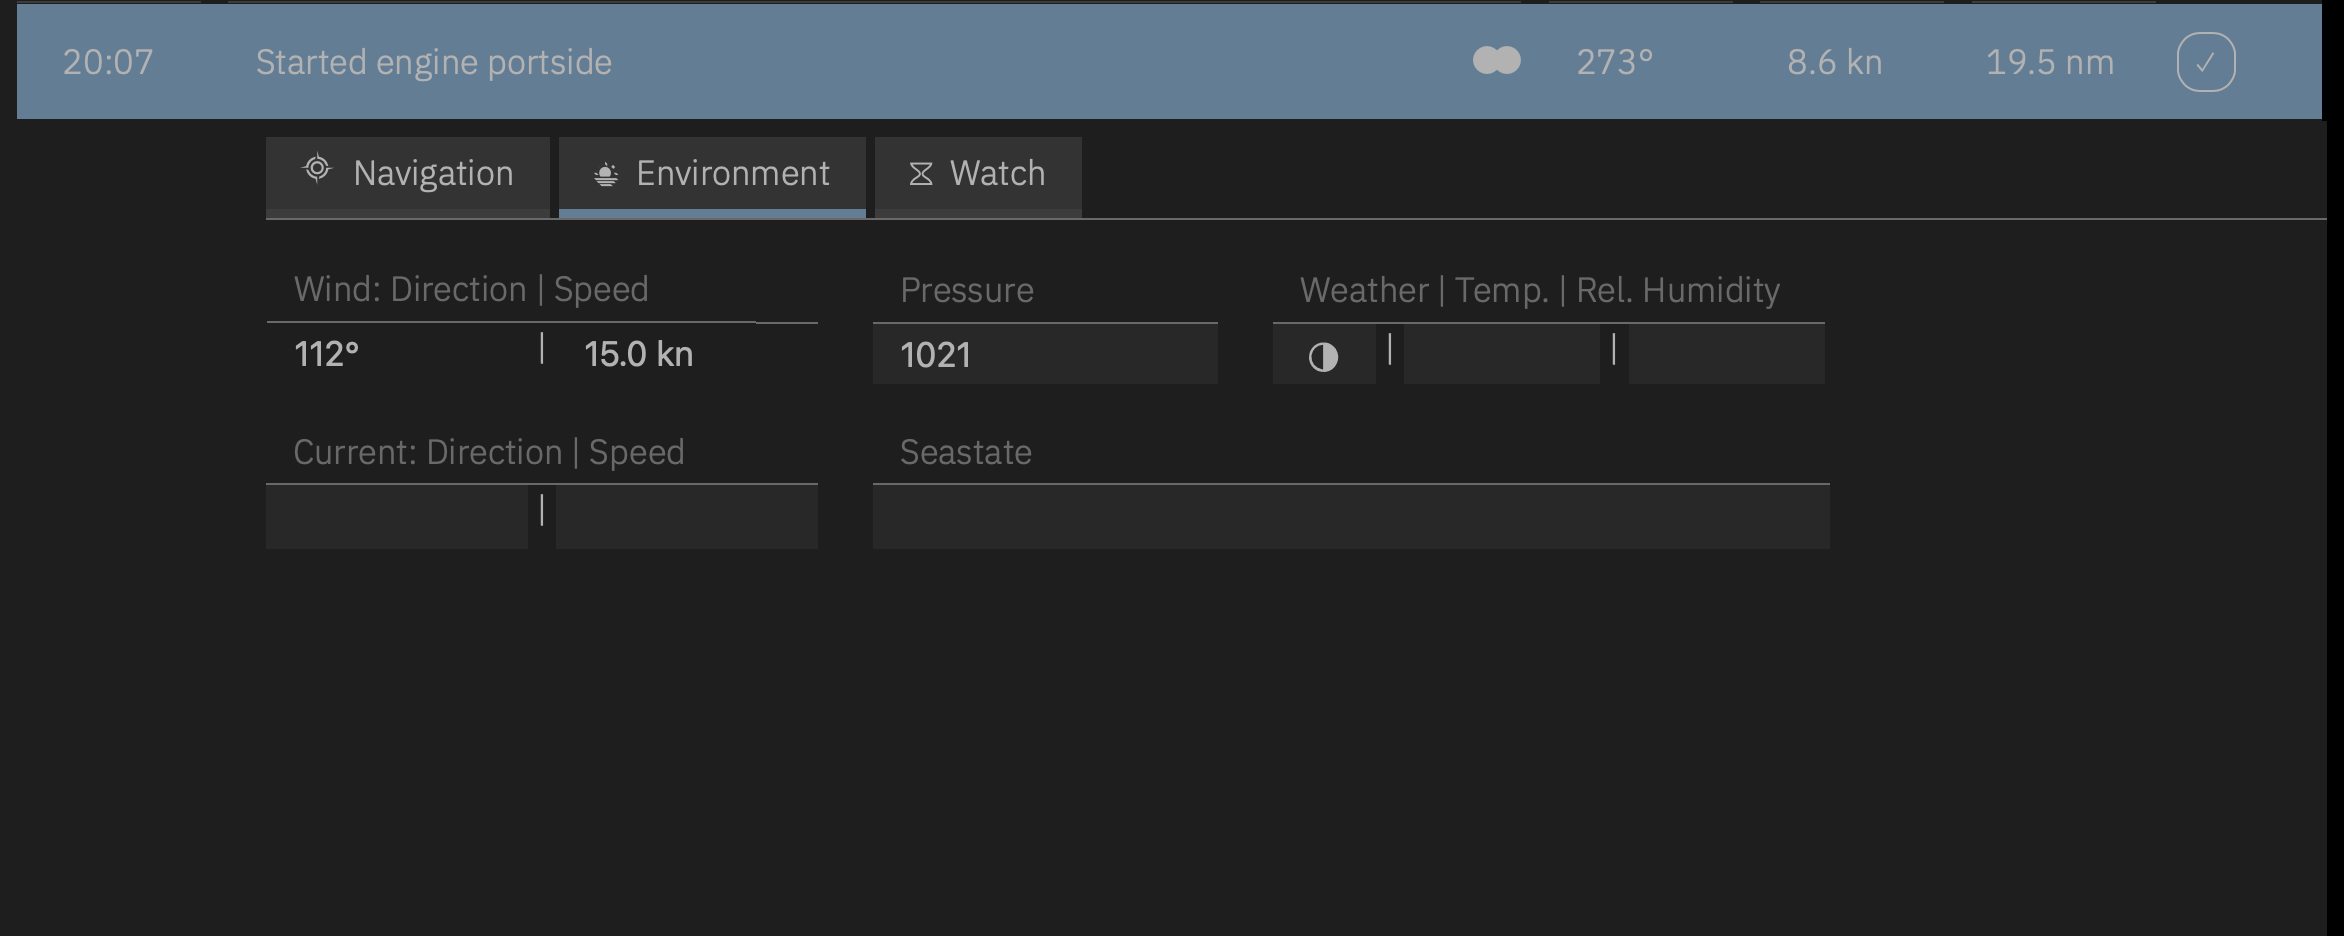
On the Watch card, a detailed comment about a situation at the time of the log entry can be written in the lower field (Watch Comment). In the upper field, the name of the person on watch who wrote the comment should be entered.
To ensure this entry is not overlooked, it may be useful to reference this comment in the Comment field on the Navigation card.
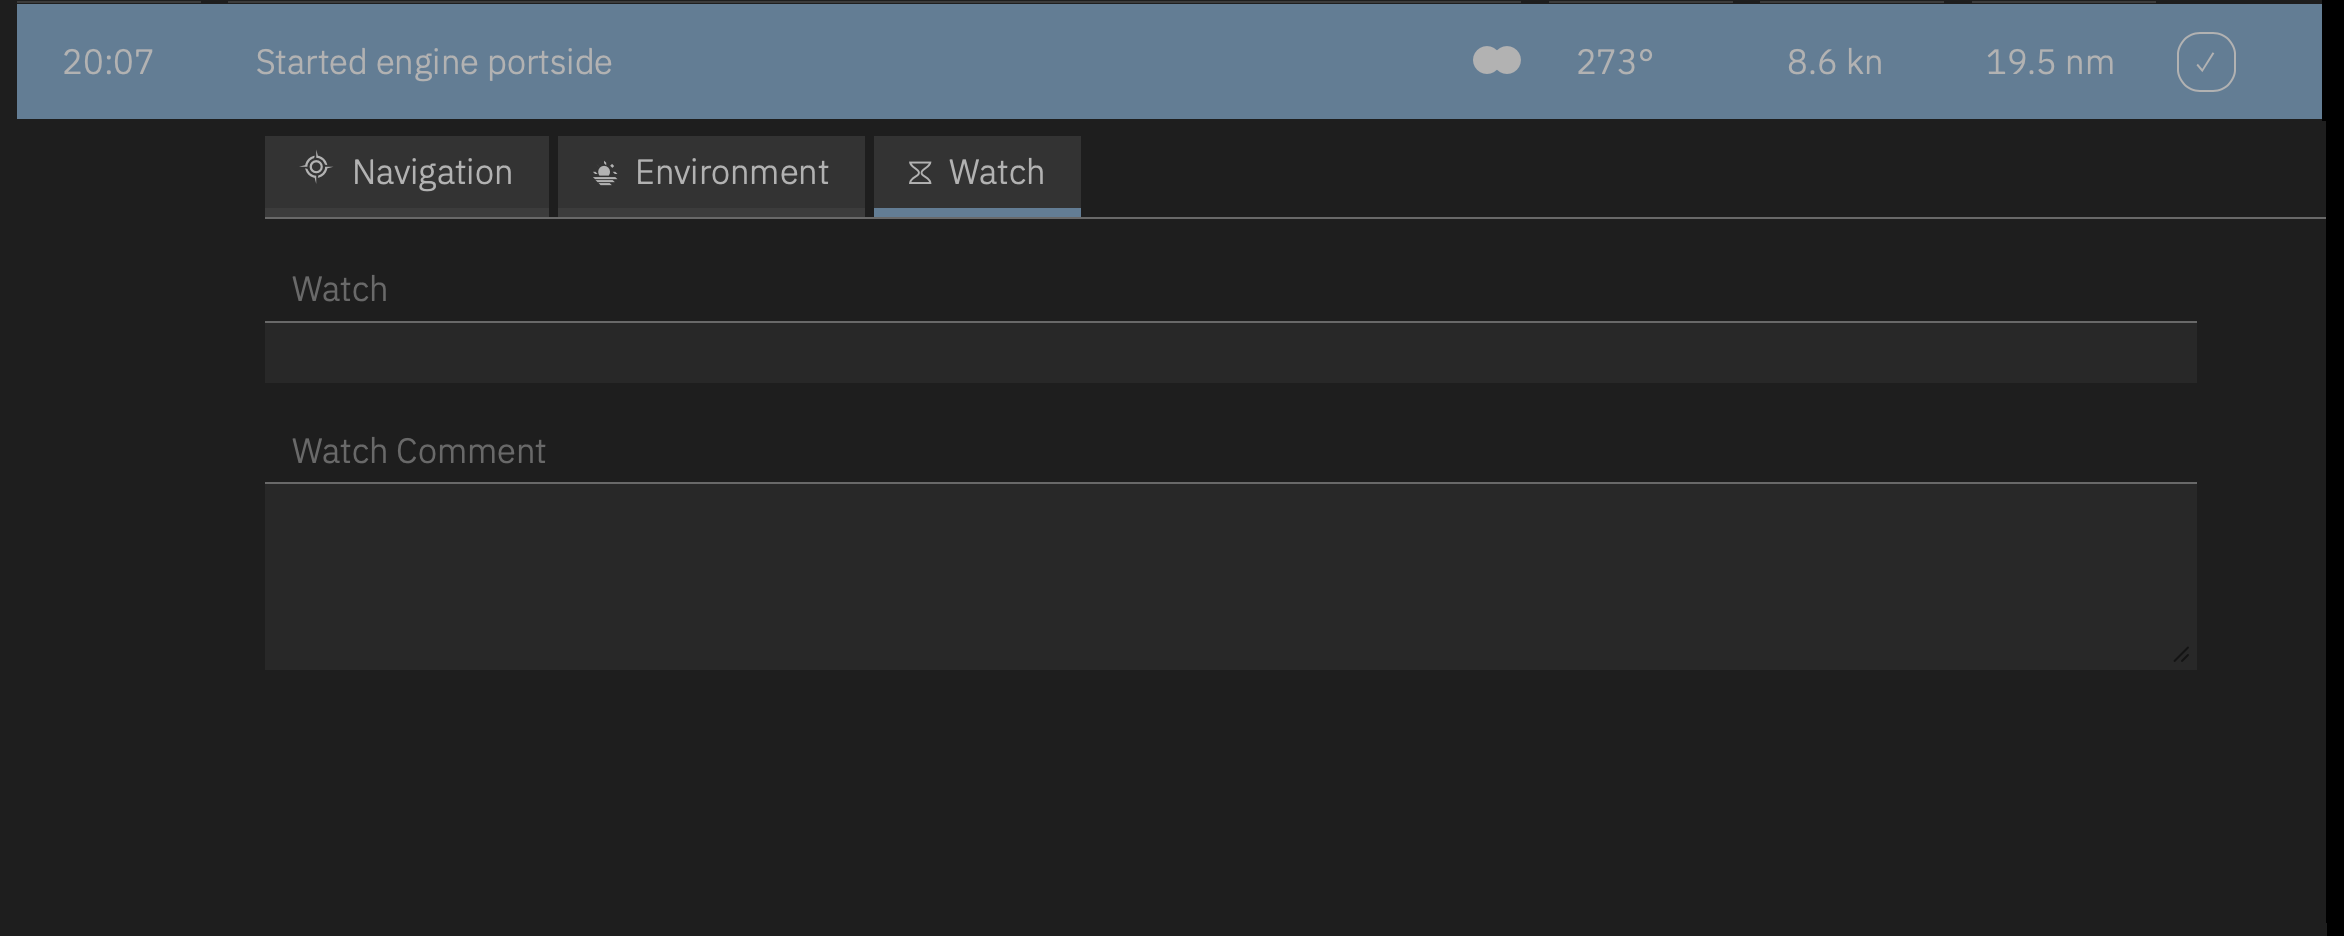
For automatic log entries, LOGBOOK must be connected to the ship's NMEA network, or if that is not possible, at least to a GPS device. The connection can be made via USB or via WiFi or Ethernet (TCP). Only the Primary LOGBOOK can be connected to the NMEA. Other devices you use on board with LOGBOOK, the so-called LOGBOOK companions, are not connected to the NMEA but to the Primary LOGBOOK via an onboard WiFi network. They receive all displayed data from the Primary LOGBOOK and all inputs on LOGBOOK companions are sent to the Primary LOGBOOK.
LOGBOOK can only read NMEA data in NMEA 0183 format. Most gateways that allow PCs and mobile devices to connect to the ship's NMEA 2000 data network convert NMEA 2000 to NMEA 0183 and provide the data in NMEA 0183 format. With some gateways, NMEA 0183 or NMEA 2000 can be selected as the output format. Pure GPS devices usually send data in NMEA 0183 format. On devices with integrated GPS, this can also be used.
Typically, the connection can be established without additional drivers, etc.
The connection between LOGBOOK and the NMEA data source is set up in the NMEA Settings dialog. Under NMEA connection type, USB and TCP are available.
In the case of USB, after selecting this connection type, the desired device or COM port must be selected from the list of available devices or ports.
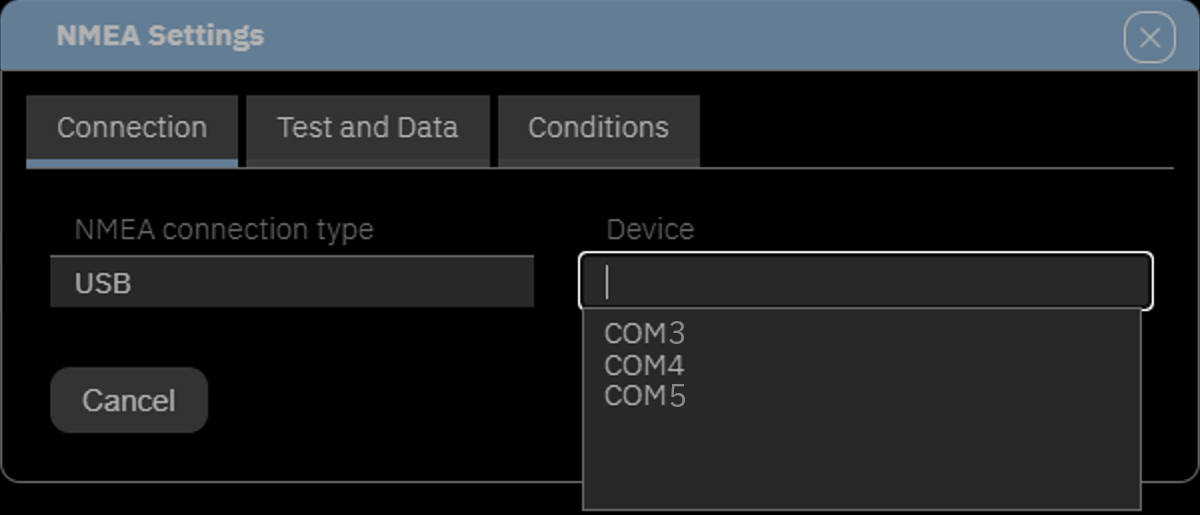
Please note
With USB connections, it is not possible to also activate devices such as a GPS mouse, NMEA gateways, or NMEA multiplexers for LOGBOOK when they are already being used by navigation software, because the navigation software permanently occupies the device port and does not release it for other programs.
For TCP, the device's IP address and port are entered. Corresponding data can be found in the gateway's manual. A common port for NMEA devices and also for GoFree (the NMEA WiFi of plotters from Simrad and B&G) is 10110. However, gateways can also use a different port.
With Test Connection, LOGBOOK checks the connection and shows which of the data used in LOGBOOK is provided by the connected NMEA data source.
As an alternative to receiving NMEA data from a connected NMEA network, LOGBOOK can also evaluate data from the internal GPS and other internal sensors such as the barometer (currently only on iPad).
For this purpose, select the Built-in GPS option under NMEA connection type on the first card in the NMEA Settings dialog. No further settings are required.
On the Internal sensors card, the internal barometer can be activated.
On the Test and Data card, the last two items indicate the connection to the internal sensors.
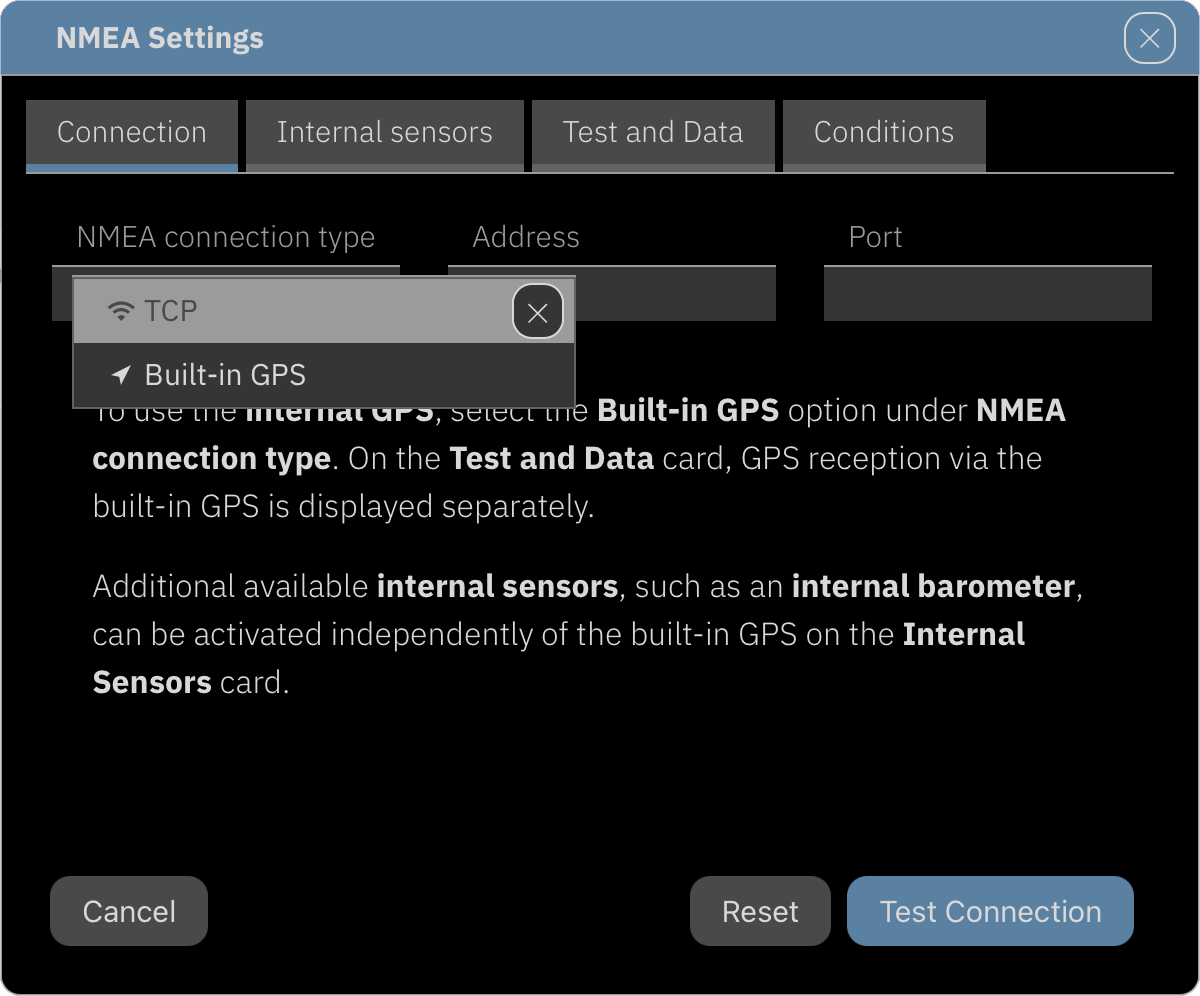
Allow GPS Data Reception on iPad for LOGBOOK
For LOGBOOK to receive GPS data on iPad, the location services for LOGBOOK must be enabled in the iOS Settings app under Privacy, Location Services. For receiving barometer data, motion sensors must be enabled.
Therefore, when you first start the app, you will receive a prompt that you should confirm in any case.
Under certain circumstances, the connection to the NMEA data source may be interrupted during data recording for various reasons. LOGBOOK then attempts to restore the connection as quickly as possible.
When a data failure is detected, LOGBOOK creates a log entry from the last received NMEA data with a corresponding note and reports the type of error.
In case of a short-term data failure, LOGBOOK creates a log entry with the latest data and a note that the data connection is active again as soon as the connection is restored.
In case of a longer data failure, it is recommended to regularly create manual log entries without NMEA data and add information by hand if necessary. For reasons of evidential value, it is not possible to manually fill in fields that should contain GPS data. If you still want to enter GPS positions in the logbook during a data failure, you should enter them in the Comment field on the Navigation card.
Important Note for Owners of Chart Plotters with WiFi
Unfortunately, the plotters from Raymarine, Furuno, and Garmin do not transmit standard NMEA data via the integrated WiFi. The WiFi only sends specially prepared information for the brand's own apps.
Therefore, to access NMEA data with another device or application, an NMEA multiplexer with WiFi function must be present in the ship network despite the plotter's WiFi function.
Only GoFree, the WiFi of plotters from Simrad, Lowrance, and B&G, sends clean data in NMEA 0183 format. Therefore, no additional gateway is required with these plotters. LOGBOOK can obtain the NMEA data directly from the GoFree WiFi.
Simultaneous Use of a USB-Connected NMEA Device with LOGBOOK and Navigation Software
With USB connections on Windows, in most cases it is not possible to also activate devices already being used by a navigation program for LOGBOOK, because the navigation programs permanently occupy the device's port and do not release it for other programs.
Some navigation programs offer a virtual port splitter that allows the port to be used by two programs. If not, appropriate additional software is required. This restriction does not apply to WiFi connections.
For keeping a logbook with LOGBOOK, it is ideal if the ship has a data network that connects all sub-networks (the ship's NMEA network, the onboard computers and tablets, and the internet). See the diagram below.
The Primary LOGBOOK can either be connected to the NMEA network gateway via a WiFi router (dashed lines) or directly, for example via USB (red line).
The NMEA gateway receives data from all components integrated into the NMEA 2000 network (blue lines) and forwards it to the Primary LOGBOOK after converting it to NMEA 0183 format.
The LOGBOOK Companions communicate with the Primary LOGBOOK via the WiFi router. The connection of the individual devices to the WiFi router (blue dashed lines), and therefore among each other, can be established either via WiFi or via an Ethernet cable.
Depending on where the ship is located, the Primary LOGBOOK can connect to the internet in different ways via the WiFi router and synchronize with the LOGBOOK Cloud.

Note: The diagram shows the ideal case and not the prerequisite for using LOGBOOK. The minimum requirement is only that LOGBOOK can continuously receive GPS data during sailing – either from the ship's NMEA, via a GPS mouse, or from the Primary Device's internal GPS.
In this section, we cover various topics that may be relevant during the use of LOGBOOK.
With passages and voyages in LOGBOOK, you can subdivide the journeys recorded with LOGBOOK and create separate evaluations for individual time periods.
In a passage, multiple consecutive days are grouped together. The number of days is arbitrary and you can decide when to start a new passage. A voyage can include one or more consecutive passages.
If a new voyage or a new passage is to be started, the ship must not be underway. If necessary, a stop must be recorded beforehand.
To start a new passage, activate the Focus view.
Then select Passage from the Actions menu. If a passage is still active, the passage will be automatically ended. Then the new passage will be created.
Please note: You can only start one new passage per day.
Always Verify the Timezone Before Starting the Passage
After starting the passage, the timezone is immutable and does not change during the running passage even if the computer's system time changes. To change the timezone within LOGBOOK, a new passage must be started.
LOGBOOK Displays the Wrong Timezone
In rare cases, the operating system of the Primary Device may not transmit the timezone correctly to LOGBOOK. In this case, you have the option to set a different timezone in Ship Settings on the Settings card. This timezone also only applies to passages started after the change. A change has no effect on an already started passage.
If no log entries have been created for more than 5 days, LOGBOOK automatically ends the current passage at the time of the last log entry and prepares a new passage.
You can already enter a name for the new passage that has been prepared, but the passage only actually starts when the notification is closed with Start Passage. There can therefore be periods that don't belong to any passage.
When Should a New Passage Be Created?
It's up to you when to create a new passage. Possible criteria for division include, for example, a crew change, a change of the ship's timezone, a longer interruption of the journey, or a harbor stay (after 5 days, LOGBOOK automatically creates a new passage).
It's also recommended to create a separate passage for a multi-day journey. This way you get a separate evaluation for the passage.
To start a new voyage, activate the Focus view.
Then select Voyage from the Actions menu.
If a voyage and possibly also a passage are still active, they will be automatically ended and then the new voyage will be created and the first passage of the voyage will be prepared.
LOGBOOK then displays the data sheet of the new voyage with the Voyage card. Here you can set a name for the voyage.
At the same time, the first passage of the voyage is already prepared and you can, as when creating a new passage, enter a name on the passage's data sheet and check the timezone for ship's time.
With the Start Passage button in the notification, the new voyage and the new passage are created and the NMEA data recording is started. The voyage and passage begin as soon as the first log entry is created.
If no log entries have been created for more than 30 days, LOGBOOK automatically ends the current voyage and prepares a new voyage. You can already give the new voyage a name and also enter a name for the first passage of this voyage. However, the voyage and passage only actually start when the prepared passage is started with Start Passage. There can therefore be periods that don't belong to any voyage.
When Should a New Voyage Be Created?
We recommend creating a voyage for each longer, self-contained voyage. The automatic ending of voyages by LOGBOOK supports you in this.
The ship status plays an important role in LOGBOOK. It indicates whether the ship is underway, moored in port, at anchor, etc., and thus determines which automatic functions of LOGBOOK are active.
In motion is the normal ship status during transit. When this status is active, LOGBOOK automatically makes log entries according to the specifications set in the NMEA Settings dialog.
 In port,
  At anchor, and
  At buoy describe a status in which the ship is no longer underway and LOGBOOK therefore does not make regular log entries. Data collection can optionally be completely turned off (for example, when the ship is moored in port) or remain active. With data collection still active, LOGBOOK recognizes when the journey continues and then automatically switches back to the status In motion. Additionally, with active data collection, ship monitoring functions such as anchor alarm can be activated.
For short-term intermediate stops at the fuel dock or in the lock, LOGBOOK also offers the status  Fuel station or
  Lock.
Lock.
With each log entry, the ship status is displayed – in addition to the display on the Navigation card – directly to the left of the timeline. In the log row, there is a button at this location that allows you to manually select a new ship status from a selection list. Changing the ship status always creates a new log entry.
As soon as LOGBOOK (with active data recording) recognizes that the ship has gotten underway, the ship status changes to In motion and LOGBOOK starts automatic log entries.
When the ship stops, LOGBOOK recognizes this and displays a stop button in the log row. The time display in the button's label shows how long the ship has already been stopped.
The button opens a dialog in which the reason for the stop and the associated new ship status can be selected. A distinction is made between an intermediate stop and the final end of the journey. Fuel station and Lock are only available for an intermediate stop, while In port, At anchor, and At buoy are available both for intermediate stops and for ending the journey on that day.
Drifting describes a status in which the ship is not moored but is making no or only very little way, such as when heaving to. With this status, automatic log entries remain active.
Under Location, you can also enter a location. This is also displayed in the timeline in the row of the log entry.
Closing the dialog with Save creates a manual log entry with this information. However, the ship status is applied retroactively to the automatic log entry that was created when the ship stopped. This way, the more detailed information about the stop does not have to be entered during the maneuver, but can be entered comfortably afterwards.
To ensure that the logbook created with LOGBOOK is legally sound and can be used as evidence in the event of a marine accident, there are some restrictions on which entries can be changed retrospectively and in which areas entries are possible until what time.
Changes and additions to log entries and day data can only be made in the Focus view.
For log entries, fields whose values are taken from NMEA or whose contents are calculated by LOGBOOK are generally not editable (see also Editability of Fields on the Navigation Card).
Editable data on the Navigation, Environment, and Watch cards can be filled in or changed for a maximum of 60 minutes after the creation of the automatic log entry – but only as long as there is no new automatic log entry. The same applies to manual log entries. Automatic and manual log entries are independent of each other.
Editable data on the day's data sheet can only be changed in the Focus view, i.e., only for the previous, current, and upcoming day.
The Passage and Voyage areas offer only a few fields in which entries can be made. As a rule, these are free text fields such as for a passage report for passages on the Journal card or for voyage planning for voyages on the Voyage plan card.
These fields do not count as evidence-relevant data and can therefore be edited at any time – even after the voyage or passage has ended.
On the day data sheet, all persons on board are recorded for each day. A distinction is made between the responsible skipper, the crew (other persons on board who take on tasks), and passengers (fellow travelers who do not take on any tasks on board). For a legally sound logbook, it is very important that this information is recorded daily.
When starting a new day, LOGBOOK automatically takes over the persons from the previous day. So if nothing changes, you don't have to do anything. If there are changes, persons can be deleted and new ones can be added in the appropriate field.
LOGBOOK manages all persons used in the fields in the person list in the Settings dialog from the Ship menu. More on this at Person List, Skipper, Crew and Passengers.
LOGBOOK takes care of the most important and time-intensive part of your logbook, namely the log entries with positions and other data. Log entries are automatically created regularly every 30 or 60 minutes as well as when departing and stopping. Additional triggers for automatic log entries can be larger course changes or turning engines on and off.
However, a well-kept logbook does not consist only of these log entries. Depending on the event, it may also be necessary for you (or the watch keeper) to create an additional log entry yourself. This makes sense when sails are set or stowed, or to record observations at sea or about the ship's behavior. If engine data is not contained in the ship's NMEA, the associated log entries must also be created manually.
All special incidents should be documented in a logbook. Log entries are best suited for this, as they directly place the notes in a temporal context. Brief remarks can be recorded in LOGBOOK in the Comment field on the Navigation card of the log entry; for longer remarks, the Watch card is suitable. Here, the new watch can also be entered with each watch change, along with information about the watch handover.
Other important information that should be entered daily in a logbook includes the names of the persons on board (best distinguished between crew and simple passengers) as well as the name of the responsible skipper.
If the ship has not been at sea for the entire day, Start location and End location should be entered. It also makes sense to enter a fixed term when Start location or End location are at sea, such as @sea.
At the beginning of each day, the weather forecasts for the coming days and for the current day should be retrieved from the preferred source on the internet and entered in the logbook. LOGBOOK offers a field on the day data sheet on the Weather forecast card for the detailed weather report for the current day and one for information about the general weather situation and a longer-term forecast. Images of weather charts, etc. from the internet can also be included.
Documenting technical problems is also part of good logbook keeping. These can be recorded in words and pictures on the Technical card.
For passages that go past midnight, LOGBOOK automatically switches to the next day at midnight. All daily defaults (skipper, crew, and passengers) are transferred from the previous day, as is usual when starting a new day. If a destination has already been entered for the old day, this becomes the departure location of the new day.
It becomes clearer if a uniform term is used for destination and departure during multi-day passages without interruption while at sea, e.g., "@sea" or similar.
It makes no sense to already enter the final destination as the destination!
LOGBOOK performs a self-contained calculation for each day. This calculation captures everything between the first and last log entry of the day. The totals are displayed on the Statistics card. For this reason, when switching to the next day, the final entry of the old day is automatically duplicated and becomes the first log entry at 0:00 h on the following day.
In LOGBOOK, each day within a passage has the same timezone. Whenever you want to change the ship timezone, you must
The new passage gets the timezone of the Primary Device's system time. The entire process takes no longer than one minute.
Changing the system time of the Primary Device afterwards has no effect on the ship time of a running passage.
For long voyages across multiple timezones, there are various strategies for how the ship timezone is handled.
Many skippers prefer to leave the ship timezone unchanged during multi-day overnight passages. This proves advantageous for watch scheduling. Upon arrival at the destination, there may be a larger difference between ship time and local time, but this is not a fundamental problem. Before continuing the voyage, the system time of the Primary Device is adjusted to local time and a new passage is started. This then has local time set as ship time.
Another option is to also adjust ship time after each crossing of a timezone boundary on the following night. In this case, after the system time of the Primary Device has already been adjusted, a new passage must be started at midnight (0:00 h) of the new day in the new timezone.
In principle, the timezone can also be changed at any time during an ongoing day. The disadvantage, however, is that the evaluation of that day is split across two passages, so you do not get one overall evaluation for the day. This approach is quite complex and prone to errors.
Set the system time of the Primary Device to the new timezone.
In LOGBOOK, select + Passage from the menu Actions.
After a safety confirmation, the current passage is ended. This also ends the automatic log entries, but data recording remains active.
After the passage is ended, the view for creating a new passage appears immediately. Here you can check again whether the desired timezone is actually set.
Start the new passage with Start Passage.
As the ship is still underway and data recording is active, LOGBOOK immediately reactivates automatic log entries and creates a start entry End of pause and, if applicable, start entries for engines that are switched on.
LOGBOOK Displays the Wrong Timezone
In rare cases, the operating system of the Primary Device may not transmit the timezone correctly to LOGBOOK. In this case, you have the option to set a different timezone in Ship Settings on the Settings card. This timezone also only applies to passages started after the change. A change has no effect on an already started passage.
Logbooks created with Logbook from Logbook Suite can easily be imported into LOGBOOK by Trimutic, allowing you to continue your logbook seamlessly in LOGBOOK. You can do the import right when you start using LOGBOOK, or at any time later.
Logbook Suite provides an Export Tool for this purpose, which is available in the Logbook Suite Manager from version 2.6.0 onwards.
In LOGBOOK, the logbooks of one ship are imported in a single import process. The Logbook Suite Export Tool combines the individual logbook files for this purpose. First, gather all Logbook files for your ship.
The Logbook files must be at least version 6.5. It is best to update all logbooks to Logbook version 6.9.8. This version includes a few minor optimizations for a better organization of your entries in LOGBOOK.
Updating is straightforward: load a new, empty Logbook file and import the old one using Import All (Update) from the Import menu in the Communication button. When loading the next new, empty file, the one just created is automatically saved as a backup. You can then import the newly created files into the Export Tool one by one.
Once you have completed all preparations, select Export for LOGBOOK from the menu of the More button in the Logbook Suite Manager.
The first time you select this function, the Export Tool is downloaded from the internet into your Logbook Suite data folder and then launched. If the Export Tool is already installed, it will launch without downloading again.
Select the Start button. The tool will guide you through all the necessary steps.
After the export is complete, you will find two files with export data in the Logbook Suite data folder: The file [Ship Name]_LOGBOOK_export.logbook contains all data from your logbooks, and the file [Ship Name]_LOGBOOK_image_export.logbook contains all image data.
Importing image data is not yet supported in the current version of LOGBOOK. Keep both export files – once this feature becomes available, you can repeat the import and bring your images across as well.
When using the Export Tool on iPad, it is important that all Logbook files you want to export to LOGBOOK are located in the Documents folder of the Logbook Suite app. You may need to copy them there first using the Files app.
Export and import always apply to a single ship. If you want to transfer logbooks for multiple ships to LOGBOOK, repeat the steps above for each ship.
Make sure the LOGBOOK of the ship you want to import into is not open.
To import data from Logbook Suite, log in to your account in the LOGBOOK Cloud. Your ships are listed on the left in Account Settings.
Select the Options button for the relevant ship.
In the next dialog, you will be prompted to select your export file from Logbook Suite. Choose the file [Ship Name]_LOGBOOK_export.logbook containing your logbook data.
The file is uploaded to the LOGBOOK Cloud and the data is imported. Depending on the size, this process may take a few minutes.
Once the process is complete, the View Ship button gets active and will display the ship in the LOGBOOK Cloud.
If you had not previously entered any ship data, some ship data may have been imported as well.
In this case, review the ship data. Since LOGBOOK manages significantly more detailed ship information than Logbook Suite, some manual adjustments may be necessary, particularly for dimensions. In Logbook, units were entered manually as text after the value, whereas LOGBOOK works with separate values and units. As a result, an incorrect unit may have been assigned to a value during import.
Ship data you had already entered before the import will not be changed.
Since passages in Logbook Suite only have numbers, all imported passages will be given the name "Unnamed Passage". You can now assign names to your passages if desired.
Undoing the Import from Logbook Suite
In Options, you have the option to completely undo the import from Logbook Suite.
If LOGBOOK is to be used on your ship with multiple devices simultaneously, there is one Primary LOGBOOK and several LOGBOOK companions.
The Primary LOGBOOK creates the automatic log entries. For this, it must be connected to the ship's NMEA network or, if no NMEA connection is possible, to a GPS device.
The other devices, the LOGBOOK companions, are connected to the Primary LOGBOOK via an onboard TCP network (WiFi or Ethernet) and display the data from the Primary LOGBOOK. Additions to log entries and manual log entries can also be made from the LOGBOOK companion.
The connection between the Primary LOGBOOK and the LOGBOOK companions is made via a TCP network, to which the devices can be connected via WiFi and/or Ethernet depending on the type of network hardware.
It is optimal if an onboard WiFi network is installed on the ship – just as is common in houses and apartments. All LOGBOOK companions can then access the Primary LOGBOOK via this network and, if desired, can also be connected to the internet at the same time.
The central point of the onboard WiFi network is the router. All devices are connected to the router (via WiFi or via Ethernet) and can then communicate with each other. Special routers for boats and RVs are available on the market that are powered by a 12V connection or battery. This makes it possible to install a WiFi network even on smaller ships without an inverter. Depending on the model, the router can establish an internet connection in the harbor via the harbor's WiFi, or it has a 5G/LTE modem so that a connection to the mobile network can be established and made available to all devices. On many ships, internet via Starlink is now installed and fed into the onboard WiFi network via the router.
On most ships, NMEA 2000 networks are not prepared for connection to computers and mobile devices. For LOGBOOK to receive the data, a gateway (or multiplexer) must be integrated into the network. Usually, a free slot in the NMEA 2000 network is sufficient for connecting the gateway.
Gateways with NMEA 2000 Micro Male or SeaTalkNG Connection
Raymarine uses its own connectors that deviate from the NMEA 2000 standard (SeaTalkNG). Many gateways or multiplexers are also available with Raymarine connections. If not, adapter cables are also available.
In our shop, we offer various proven gateways with USB or WiFi connection and connectors for standard NMEA 2000 or for Raymarine SeaTalkNG.
If the NMEA network transmits the NMEA data to the Primary Device with the Primary LOGBOOK via a WiFi gateway and LOGBOOK companions are to be connected to the Primary LOGBOOK via the onboard WiFi network at the same time, the gateway must operate in client mode. In client mode, the gateway does not provide its own WiFi network but connects to the WiFi network just like the other devices.
Unfortunately, the plotters of many manufacturers (such as Raymarine, Furuno, and Garmin) do not transmit standard NMEA data via the integrated WiFi. The WiFi only sends data specially prepared for the brand's own apps. Therefore, to access NMEA data with LOGBOOK, an NMEA multiplexer must be present in the ship network despite the plotter's WiFi function.
Exceptions here are the chart plotters from B&G, Simrad, and Lowrance, which send pure NMEA data via the integrated WiFi network GoFree.
If an internet connection is also desired in parallel with receiving NMEA data, it can be advantageous to connect the NMEA to LOGBOOK via USB. Otherwise, an onboard WiFi network must also be set up here and the gateway must be operated in client mode.
GoFree cannot send NMEA data in client mode, which is why GoFree cannot be integrated into a WiFi network.
Using USB-Connected NMEA Data Sources on Windows
With USB connections on Windows, in most cases it is not possible to also activate devices for LOGBOOK that are already being used by another program such as a navigation program, because the navigation programs permanently occupy the device's port and do not release it for other programs.
Some navigation programs offer a virtual port splitter that allows the port to be used by two programs. If not, appropriate additional software is required.
Allow GPS Data Reception on iPad for LOGBOOK
For LOGBOOK to receive GPS data via the internal GPS on the iPad, location services for LOGBOOK must be enabled in the iOS Settings app under Privacy, Location Services.
LOGBOOK is network-capable and can be operated from multiple devices. The additional device, the LOGBOOK companion, connects directly to the Primary LOGBOOK.
Proceed as follows:
Make sure that the Primary LOGBOOK is open and that the Primary Device and the additional device are connected to your ship's TCP network.
Install the LOGBOOK app on the additional device.
Open the LOGBOOK app and log in to your account. (An internet connection is required for this.)
Connect your additional device to your ship's TCP network (via WiFi or Ethernet).
Now press the Search LOGBOOK button to connect the app to the Primary LOGBOOK. This starts an automatic search on the network for a device running a Primary LOGBOOK.
Once a device with a Primary LOGBOOK has been found, you can log in with your username via the login field below the button and connect your device to the Primary LOGBOOK.
Subsequently, all entries etc. can also be made from this device.
Ensure All Devices Are Ready Before Departure
If your ship does not have permanent internet access, you should check before departure whether all devices have the desired access to LOGBOOK and whether a login to the account is still required.
From the LOGBOOK companion, you can access all functions of LOGBOOK even if this device is not connected to the NMEA. For example, you can also activate and deactivate the NMEA connection of the Primary LOGBOOK from the LOGBOOK companion.
In this way, it is also possible for the Primary LOGBOOK to run on a computer that has no screen of its own and is only controlled via the LOGBOOK companions.
In the LOGBOOK cloud, you can access your logbooks from any internet-connected device without the LOGBOOK app.
You can find the LOGBOOK cloud at https://logbook.yachts/app. All functions related to your account are also available here.
If your LOGBOOK regularly synchronizes with the LOGBOOK cloud, you can access LOGBOOK not only from within the vessel. Via the internet, you have access to the version of the logbook stored in the LOGBOOK cloud from anywhere.
Here's how to log in to your ship in the LOGBOOK cloud via the internet:
The user interface of LOGBOOK in the web view is structured the same way as in the LOGBOOK app. However, since certain areas can only be viewed and not edited, a number of menus are omitted.
The LOGBOOK cloud does not offer different color schemes. It always uses the dark color scheme. However, the header in the LOGBOOK cloud is blue and not black, so it can be easily distinguished from the app.
In the LOGBOOK cloud, the title bar shows only the refresh button as well as the Ship, Account, and Help menus. All other buttons and menus known from the app concern functions that are only available in the app and are therefore not displayed in the LOGBOOK cloud.
A close button is displayed on the right in the Ship area.
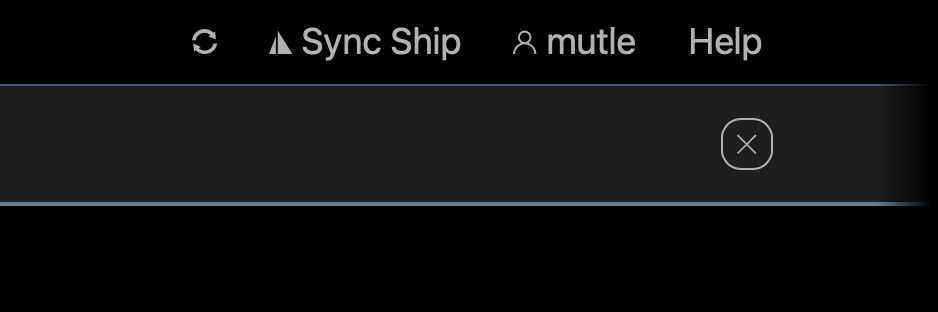
The Ship menu differs between the app and the cloud view of LOGBOOK. Via the Ship menu in the cloud view, there is access to all ships available to the logged-in user. If no ship is selected, the menu entry reads Select Ship, otherwise the name of the currently selected ship is the menu item title.
Since there is no NMEA connection and the logbooks are only viewed and no log data is recorded, you can switch directly between ships via the menu.
When a ship is selected, the ship data can be displayed using the additional menu item [ship name] Ship data shown in the menu.
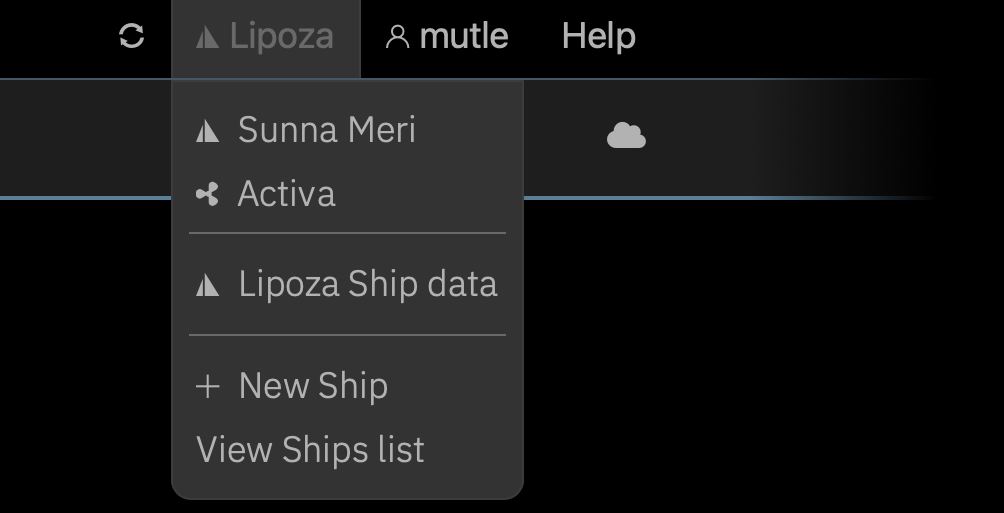
The Account menu offers the two options known from the app Account Settings and User Settings, as well as the option to log out of the LOGBOOK cloud again with Logout.
The Account Settings in the LOGBOOK cloud differ somewhat from those in the app. The Your Ships tab lists all ships available to the logged-in user in the left area.
With the View button, the ship is opened in the LOGBOOK cloud and both the timeline and the ship data can be displayed in the browser and, if applicable, also edited. The color of the View button indicates whether the ship's logbook is currently also open on a Primary Device. In this case, it appears in the same color as the Add new Ship button.
The Options button opens a dialog with information about the ship's logbook. Here it is displayed when the last synchronization between the Primary LOGBOOK and the LOGBOOK cloud took place.
For a logbook that is still open on a ship on a device, the Options dialog provides the option Disconnect Ship to disconnect the connection between the Primary LOGBOOK and the LOGBOOK cloud.
Warning
The Disconnect Ship function is intended as an emergency solution when the Primary LOGBOOK was not properly closed after ending logbook keeping.
In this case, it may be necessary to disconnect the Primary LOGBOOK from the LOGBOOK cloud from the cloud. Examples of this are problems when logging in a Primary Device again or when there is no longer access to the Primary Device because it is defective or lost.
When the connection between the Primary LOGBOOK and the LOGBOOK cloud is disconnected via the Disconnect Ship function, there is a risk of data loss. All data not yet synchronized from the Primary LOGBOOK to the LOGBOOK cloud will be lost!
With the functions in the right half of the Your Ships tab, you can also create a new ship directly in the LOGBOOK cloud or import a new ship from Logbook Suite. The LOGBOOK cloud thus offers the option to prepare your logbook in advance without needing the LOGBOOK app or the device with which you later want to connect to the NMEA data source on the ship.
When a ship is opened in the LOGBOOK cloud, the web browser displays all data recorded by the Primary LOGBOOK and synchronized to the cloud. All views (timeline, data sheets, ship data) are identical to the views in the LOGBOOK app. In the cloud, LOGBOOK cannot retrieve NMEA data and thus cannot record log data or create entries. Therefore, there is no focus view in the cloud.
When a ship's logbook is open on a Primary Device (recognizable by the color of the View button), no input is possible in the LOGBOOK cloud.
If the logbook is no longer in use and has been closed on the Primary Device, some data that is not relevant to the evidentiary value of the logbook can also be entered and changed in the LOGBOOK cloud. These are the ship data as well as data in the data views of passages and voyages. Log entries and data for days cannot be edited in the LOGBOOK cloud. Likewise, no new voyages or passages can be started and ongoing passages and voyages cannot be ended.